WooCommerce Troubleshooting

WooCommerce Troubleshooting

WP Fusion』s integration with WooCommerce is quite complex, and while it』s generally very reliable occasionally things can go wrong, especially with more complex configurations— for example combinations of subscriptions, deposits, variations, attributes, and auto-login sessions.
This guide will walk you through some troubleshooting steps to help solve the most common WooCommerce issues.
#Use a test user
When testing WooCommerce checkouts, it』s best to use a test customer in either an incognito browser window, or logged in to your site as a non-admin user.
If a user is logged in, WP Fusion will sync the checkout data and apply any tags to the contact record of the user who made the purchase— regardless of the email entered on the checkout form. This is to help prevent creating duplicate contact records and fragmented data in your CRM.
Some people test their checkout while logged in as an administrator and then don』t see a new contact record created or any tags applied for the customer. This is because the tags are being applied to their own contact record in the CRM.
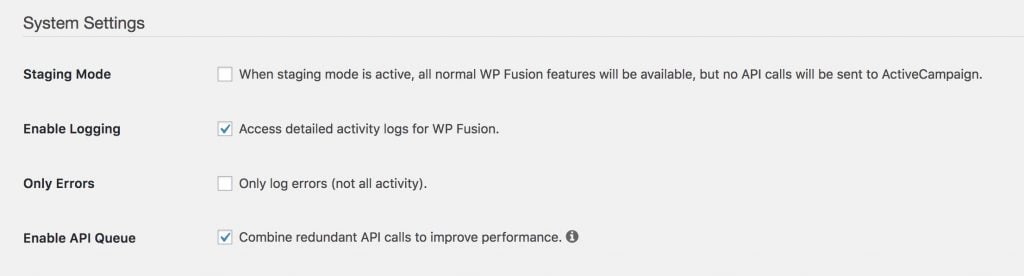
#Turn on logging
If you haven』t already, enable WP Fusion』s activity logs from the Advanced settings menu:

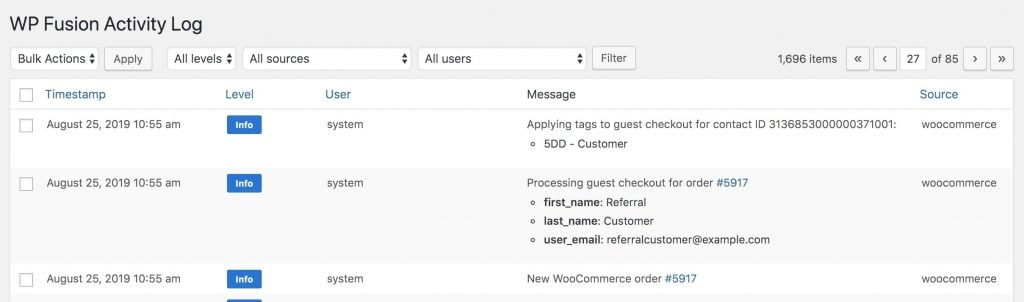
The logs will show any API calls that are being made by WP Fusion, including any field updates, tags being removed or applied, and automated course and membership enrollments.
Here』s a typical WooCommerce order recorded in the WP Fusion logs:

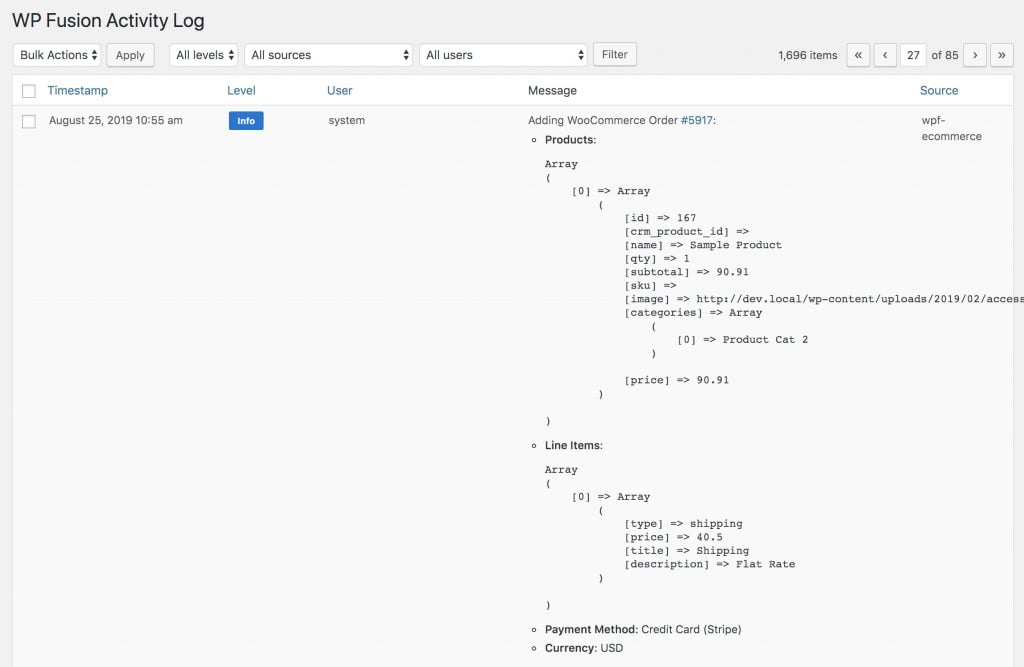
If you』re using the Enhanced Ecommerce addon you』ll also see additional data related to the ecommerce data:

If there are any errors these will also be marked in the logs in orange:

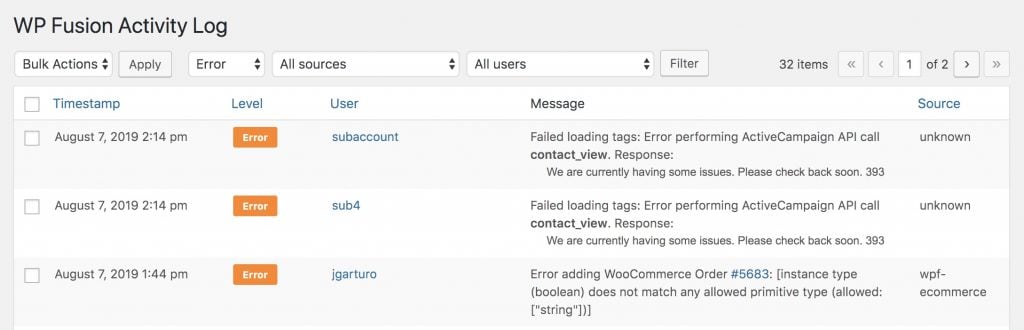
If you can include the error details with your support ticket it will help us to diagnose the issue more quickly.
#Check order notes
Even if you don』t have logging turned on, WP Fusion will still record some information to the order notes for each WooCommerce order.
These can be viewed in the sidebar when editing any single order:

Any API errors will also be added to the order as notes.
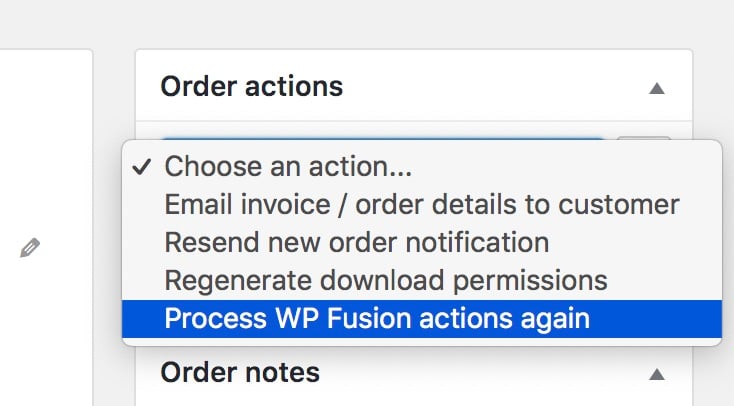
#Process order actions again
If for some reason an order didn』t get sent to your CRM, or you』d like to process an order again with logging turned on, you can manually process an order again by choosing Process WP Fusion actions again from the Order Actions menu:

#Disable asynchronous checkout
WP Fusion includes an option for WooCommerce called Asynchronous Checkout, which is enabled by default. When this setting is enabled WP Fusion processes all API calls in the background, which speeds up the checkout process.

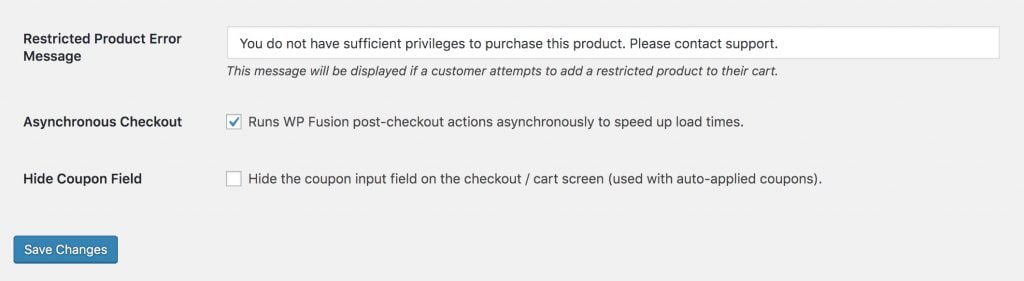
While this works fine on 95% of sites, it can sometimes be blocked by security plugins or firewall rules. If your customers are checking out but no data is being sent to your CRM then turning off this setting is a good diagnostic step.
If turning off Asynchronous Checkout fixes the checkout process then it』s quite likely the background process is being blocked.

If you』re using WordFence: Putting the WordFence firewall into 「learning mode」 temporarily has been known to fix the issue
You can also contact support for additional assistance

#Default settings
When you first install WP Fusion the settings are initialized with some default options. These defaults are sufficient for the majority of sites and don』t need to be changed.
Some things we』ve seen changed that have caused problems are:
#Create Contacts

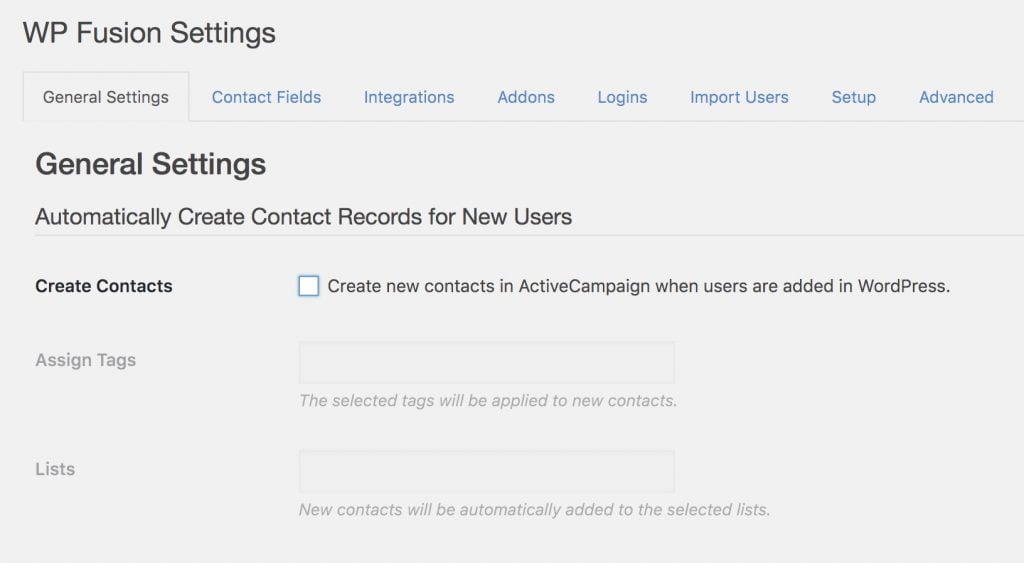
If you un-check the setting for Create Contacts then WP Fusion will not create contact records in your CRM when someone makes a purchase in WooCommerce. It will only apply tags to existing contacts. It is recommended to leave this setting on.
#Limit user roles

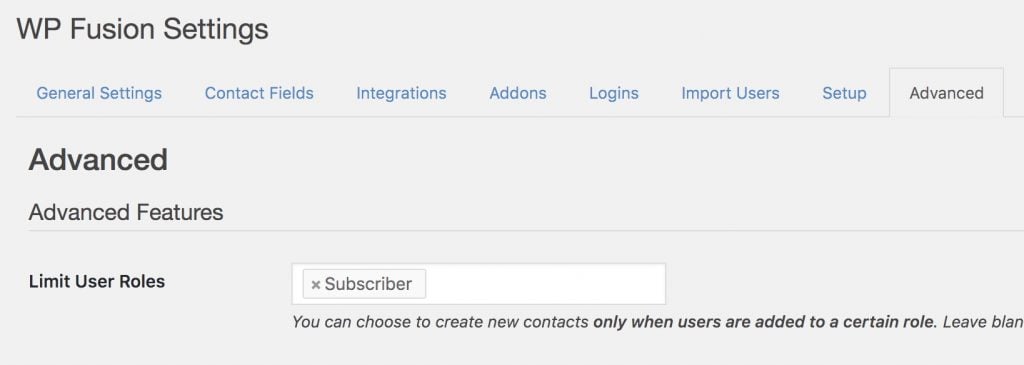
WP Fusion includes a setting to limit contact record creation to certain user roles. In the screenshot above the 「Subscriber」 role has been specified. This will not work with WooCommerce, since WooCommerce creates users with the role Customer.
It is recommended to leave this setting blank so contact records are created for all new users.

#Was this helpful?

Let us know if you liked the post. That』s the only way we can improve.

Yes

No

WP Affiliate Manager

WP Affiliate Manager

#Overview
WP Fusion integrates with WP Affiliate Manager to add affiliates to your CRM when they register on your site.

You can also tag affiliates when they apply for an account, and when their affiliate account is accepted.

#Was this helpful?

Let us know if you liked the post. That』s the only way we can improve.

Yes

No

FacetWP

FacetWP

#Overview
WP Fusion integrates with FacetWP to allow you to filter the results returned in templates using WP Fusion』s access rules. This lets you create personalized FacetWP results templates based on a user』s CRM tags.

To enable, head to the FacetWP settings and click on the WP Fusion tab, then switch on the toggle for Exclude restricted items.

#Was this helpful?

Let us know if you liked the post. That』s the only way we can improve.

Yes

No

Advanced Ads

Advanced Ads

#Overview
WP Fusion integrates with Advanced Ads to allow you to control the display of ads on your site based on a logged-in user』s tags.
#Setup
When editing any ad, scroll down to the Visitor Conditions meta box. To add a new WP Fusion condition, select WP Fusion from the Choose a Condition dropdown.

There are two options:

User is logged in and has at least one of the tags: The content will only be shown to logged in users who have at least one of the tags specified in the tags select box.
User is logged in and has none of the tags: The content will only be shown to logged in users who do not have any of the tags specified in the tags select box.

#Was this helpful?

Let us know if you liked the post. That』s the only way we can improve.

Yes

No

WP Job Manager

WP Job Manager

#Overview
WP Fusion integrates with WP Job Manager to add contacts to your CRM when they register to post a job.
You can also optionally apply a tags to users when they post a job. These tags will also be applied when a user registers via the WP Job Manager registration form.

To configure these tags, in the admin, go to Job Listings » Settings, and select the 「Job Submission」 tab. You』ll see a new field where you can specify what tags should be applied.
#Job Alerts
If you』re using the Job Alerts addon you can also tag people when they sign up for a job alert of a certain type.

To to that, navigate to Job Listings » Job Types and click Edit on any job type. You』ll see a setting like in the screenshot above where you can specify the tags to be applied when an alert is created.

#Was this helpful?

Let us know if you liked the post. That』s the only way we can improve.

Yes

No

If Menu

If Menu

#Overview
WP Fusion integrates with If Menu to allow you to use tags or lists from your connected CRM as conditions for menu item visibility.
If Menu WP Fusion settings
When editing any menu item with If Menu, you can select from three WP Fusion conditions:

Required Tags (any): The menu item only be shown if the user is logged in and has at least one of the specified tags
Required Tags (all): The menu item will only be shown if the user is logged in and has all of the specified tags
Required Tags (not):The menu item will be shown if the user is logged in and has none of the specified tags, or if the user is not logged in.


#Was this helpful?

Let us know if you liked the post. That』s the only way we can improve.

Yes

No

Advanced Custom Fields

Advanced Custom Fields

#Overview
WP Fusion can detect user fields created with Advanced Custom Fields Pro and sync field data to your CRM of choice when a user profile is updated.
The sync of data is bi-directional, so WP Fusion can also load data from your CRM into fields created with Advanced Custom Fields.
#Setup in Advanced Custom Fields
To create user fields in Advanced Custom Fields, navigate to Custom Fields » Field Groups » Add New. Add your fields, and make sure that the location rules are set to display the fields on User Form.
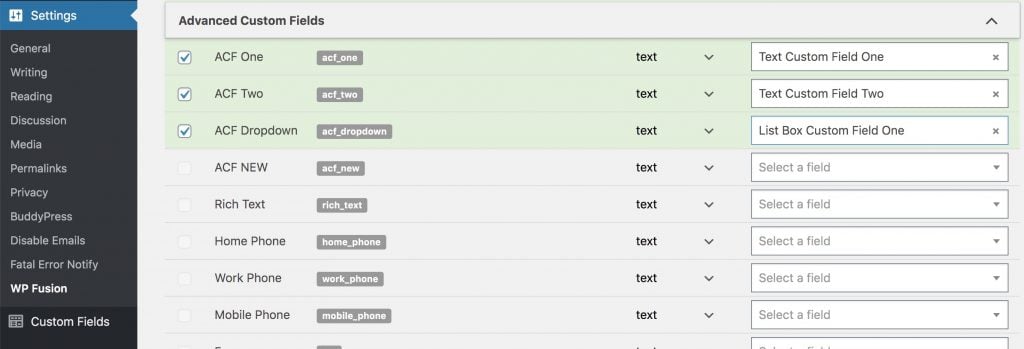
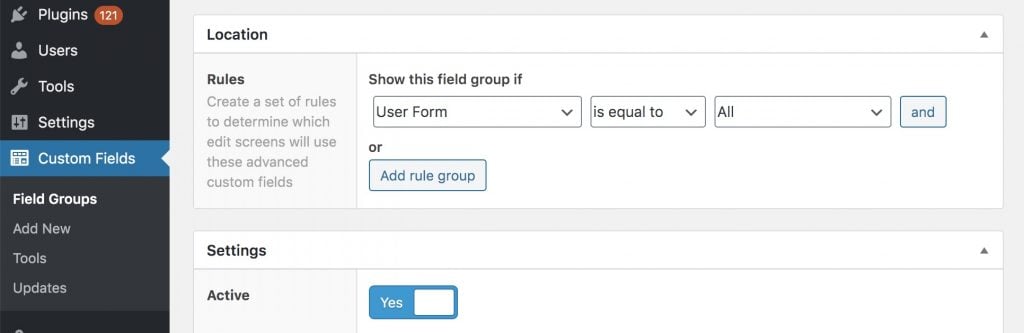
Your ACF custom fields must be set to display on the User Form to be synced with WP Fusion.
After saving your field group, you should now see your fields when editing any WordPress user in the admin.

#Setup in WP Fusion
Head to Settings » WP Fusion » Contact Fields, and scroll down to the Advanced Custom Fields header:

For each ACF user field, you』ll see the field name and field key in your database. In the right column you can select a corresponding field in your CRM from the dropdown.
When the user』s profile is updated, WP Fusion will sync the field value from WordPress to the selected custom field in your CRM.
For more information on syncing contact fields, see this page.

#Was this helpful?

Let us know if you liked the post. That』s the only way we can improve.

Yes

No

WP Remote Users Sync

WP Remote Users Sync

#Overview
WP Remote Users Sync is a free plugin that allows you to synchronize WordPress users, user passwords, and login sessions securely between sites.
It is currently our recommended solution for synchronizing WordPress user accounts.
Using WP Fusion with WP Remote Users sync, your users』 CRM contact IDs and tags are synced directly between any configured sites. In many cases this can reduce the number of webhooks you need to configure in your CRM.
#Setup
WP Fusion automatically configures itself for WP Remote Users sync, and there』s no extra setup required to have users』 contact IDs and CRM tags synced automatically between your connected sites.

In the screenshot above, 「Site B」 at https://test.verygoodplugins.com is configured to connect to 「Site A」 at https://dev.local.
It』s configured to both accept and send actions for Login, Logout, Create, and Update.
#Behavior
When a new user registers on Site A, or their profile is updated, WP Remote Users Sync will sync their profile data directly to Site B.
When that happens, the WP Fusion logs on Site A will show the user』s CRM tags being synced to Site B as well. The 「Source」 column will say wp-remote-users-sync.

Meanwhile on Site B, when the Site A data is loaded by WP Remote Users Sync, WP Fusion will record a message in the logs indicating the tags that were loaded:

#Why use WP Remote Users Sync
If all this sounds complicated, don』t worry, it should all happen automatically without any extra configuration. As long as WP Remote Users Sync is communicating properly between your sites, WP Fusion will as well.
The benefit of using WP Remote Users Sync is that it removes a lot of the friction that comes from having the customer experience split across two websites.
Without WPRUS:

WooCommerce purchase on Site A applies a tag in your CRM via WP Fusion
The tag triggers an automation which sends a webhook to Site B
The webhook creates a new user, loads their tags, and generates a password
A welcome email is sent from the CRM with a link to log in to Site B

This takes around 5 minutes and there』s a lot of opportunity for a webhook to fail or an email to land in spam.
With WP Remote Users Sync and WP Fusion:

WooCommerce purchase on Site A applies a tag in your CRM via WP Fusion
Simultaneously, WPRUS has created the new user on Site B and set the correct login cookies
The customer clicks a link on the Order Received page and is taken to Site B, without having to log in
The tags applied by WooCommerce in step one are already available, so the customer can immediately access their purchased content

#Was this helpful?

Let us know if you liked the post. That』s the only way we can improve.

Yes

No

If-So

If-So

#Overview
WP Fusion integrates with If-So Dynamic Content to allow you to use tags or lists from your connected CRM as conditions in triggers.
When editing any If-So condition, select CRM Tags (any) from the Select A Condition dropdown.

You can then select one or more CRM tags in the Select Tag(s) box, and add your content.
The content will then only be displayed to users who are logged in and have at least one of the specified tags.

#Was this helpful?

Let us know if you liked the post. That』s the only way we can improve.

Yes

No

AffiliateWP

AffiliateWP

#Overview
WP Fusion integrates with AffiliateWP to add affiliates to your CRM when they register on your site or update their affiliate profiles.
You can also tag customers when they make a purchase via an affiliate link.
#Syncing affiliate meta fields
In addition to the normal signup fields, you』ll also see several new AffiliateWP-specific fields added to the Contact Fields tab in the WP Fusion settings.

These fields are related to the affiliate, and will be synced when an affiliate registers or updates their profile.
#Syncing referrer meta fields
WP Fusion also supports synchronizing details about an affiliate to a customer』s contact record when they make a purchase using an affiliate link.

You can use these fields to personalize the marketing sent to a customer based on the affiliate who referred them.
At the moment syncing referrer meta fields is supported for referrals recorded via:

WooCommerce purchase
Gravity Forms submission
Ultimate Member signup

#Applying tags to affiliates
You can also specify tags to be applied when new affiliates register on your site. This can be found under the Integrations tab in the WP Fusion settings.

The available options are:

Apply Tags – Affiliate Registration: These tags will be applied when someone registers to be an affiliate, regardless of their approval status.
Apply Tags – Affiliate Approval: If you』re requiring manual approval of affiliates you can also specify additional tags to be applied when an affiliate has been approved.
Apply Tags – Affiliate Rejected: These tags will be applied if a pending affiliate is rejected.
Apply Tags – Customers: This option will appear if WooCommerce is active and lets you specify tags to be applied to customers that make a purchase via an affiliate link (for example a tag like 「Referred by Affiliate」).

#Applying tags to WooCommerce customers
You can specify tags to be applied to WooCommerce customers when they make a purchase after following a referral URL. This is configured from the Integrations tab in the WP Fusion settings (above).
While editing any affiliate you can also specify tags to be applied to the WooCommerce customer if they purchase from that specific affiliate』s referral.

#Export options
WP Fusion includes an export / batch processing tool for AffiliateWP affiliates. Head to Settings » WP Fusion » Advanced and select the AffiliateWP Affiliates option from the Batch Operations list:

Then click Create Background Task to start the process.
Each of your affiliates will be updated in your connected CRM with any enabled custom fields. They will also be tagged with any tags you』ve selected to be applied to affiliates.

#Was this helpful?

Let us know if you liked the post. That』s the only way we can improve.

Yes

No