Salesforce Sandbox Accounts

Salesforce Sandbox Accounts

It』s possible to connect WP Fusion to a Salesforce sandbox account for testing purposes. To do so you』ll need to add a filter to your theme』s functions.php file to override the authentication URL:
function salesforce_auth_url( $url ) {

return 'https://test.salesforce.com/services/oauth2/token';

}

add_filter( 'wpf_salesforce_auth_url', 'salesforce_auth_url' );
Then enter the credentials for your sandbox user into the main WP Fusion setup tab, and click Test Connection to establish a connection to Salesforce.
For more information about user credentials with Salesforce sandboxes please see https://help.salesforce.com/articleView?id=data_sandbox_create.htm&type=5.

#Was this helpful?

Let us know if you liked the post. That』s the only way we can improve.

Yes

No

Slow performance with Klaviyo

Slow performance with Klaviyo

#Overview
While WP Fusion does support Klaviyo, we don』t recommend using Klaviyo because their API is not optimized for the ways in which WP Fusion interacts with your List data.
Because of this, creating more than ~5 total lists in your Klaviyo account will result in a noticeable slowdown on your site.
Since much of WP Fusion』s functionality is achieved by segmenting contacts into Lists based on WordPress user or customer behavior (purchases, course activity, etc.), this negates a lot of the benefits of using WP Fusion.
#More details
With most CRMs WP Fusion uses 「tags」 to assign contact records into segments. Klaviyo doesn』t have tags, and doesn』t make their contact 「Segments」 available over the API, so the only way WP Fusion can segment people is using 「Lists」.
For WP Fusion to personalize the experience in WordPress based on a user』s lists, it must first load all the lists for a contact from Klaviyo. Klaviyo does not have an API method for retrieving a contact』s lists, instead we need to query each list individually to see if the contact is on that list.
That means the more lists you have in your account, the slower this process is, since each API call takes about 1.5 seconds to process. For example:

If you have two total lists in Klaviyo, this will add ~3 seconds to a user registration or checkout
If you have 10 total lists in Klaviyo, this will add ~15 seconds to a user registration or checkout
If you have 20 total lists in Klaviyo, your user registrations or checkouts will take ~30 seconds, and will begin to time out

If you』re not committed to Klaviyo, we recommend ActiveCampaign.

#Was this helpful?

Let us know if you liked the post. That』s the only way we can improve.

Yes

No

Infusionsoft API Goals

Infusionsoft API Goals

WP Fusion supports making API calls to your Infusionsoft application when a user profile is updated on your WordPress site. This is useful if you want to trigger a campaign sequence after a user』s updated profile data is synced with your application. For example, you could perform actions based on the contents of certain fields, like assigning an owner, or applying a tag.
api-call
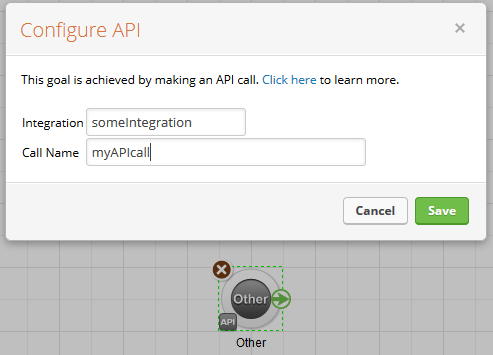
In the main WP Fusion settings page, check the API Call checkbox, and then optionally specify an integration name and API call name. For most setups you can leave these at default.
Then, in the Infusionsoft campaign builder, create an 「API Call goal」, and configure it to match the integration name and call name you set in the WP Fusion settings.
Now, whenever a user profile is updated, the goal will be achieved, and the contact will be moved through the subsequent campaign!

#Was this helpful?

Let us know if you liked the post. That』s the only way we can improve.

Yes

No

ActiveCampaign Event Tracking

ActiveCampaign Event Tracking

#Overview
ActiveCampaign includes a feature called Event Tracking which can be used in addition to site tracking to track additional engagement points on your website, for example video plays, course progress, forum activity, etc.

WP Fusion』s ActiveCampaign integration includes a helper function to allow you to track events over the ActiveCampaign events API.
To use event tracking with WP Fusion it must first be enabled in your ActiveCampaign account, at Settings » Tracking » Event Tracking.
These examples work with the full version of WP Fusion as well as WP Fusion Lite.
#Examples
#Basic example
Events are tracked by making a call to wp_fusion()->crm->track_event(), for example:
wp_fusion()->crm->track_event( 'My event' );
You can also optionally pass an event description:
wp_fusion()->crm->track_event( 'My event', 'Event description' );
#Track LearnDash course progress as events
Tracking data from other plugins can be achieved by calling the track_event function while hooked to other plugins』 actions.
For example to send LearnDash course progress to ActiveCampaign as events:
function wpf_track_learndash_events( $data ) {

if ( doing_action( 'learndash_course_completed' ) ) {
$post_id = $data['course']->ID;
} elseif ( doing_action( 'learndash_lesson_completed' ) ) {
$post_id = $data['lesson']->ID;
} elseif ( doing_action( 'learndash_topic_completed' ) ) {
$post_id = $data['topic']->ID;
} elseif ( doing_action( 'learndash_quiz_completed' ) ) {
$post_id = $data['quiz']->ID;
}

$last_item = get_post( $post_id );

// Get the post type label

$post_type = get_post_type_object( $last_item->post_type );
$label = $post_type->labels->singular_name;

wp_fusion()->crm->track_event( 'Completed ' . $label, $last_item->post_title );

// Quizzes

if ( isset( $data['quiz'] ) ) {

if ( true == $data['pass'] ) {
wp_fusion()->crm->track_event( 'Passed quiz' );
} else {
wp_fusion()->crm->track_event( 'Failed quiz' );
}
}

}

add_action( 'learndash_course_completed', 'wpf_track_learndash_events', 5 );
add_action( 'learndash_lesson_completed', 'wpf_track_learndash_events', 5 );
add_action( 'learndash_quiz_completed', 'wpf_track_learndash_events', 5 );
add_action( 'learndash_topic_completed', 'wpf_track_learndash_events', 5 );
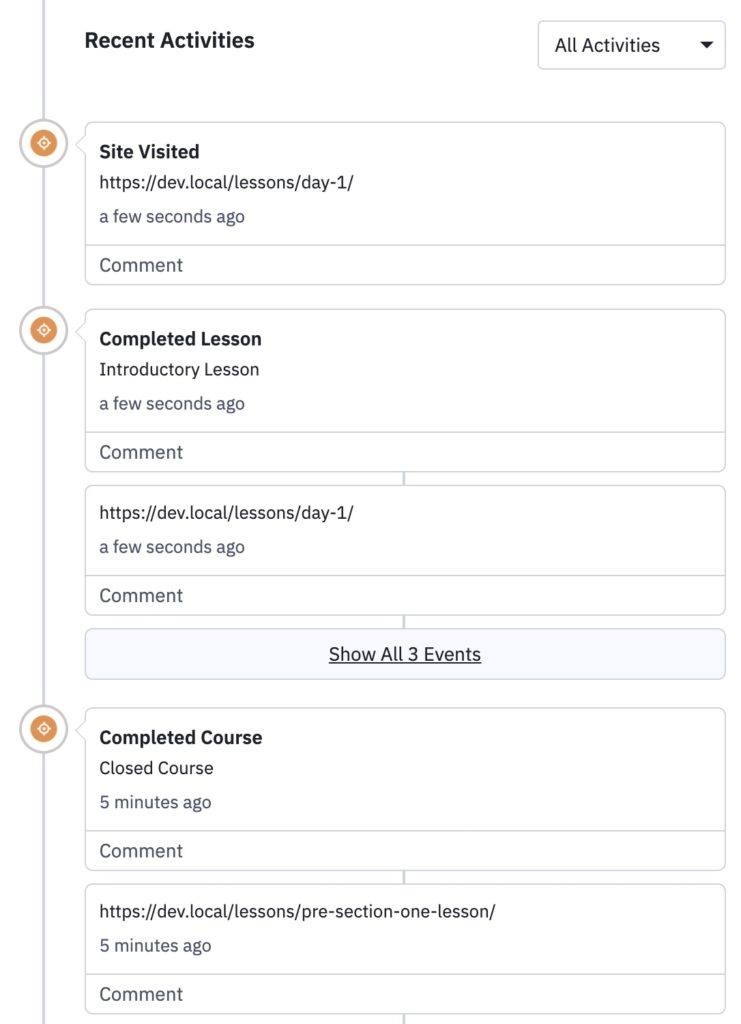
That data then shows up on the student』s contact record in ActiveCampaign like so

#Was this helpful?

Let us know if you liked the post. That』s the only way we can improve.

Yes

No

Unexpected Tags with ConvertKit

Unexpected Tags with ConvertKit

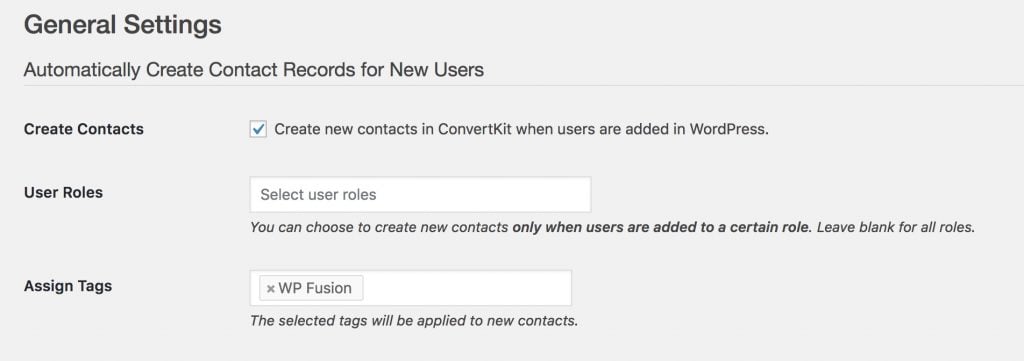
Due to some quirks with ConvertKit, you cannot create a new subscriber via the API without also applying a tag. It』s recommended to set a general tag in the Assign Tags setting to be applied to all new subscribers.

If you don』t specify a tag here, the first available tag in the list will be applied.

#Was this helpful?

Let us know if you liked the post. That』s the only way we can improve.

Yes

No

ConvertKit Unsubscribe Notifications

ConvertKit Unsubscribe Notifications

When a contact unsubscribes from emails in ConvertKit, ConvertKit prevents the subscriber from being accessed via the API.
This means that any tags associated with the subscriber will no longer be available in WordPress.
Unfortunately the only way around this is to manually delete the subscriber and re-add them, then manually apply their access tags.
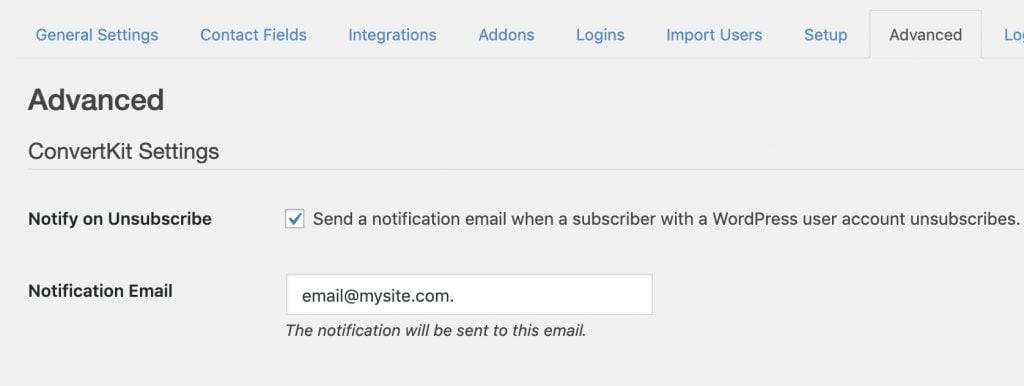
Under the Advanced tab in the WP Fusion settings you can choose to be notified via email when a subscriber unsubscribes.

When this setting is enabled you』ll receive an email at the specified address containing the email address of the unsubscribed person. You can then log into ConvertKit, delete them, and add them again.

#Was this helpful?

Let us know if you liked the post. That』s the only way we can improve.

Yes

No

Custom fields not loading with AgileCRM

Custom fields not loading with AgileCRM

AgileCRM doesn』t currently have an API method for listing all of the custom fields in your account. To get around this, we query the first 100 contacts in your account, and build the list of available custom fields based on fields found on those contacts.
If you』re missing custom fields in WP Fusion, or if you』ve just added a custom field in Agile, try adding some data to the custom field for a few contacts, then resynchronize the available fields by going to Settings >> WP Fusion >> Setup, and clicking the green Resynchronize button.

#Was this helpful?

Let us know if you liked the post. That』s the only way we can improve.

Yes

No

Custom Objects with HubSpot

Custom Objects with HubSpot

#Overview
In addition to supporting custom objects with Zoho, Salesforce, and Ontraport via the wpf_crm_object_type filter and the add_object() method, WP Fusion supports adding and updating custom objects with HubSpot.
For a video walkthrough of custom objects, check out Data in HubSpot: Custom Objects and Other Tools in HubSpot』s Academy.
For additional information and examples please review HubSpot』s CRM Custom Objects documentation.
The examples below assume you have already created a custom object schema and know the object type ID as well as any association type IDs (if you plan to associate your objects with other objects).
#Authentication
Because custom objects are still in beta, your HubSpot API key is required to interact with them (your existing OAuth authorization via WP Fusion isn』t yet sufficient).
To use custom objects with HubSpot and WP Fusion, you must first define your HubSpot API key in your wp-config.php file, like so:
define( 'HUBSPOT_API_KEY', 'xx599590-7888-43ed-a896-5abbc2ef9aa2' );
#Methods
The methods are basically the same as those with other CRMs, those are:

add_object( $properties, $object_type_id )
update_object( $object_id, $properties, $object_type_id )
load_object( $object_id, $object_type_id, $properties )

#add_object()
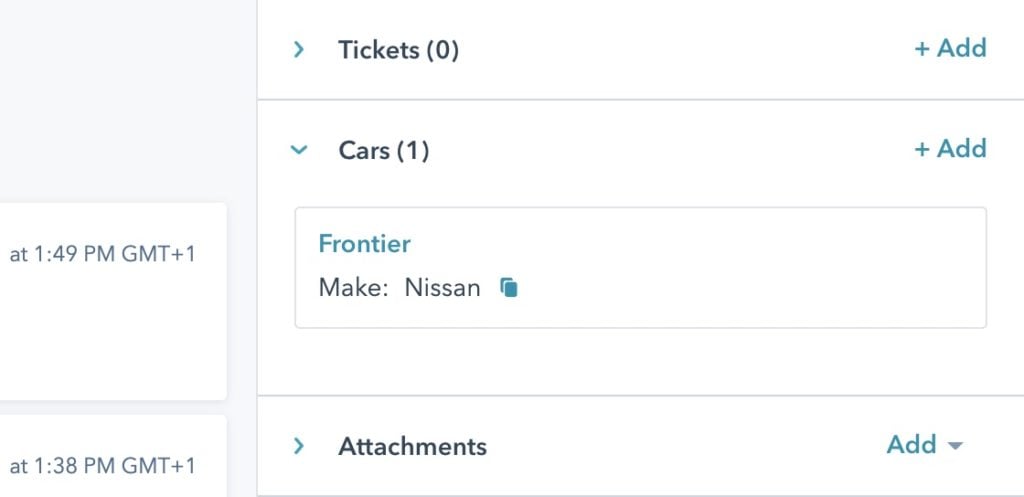
This method creates a new object of the specified object type ID. Following the HubSpot custom objects walkthrough, we have created a new Car custom object, with an objectTypeId of 2-4370788.
$properties = array(
'condition' => 'used',
'date_received' => '1582416000000',
'year' => '2014',
'make' => 'Nissan',
'model' => 'Frontier',
'vin' => '4Y1SL65848Z411439',
'color' => 'White',
'mileage' => '80000',
'price' => '12000',
'notes' => 'Excellent condition. No accidents.',
);

$object_type_id = '2-4370788';

$object_id = wp_fusion()->crm->add_object( $properties, $object_type_id );

if ( is_wp_error( $object_id ) ) {
wpf_log( 'error', wpf_get_current_user_id(), 'Error adding object: ' . $object_id->get_error_message() );
return false;
}

// Do what you want with $object_id here.
Now we have an $object_id with the ID of the new object. This can then be used for additional operations.
For example to associate the new object with a contact ID 101, we can make a PUT request against the associations API:
$contact_id = '101';
$association_type_id = '3';

$request = "https://api.hubapi.com/crm/v3/objects/{$object_type_id}/{$object_id}/associations/contacts/{$contact_id}/{$association_type_id}/?hapikey=" . HUBSPOT_API_KEY;

$params = array( 'method' => 'PUT' );
$response = wp_safe_remote_request( $request, $params );

if ( is_wp_error( $response ) ) {
wpf_log( 'error', wpf_get_current_user_id(), 'Error associating object with contact: ' . $response->get_error_message() );
return false;
}
Then the new object is associated with the contact, like so:
#update_object()
This method allows you to update an existing object. For example to change our Nissan Frontier with ID 599237525 into a Ford Ranger:
$properties = array(
'make' => 'Ford',
'model' => 'Ranger',
);

$object_id = '599237525';
$object_type_id = '2-4370788';

$response = wp_fusion()->crm->update_object( $object_id, $properties, $object_type_id );

if ( is_wp_error( $response ) ) {
wpf_log( 'error', wpf_get_current_user_id(), 'Error updating object: ' . $response->get_error_message() );
return false;
}
#load_object()
This method loads an object by ID and returns its properties. Note that unlike other CRMs, you must specify the properties you want returned.
Using our Car example from above, we can request the Condition, Year, Make, and Model:
$object_id = '599237525';
$object_type_id = '2-4370788';
$properties = array( 'condition', 'year', 'make', 'model' );

$response = wp_fusion()->crm->load_object( $object_id, $object_type_id, $properties );

if ( is_wp_error( $response ) ) {
wpf_log( 'error', wpf_get_current_user_id(), 'Error loading object: ' . $response->get_error_message() );
return false;
}

print_r( $response );

/*

Array
(
[id] => 599237525
[properties] => Array
(
[condition] => used
[hs_createdate] => 2021-12-15T09:41:24.159Z
[hs_lastmodifieddate] => 2021-12-15T10:10:22.801Z
[hs_object_id] => 599237525
[make] => Ford
[model] => Ranger
[year] => 2014
)

[createdAt] => 2021-12-15T09:41:24.159Z
[updatedAt] => 2021-12-15T10:10:22.801Z
[archived] =>
)

*/

#Was this helpful?

Let us know if you liked the post. That』s the only way we can improve.

Yes

No

Email address changes with MailerLite

Email address changes with MailerLite

#Overview
MailerLite gives you a very capable email marketing automation solution, at a great price.
In almost every way it』s just as powerful as one of our A-rated marketing automation tools, like ActiveCampaign, but at a fraction of the cost.
The one limitation with MailerLite is that it is not possible for subscribers to change their email address.
Unfortunately this basically cripples MailerLite in terms of being a marketing automation tool for use with WP Fusion / WordPress, and makes it suitable only for the most basic of businesses.
#Email address changes
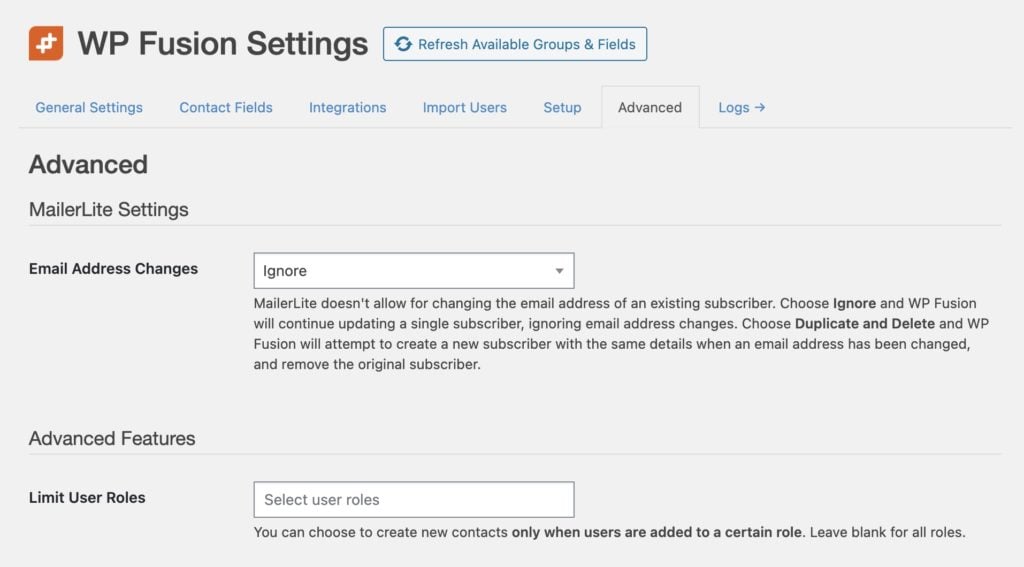
To get around this, WP Fusion has two options for ways to deal with email address changes. These can be configured at Settings » WP Fusion » Advanced.

The options are Ignore or Duplicate and Delete.
#Ignore
The default setting is to ignore email address changes and not sync them to MailerLite (since trying to update a subscriber』s email address will create an API error).
With this setting, if someone changes their email address in WordPress, their WordPress user record will become unlinked from their MailerLite subscriber record. This will remove any MailerLite groups from the user record, which means the user will lose access to any purchased courses or membership content until you manually create a new record for them in MailerLite.
#Duplicate and Delete
If you』re worried about members losing access to purchased content, you can choose Duplicate and Delete.
When this option is selected, if a user changes their email address, WP Fusion will load their subscriber record and groups over the MailerLite API. It will then create a new subscriber in MailerLite with the same custom fields and groups, but the updated email address. Then the original subscriber record (with the old email) will be deleted.
While this does allow users to change their email address without losing their groups (and group-based access), anything else about the subscriber will be lost. That means any site tracking data, email open history, and positions in automations and campaigns will be permanently lost.

#Was this helpful?

Let us know if you liked the post. That』s the only way we can improve.

Yes

No