Site Tracking Scripts

Site Tracking Scripts

#Overview
For your convenience, WP Fusion includes bundled copies of the site tracking scripts for:

ActiveCampaign
AgileCRM
Bento
Drip
Emercury
EngageBay
HubSpot
Infusionsoft
Mautic
and Ontraport

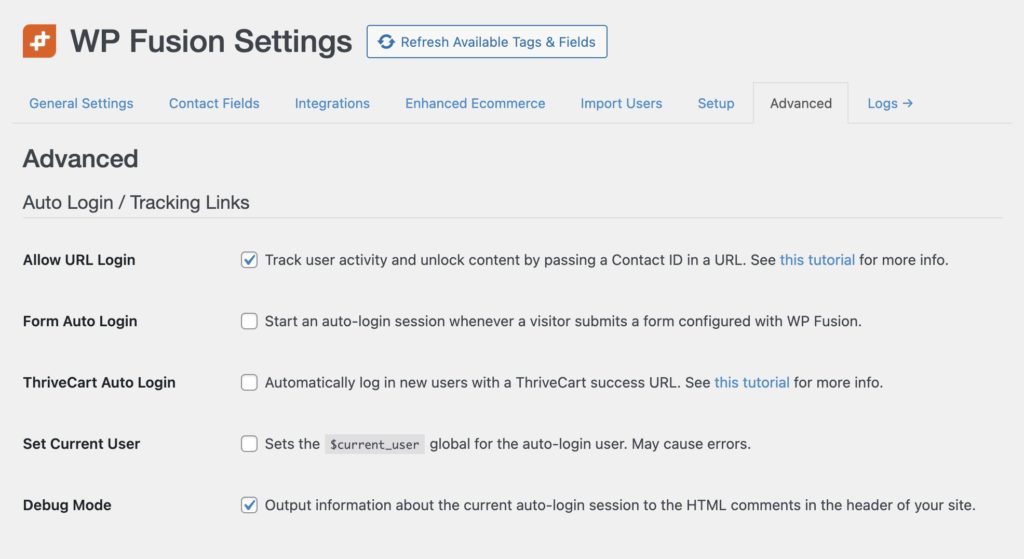
To enable site tracking, check the box on the main WP Fusion settings page, on the General settings tab.

Once enabled, visitors and users will be tracked using each CRM』s tracking methods, and tracking data will appear on contact records in your CRM.
#How it works
#ActiveCampaign
Site tracking data shown in the ActiveCampaign contact record.
In addition to loading the ActiveCampaign site tracking script in the footer of your site, WP Fusion will also identify any logged in users to the tracking script by email address. This also works with auto login links and form auto login.
In cases where a guest (not logged-in) makes a purchase or fills out a form using a supported form plugin, WP Fusion will try to set a cookie wpf_guest, containing the person』s email address.
When this cookie is present, the email address in the cookie will also be passed to the ActiveCampaign site tracking script. This makes it possible to start tracking a site visitor after a guest checkout or form submission, despite them not having a user account on the site,
#AgileCRM
Site tracking data shown in the AgileCRM contact record.
In addition to loading the AgileCRM site tracking script in the footer of your site, WP Fusion will also identify any logged in users to the tracking script by email address. This also works with auto login links and form auto login.
#Bento
With Bento site tracking enabled, you』ll be able to see your visitors pageviews in Bento, as well as initial landing page and geo location.
In addition to loading the Bento site tracking script in the header of your site, WP Fusion will also identify any logged in users to the tracking script by email address.
This also works with auto login links and form auto login.
#Drip
Site tracking data shown in the Drip contact』s Activity Log.
In addition to loading the Drip site tracking script in the footer of your site, WP Fusion will also identify any logged in users to the tracking script by email address. This also works with auto login links and form auto login.
#Emercury
To enable Emercury site tracking, check the box for Site Tracking on the General tab in the WP Fusion settings.
Note that you must be on a Pro or Scale plan with Emercury to use site tracking. If site tracking is not available for your account, WP Fusion will display an error message when you attempt to enable site tracking.
For site tracking to work you need to add your site』s domain inside the site tracking settings of your Emercury account. For more information on how site tracking works with Emercury, see this guide.
If your users are logged in or otherwise identified to WP Fusion (for example via an Auto Login Link) WP Fusion will also pass the user』s email address to the tracking script, which will associate their activity with their corresponding Emercury contact record.
#EngageBay
To enable EngageBay』s site tracking, first check the box for Site Tracking in the WP Fusion settings.

You will need your JavaScript API Key, which can be found in your EngageBay account.
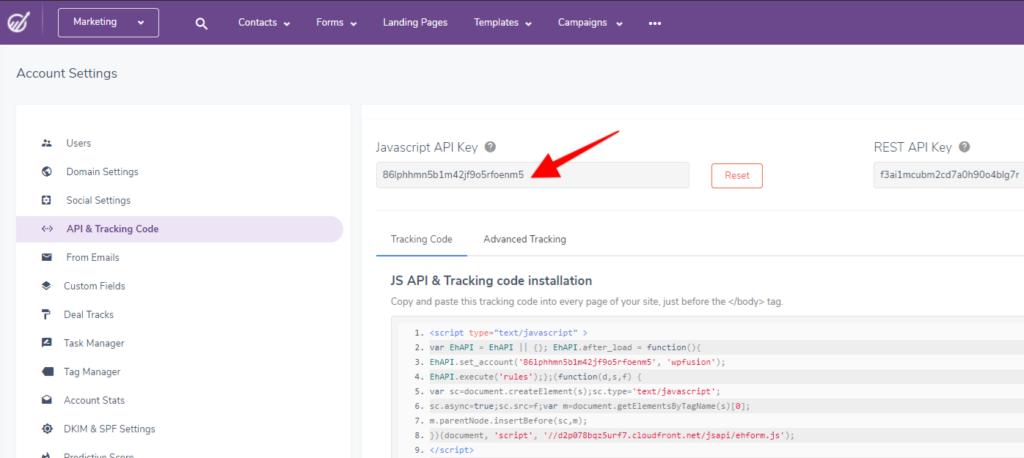
You can find your EngageBay JavaScript API key in your account under Admin Settings » API and Tracking Code
Once enabled, WP Fusion will output the EngageBay tracking code in the header of every page of your site.
If your users are logged in or otherwise identified to WP Fusion (for example via an Auto Login Link) WP Fusion will also pass the user』s email address to the tracking script, which will associate their activity with their corresponding EngageBay contact record.
#HubSpot
If site tracking is enabled for HubSpot, WP Fusion will load the site tracking scripts into the header of your site. WP Fusion will also identify any logged in users to the tracking script, by email address.
If a guest visitor submits a form or makes a checkout, WP Fusion will also identify the guest to the tracking script by email address, which allows the anonymous tracking data to be merged retroactively with the guest』s contact record.
Site tracking data is shown on a contact』s Activity stream in HubSpot, including pages visited and forms submitted.
The visitor』s page views are tracked and recorded up to the time of submitting the lead form.
HubSpot』s tracking scripts are a little more sophisticated than our other supported CRMs. They will automatically detect when a form is on a page, and try to sync the submitted form values to HubSpot.
Submitted forms on your website are automatically displayed on the contact』s Activity stream.
This generally works quite well, but can sometimes cause problems. For example the WooCommerce 「Billing Email」 can get synced to HubSpot and overwrite the customer』s account email.
If you encounter unexpected property changes in HubSpot, try deactivating site tracking.
Note: If you』re using the HubSpot for WordPress plugin, then the tracking scripts are already loaded on your site. In that case you should keep site tracking disabled in WP Fusion.
#Infusionsoft
Site tracking data shown in the Web Profile tab for an Infusionsoft contact.
#Mautic
Mautic site tracking is a little more complicated than site tracking with our other supported CRMs.
Set up properly it can be very effective, but it can also cause problems with misidentified contacts, or contact records getting merged.
Note: Mautic site tracking will not work if you are currently logged into Mautic as a user with the same email address as your WordPress user email. To test Mautic site tracking always use an incognito browser window.
WP Fusion』s two options for site tracking with Mautic
WP Fusion includes two options for Mautic site tracking:

Site Tracking: Enabling this option includes the Mautic tracking script in the footer of your page and sends a mt('send', 'pageview'); event with each page view. This is the same as if you were using the WP Mautic plugin, or had added the tracking code manually.
Advanced Site Tracking: Enabling this option activates some additional tracking methods unique to WP Fusion. When Advanced Site Tracking is active:

If an anonymous visitor on your site is being tracked in Mautic, and later registers an account, submits a form, or makes a purchase, WP Fusion will merge the anonymous tracking data with the new contact record. This gives you a more complete picture of the visitor』s history on your site before they provided an email address.
If a user is logged in to your site, WP Fusion will send a mt('send', 'pageview', {"email":"EMAILADDRESS"} ); event to Mautic』s tracking script, to track pageviews for logged in users in cases where they default Mautic tracking can』t properly identify them.

Where you need to be careful with Advanced Site Tracking is caching.
If [email protected] is logged into your site, and the Mautic tracking script is output to the footer of your page with Jane』s email address, then this could become cached.
If [email protected] later visits the same cached page, the tracking script would send a mt('send', 'pageview', {"email":"[email protected]"} ); event.
This would update Steve』s contact ID in Mautic with Jane』s email. Since the email address field in Mautic must be unique, this would merge the two contact records and delete Steve』s data and tags.
With Mautic site tracking enabled, anonymous visitors are tracked in Mautic.
When a visitor registers an account, makes a purchase, or submits a form, their tracking data is merged into the new contact record (using Advanced Site Tracking).
#Developers
Site tracking will automatically be disabled when WP Fusion is set to Staging Mode (on the Advanced settings tab).
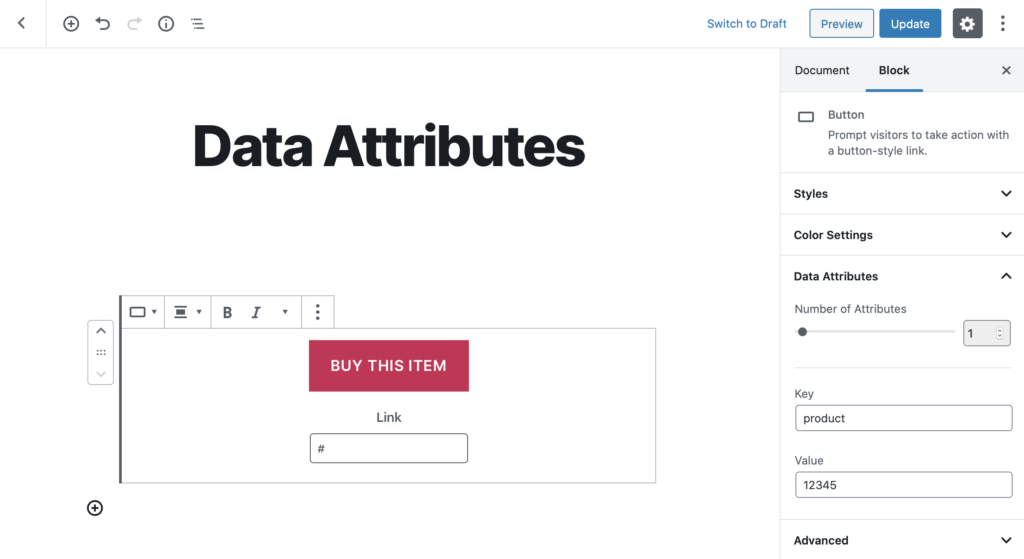
If needed you can also conditionally load the site tracking scripts via the wpf_get_setting_site_tracking filter.
For example, to disable site tracking for logged in administrators:
function disable_site_tracking() {

if ( current_user_can( 'manage_options' ) ) {
add_filter( 'wpf_get_setting_site_tracking', '__return_false' );
}

}

add_action( 'init', 'disable_site_tracking' );
Or to disable site tracking on a specific page:
function disable_site_tracking() {

if ( is_page( 'login' ) ) {
add_filter( 'wpf_get_setting_site_tracking', '__return_false' );
}

}

add_action( 'init', 'disable_site_tracking' );

#Was this helpful?

Let us know if you liked the post. That』s the only way we can improve.

Yes

No

Switching CRMs

Switching CRMs

#Overview
The time may come when you need to move from one marketing automation platform to another. Thankfully WP Fusion makes this pretty easy. Here are the steps:
#1. Move your data
To ensure that no data gets lost in the transfer, the best way to move your contacts over is to do an export of all contacts from your old CRM and import that data into the new CRM.
Make sure that your contacts』 tags get transferred over, as WP Fusion can』t migrate contact tags between platforms.
#2. Clear out linked tags
If you』re using 「Linked tags」 to trigger automated enrollments into courses or membership levels, it works best if you remove the linked tags before switching CRMs.
Since every user』s tags will be updated during the migration, this could cause people to temporarily be removed from courses or membership levels. After you』ve connected to your new CRM you can go back in and restore the tag link settings.
#3. Reset WP Fusion
Go to Settings » WP Fusion » Advanced and check the box at the bottom for Reset Settings. Save the settings.
#4. Connect
Select your new CRM from the dropdown, enter your API credentials, and click Test Connection. Once it』s connected save the settings.
WP Fusion will continue to work in the background on matching up your existing users with their new contact IDs in your new CRM, and loading their tags.
#5. Update your settings
The only settings that have been completely reset are the main WP Fusion settings. You』ll want to go through those and re-associate any WordPress fields with custom fields in your new CRM, and generally make sure everything is configured how you』d like.
If you are using any of our form integrations, like Gravity Forms, make sure you edit your form feeds to use the new custom fields as well.
The next part depends on what you』re switching from, and what you』re switching to, and has to do with whether the CRM supports creating new tags 「on the fly」.

For example in switching from ActiveCampaign to Drip, no additional configuration is required. Your products, membership levels, and courses will all continue to use the same tags from ActiveCampaign.
If you』re switching from a CRM with numeric tag IDs, like Infusionsoft or Ontraport, to one without, like Drip, then you will need to go through and update all of your tagging settings across all of your content. Until you do you will continue to see numeric IDs applied as tags instead of the new tag names. To troubleshoot any mystery tags being applied we recommend turning on WP Fusion』s activity logs.
If you』re switching between CRMs with numeric tag IDs, like from Infusionsoft to Ontraport, you will also need to update all your tagging settings.

For a list of platforms that support 「Dynamic Tags」, see the compatibility table.
Switching between any two platforms that support Dynamic Tags does not require any additional reconfiguring of your products or access rules— all of your tags will copy over automatically.

#Was this helpful?

Let us know if you liked the post. That』s the only way we can improve.

Yes

No

Auto Login

Auto Login

#Overview
WP Fusion』s auto-login system can load the CRM tags and meta data for a contact record into a temporary WordPress user account. The site visitor is then tracked with a cookie.
This allows you to personalize site content, pre-fill forms, and track activity (by applying tags) even if the contact doesn』t have a WordPress account.
The auto-login process can either be triggered via a link, or via a form submission.
Note: This feature does not work properly on WP Engine or other hosts that don』t let you edit your site』s caching settings.
#Auto Login Links
Auto login links can be used in an email to grant access to restricted content on your site without requiring a user to log in. You can even grant access to contacts in your CRM that don』t have user accounts on your site.
Keep in mind that the user will only be logged in for the purposes of WP Fusion』s content restriction and activity tracking features. For security reasons, users will not be able to access or edit their account details, purchase history, or any other sensitive information. For that they will need to log into your site using their username and password. All other plugins will see the visitor as a guest.
#Usage
To use this feature, first enable it from the Advanced section of the WP Fusion general settings tab.

You can now log a user into your site by passing a contact ID in any URL pointed at your site, for example:
http://mysite.com/my-special-content/?cid=1234
This sets a cookie and creates a temporary WordPress user with that contact』s tags and other information from your CRM. Any protected content will be accessible if the contact has the correct tags. You can also apply tags and track activity as if the user was logged in.
You can also use WP Fusion』s user meta shortcodes to display contact data from your CRM.
#Personalization tags
Here are some of the personalization tags for our more popular CRM integrations. This list will continue to be updated:

ActiveCampaign: http://mysite.com/?cid=%CONTACTID%
AgileCRM: http://mysite.com/?cid={{id}}
ConvertKit: http://mysite.com/?cid={{ subscriber.id }}
Drip: http://mysite.com/?cid={{ subscriber.id }}
FluentCRM: http://mysite.com/?cid={{contact.id}}
Gist: not supported by Gist
Groundhogg: http://mysite.com/?cid={id}
HubSpot: http://mysite.com/?cid={{ contact.email }}
Infusionsoft / Keap: http://mysite.com/?cid=~Contact.Id~
Mailchimp: http://mysite.com/?cid=*|EMAIL|*
MailerLite: http://mysite.com/?cid={$email}
Mautic: http://mysite.com/?cid={contactfield=id}
NationBuilder: http://mysite.com/?cid={{recipient.id}}
Ontraport: http://mysite.com/?cid=[Contact ID]
Sendinblue: http://mysite.com/?cid={{ contact.EMAIL }}
Zoho: http://mysite.com/?cid=${Contacts.Contact Id}

For other CRMs you can find the merge field for the contact ID from their merge fields documentation.
#Set Current User
By default auto-logged in users will only be able to access content protected by WP Fusion, and contact data can only be displayed using WP Fusion』s shortcodes.
You can enable Set Current User to have WP Fusion set the $current_user global in WordPress, so other plugins will be tricked into treating the user as logged-in as well.
This works well for pre-filling forms (in plugins like Gravity Forms or Advanced Custom Fields) with data from the CRM contact record, allowing you to create profile update forms or subscription preferences forms for your mailing list subscribers.
However this can cause problems with membership plugins (like BuddyBoss) and gamification plugins as they try to trigger notifications or achievements for a non-existent user, and may cause your site to crash when the auto-login link is visited.
If you get a white screen or an error message when visiting an auto-login link, turning off Set Current User will likely fix the error.
#Form Auto Login
You can also start an auto-login session when a form is submitted with any one of our supported form plugins.
This is the same as if the visitor had just followed an auto-login link— a cookie is set and then you can customize the site appearance based on the tags and meta data on their contact record.

To enable this, check the box for Form Auto Login from the Advanced settings tab.
#Ending auto-login sessions
WP Fusion will attempt to end the auto login session in several situations to prevent unexpected behavior on your site:

When a user logs into the site with a username and password
When a visitor reaches a page that contains 「login」 in the URL
When a visitor reaches a page that contains 「register」 in the URL
When a visitor reaches a page that contains 「checkout」 in the URL

However you may also want to force the auto-login session to end at a different time, for example when a form is submitted. You can do this by appending ?wpf-end-auto-login=true to any URL.
You can also achieve this in PHP by calling wp_fusion()->auto_login->end_auto_login();
#Troubleshooting Auto Login
The auto login system is still considered experimental and we can』t guarantee that it will work with all plugins.
If you』re using an auto login link and it doesn』t seem to be working, the first thing to check is if the cookie has been set for the auto login session. You can check your browser』s cookie storage to see if the wpf_contact cookie is being set. In Chrome this is found in the developer console under Application » Cookies:

If the wpf_contact cookie isn』t set, then the auto login URL wasn』t recognized. You should make sure that you』re using a real contact ID in your auto login URL, and that Auto Login is turned on in the WP Fusion settings.
#Caching
Because auto-login links are visited by guests (people who aren』t logged in), making auto-login links work with caching requires some extra attention.
For starters, make sure that any URLs with cid= in them are excluded from cache. Also add a cookie based cache exclusion for the wpf_contact cookie.
Note that URLs with UTM parameters (from Google Analytics) force-enable caching on some hosts. In many cases https://mysite.com/?cid=123 will work, but https://mysite.com/?utm_campaign=FallNewsletter&cid=123 will not, because the utm_campaign parameter triggers caching.
Getting around that is different for every host. For example with Cloudways we』ve had to:

In the cache exclusion settings in the Breeze plugin, put in a URL exclusion for the landing page being used with auto-login
In the Varnish settings in Cloudways, put in a cache exclusion for the landing page being used with auto-login
In the Varnish settings in Cloudways, put in a cache exclusion for the wpf_contact cookie.

#Debug Mode
As of WP Fusion v3.37.12, you can enable Auto Login Debug Mode from the Advanced tab in the WP Fusion settings.

When enabled, details about the current auto-login session will be output to the HTML comments in the header of your site.
You can use this to troubleshoot issues for a particular auto-login user, for example missing or malformed metadata or tags. This will also show if the wpf_contact cookie isn』t being set, for example due to caching.
#Developer resources
There are a few filters that allow you to modify the auto-login process.
#Using an alternate auto-login query variable
Instead of using ?cid= in your URL, you may want to use another variable,  for example if you』re already passing the contact』s ID to a different plugin. You can register an additional custom query variable using the wpf_auto_login_query_var filter.
For example to share the contact ID parameter with RightMessage, you』d use:
function alt_auto_login_var( $var ) {
return 'rm_ac';
}
add_filter( 'wpf_auto_login_query_var', 'alt_auto_login_var' );
#Pass auto-login data to other scripts
WP Fusion includes a function, wpf_get_current_user(), which works the same as the wp_get_current_user()  function, except that it also supports auto-login sessions. This can be used to pass data from an auto-login session to a 3rd party tracking script.
Below are two examples, one for Oribi』s site tracking, and one for Smartlook』s site tracking.
function custom_wpf_tracking() {

if ( ! function_exists( 'wp_fusion' ) || ! wpf_is_user_logged_in() ) {
return; // WP Fusion needs to be active and the user needs to be identified.
}

$user = wpf_get_current_user(); // Get the details about the current user. This lets you use the email via $user->user_email
$contact_id = wpf_get_contact_id(); // Or, optionally, you can use the contact ID for tracking.

?>

ORIBI.api('setUserEmail', 'user_email; ?>' );

smartlook( 'identify', '' );


user->has_tag( 'Payment Failed' ) ) {
$end = true;
}

return $end;
}

add_filter( 'wpf_end_auto_login', 'my_end_auto_login', 10, 2 );
There is also a helper filter which allows you to end a session based on a partial URL match, wpf_end_auto_login_request_uris:
function my_end_auto_login_uri( $request_uris ) {

$request_uris[] = 'my-page-slug';

return $request_uris;
}

add_filter( 'wpf_end_auto_login_request_uris', 'my_end_auto_login_uri' );
In this example, if the visitor lands on https://mysite.com/my-page-slug/ (or any URL with my-page-slug in it) the session will end.
#Skipping an auto-login session
You can skip an auto-login session on a single page via the wpf_skip_auto_login filter. The session will be resumed once the visitor navigates to another page.
function my_skip_auto_login( $skip, $contact_data ) {

if ( is_page( 'my-custom-form' ) ) {
$skip = true;
}

return $skip;
}

add_filter( 'wpf_skip_auto_login', 'my_skip_auto_login', 10, 2 );
There is also a helper filter which allows you to skip the session based on a partial URL match, wpf_skip_auto_login_request_uris:
function my_skip_auto_login_uri( $request_uris ) {

$request_uris[] = 'my-page-slug';

return $request_uris;
}

add_filter( 'wpf_skip_auto_login_request_uris', 'my_skip_auto_login_uri' );
In this example, if the visitor lands on https://mysite.com/my-page-slug/ (or any URL with my-page-slug in it) the session will skipped on that page.
#Making auto-login more secure
The basic auto-login implementation with just the cid= parameter is the easiest to set up and the most reliable. However this does mean that a visitor could cycle through random contact IDs in the URL, and potentially gain access to another contact』s content or details.
You can further secure the URL by adding a second parameter that has to pass. In this example, the auto-login URL contains an additional email= parameter. If the email doesn』t match the email address on the contact record in the CRM, the auto-login session.
To work, the URL would need to be formatted like https://mysite.com/?cid={contact_id}&email={email_address}
function verify_wpf_auto_login( $end, $contact_data ) {

if ( isset( $_GET['cid'] ) ) {

$contact = wp_fusion()->crm->load_contact( intval( $_GET['cid'] ) );

if ( is_wp_error( $contact ) ) {
return true;
}

// If there's no &email= parameter in the URL, or the email doesn't match
// the email in the database, end the auto login session

if ( ! isset( $_GET['email'] ) ) {
return true;
}

if ( urldecode( $_GET['email'] ) != $contact['user_email'] ) {
return true;
}
}

return $end;

}

add_filter( 'wpf_end_auto_login', 'verify_wpf_auto_login', 10, 2 );

#Was this helpful?

Let us know if you liked the post. That』s the only way we can improve.

Yes

No

Sync Users Between Sites

Sync Users Between Sites

#Overview
If you have a sales site separate from your learning or membership site, you』ll need to keep users in sync between the two sites. You may also want to keep user passwords in sync, and enable single-sign-on, so users only have to log in once.
Because WP Fusion uses tags in your CRM or marketing automation platform to grant access to content, a tag applied on Site A can unlock content on Site B (or C, D, and E).
For example, a WooCommerce purchase applies a tag to the new customer on Site A, which then triggers an automatic enrollment into a LearnDash course on Site B.
#Setup and strategy
While WP Fusion can be used to sync user accounts between sites, we don』t recommend it because to keep passwords in sync they need to be stored in plain text in your CRM, which is a major security concern.
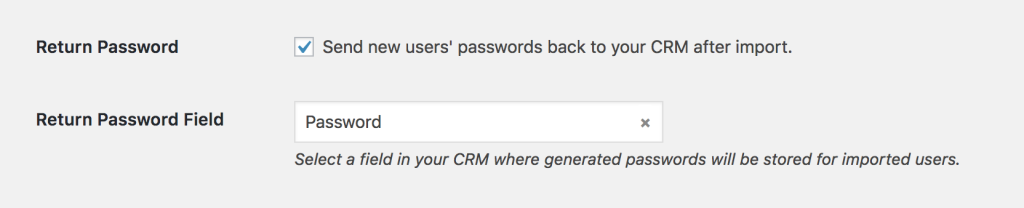
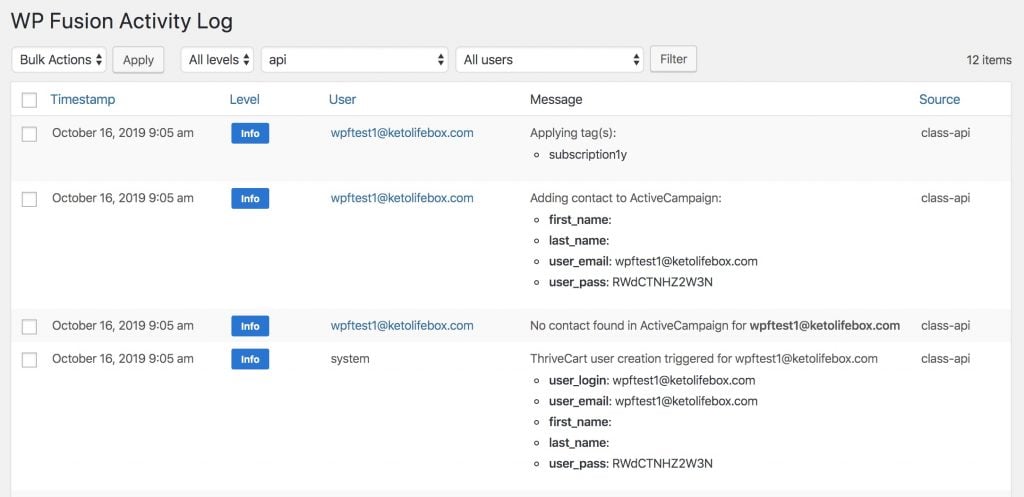
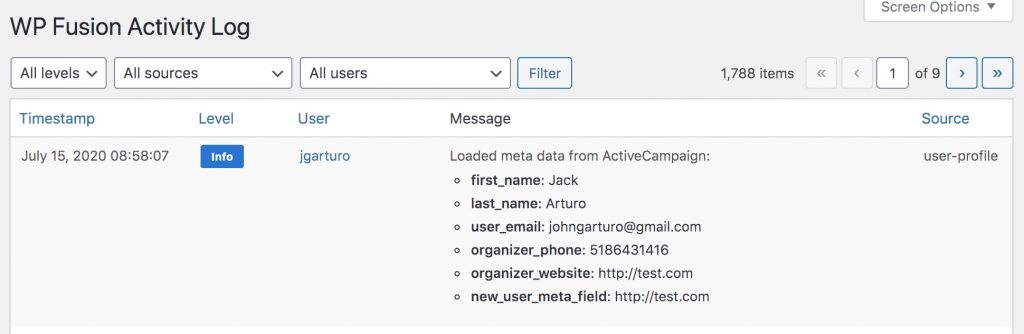
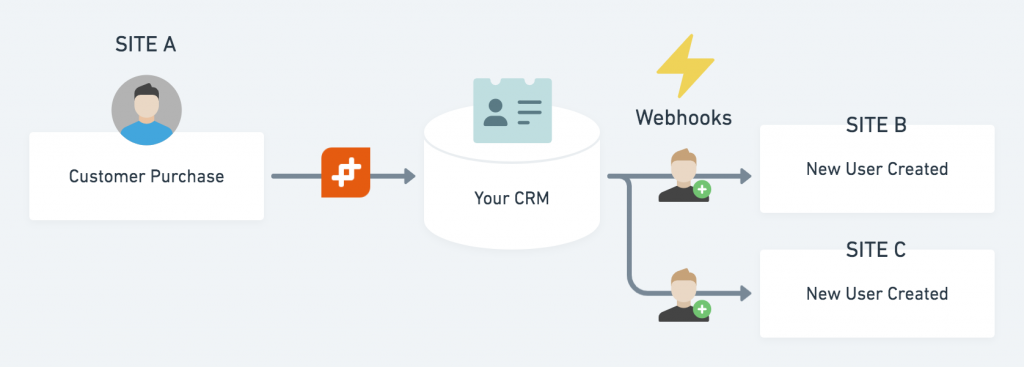
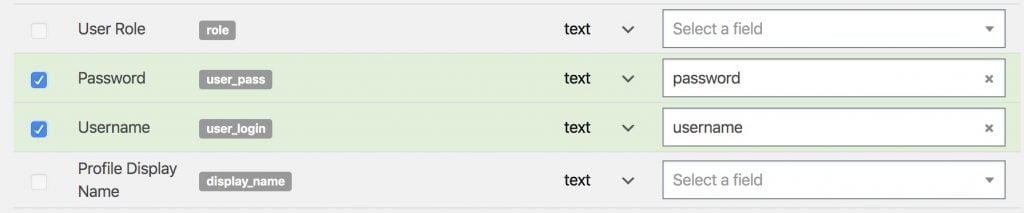
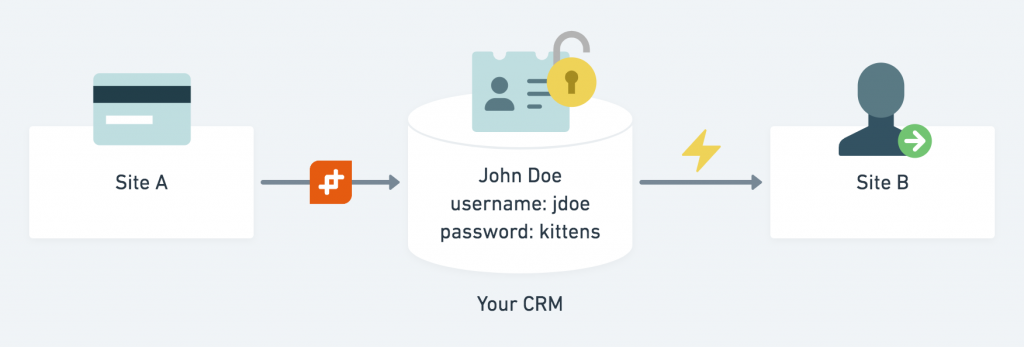
When you use your WP Fusion to sync users between sites, your user passwords end up stored in your CRM in plain text
For that reason we recommend using a plugin that allows you to sync user data directly between the sites, such as WP Remote Users Sync or Uncanny Automator.
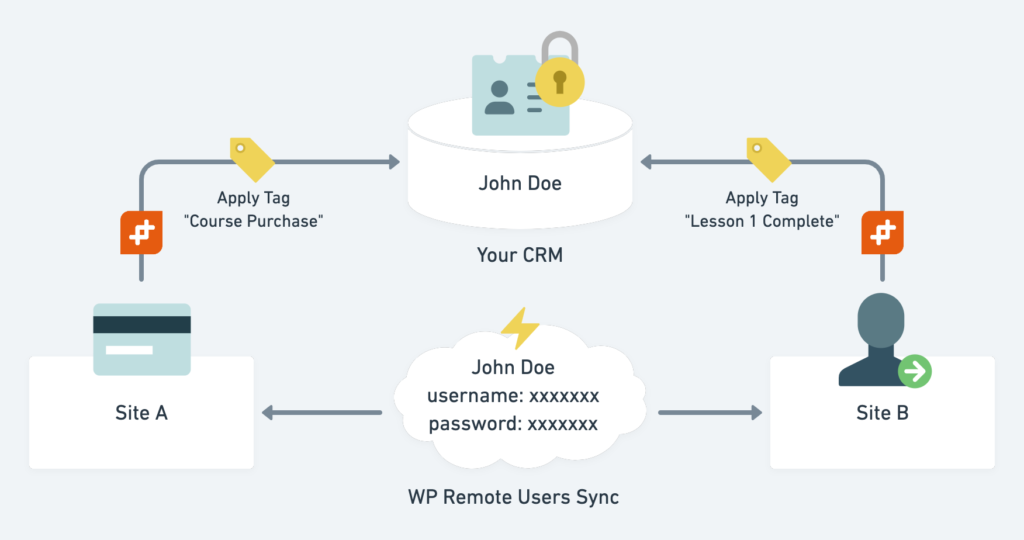
It』s preferable to sync user passwords directly between your sites, and then WP Fusion can sync non-sensitive data such as tags with your CRM
In that scenario, WP Fusion can still connect both sites to your CRM, but it will just be responsible for applying tags and syncing other non-sensitive information.
#Using WP Remote Users Sync
Our recommended solution syncing users between sites is with the WP Remote Users Sync plugin.
It lets you connect your sites directly to each other, so new user accounts are immediately created on your membership site when a customer registers on your sales site.

It also enables single sign on, so customers don』t need to log in a second time on your membership site.
#Example
For example if you wanted to sell a product with WooCommerce on Site A, and deliver access to a course on Site B, you would first set up your WooCommerce product to apply an access tag via WP Fusion, and then in your course use that same tag for auto-enrollment (for example with LearnDash or LifterLMS).
You would then connect Site A to Site B using WP Remote Users Sync, and make sure that guest checkout is disabled in the WooCommerce settings.
Make sure that guest checkout is disabled in the WooCommerce settings on Site A.
Now, when the customer checks out, they will automatically be logged in to their new user account.
WP Remote Users Sync will sync the new user to Site B, along with their tags and logged-in status. This means the customer doesn』t have to log in again to access their course on Site B.

When the tags are loaded on Site B, WP Fusion will automatically enroll the new user into any courses linked to those tags, and record a message in the logs.
For more information on setting up WP Remote Users Sync, see our documentation.
#Using Uncanny Automator
Uncanny Automator allows you to set up a webhook between two sites which automatically creates a new WordPress user. You can use this to have your checkout on one site which automatically creates a user and enrolls them into a course on a second site.
For more info on using Uncanny Automator to sync users between sites, see this tutorial.
#Using WP Fusion
It』s also possible to sync user accounts between multiple websites with WP Fusion, using your CRM to store the data and push it onwards to multiple sites. This method is more advanced and requires additional setup, but doesn』t require installing another plugin.
#No user account
The simplest way to use WP Fusion to sync user data is to require guest checkout on your sales site. In this case WP Fusion syncs your customer data to your CRM, but no user account is generated on the sales site (so there』s no password that needs to be synced).
Then you can create an automation in your CRM that sends a webhook to Site B, with wpf_action=add in the webhook URL. This will create a new user account, generate a random password, and enroll the new user in any purchased courses or memberships.
This is quite secure because the password is randomly generated, and relatively easy to manage because once the user account has been created, the user only exists on that one site (you』re not trying to keep passwords and other details in sync on an ongoing basis).
#Syncing user accounts
Using WP Fusion it』s possible to sync a user』s user name and password to custom fields on their contact record in your CRM.
To do this enable the fields user_login and user_pass for sync from the Contact Fields tab in the WP Fusion settings, and select corresponding custom fields in your CRM in which to store the data.
You can then set up WP Fusion on a different WordPress site, and use WP Fusion to pull the latest user name and password from your CRM, effectively keeping your customer logins in sync across two or more WordPress sites.

#Setup
To set up the integration, first navigate to the Contact Fields tab and click the check boxes next to Password and Username to enable them for sync.

Then go to the General Settings tab and make sure the checkbox next to the Push option is checked.
Note: All data is synchronized with SSL encryption but passwords are stored in your CRM application as plain text. Make sure that everyone who has access to your application is trusted before you choose to synchronize passwords.
Now, when a user creates an account or updates their information, their username and password will be synced to to your CRM. You』ll then want to configure a webhook to push the information to the other site(s).

#Was this helpful?

Let us know if you liked the post. That』s the only way we can improve.

Yes

No

Batch Operations / Exporting Data

Batch Operations / Exporting Data

#Overview
WP Fusion includes a series of tools that let you export data in bulk to your CRM. These are found under Settings » WP Fusion » Advanced » Batch Operations.

The options available will depend on which plugins you have active. For each operation you can hover over the tooltip indicator to get a description of what data will be synced or modified.

Note: These operations can potentially modify thousands of records in both WordPress and your CRM, and they are irreversible. It』s always recommended to test with a single record before running a batch operation— for example doing a test checkout before exporting orders, or a test registration before exporting users.

#When to use a batch operation
Just because WP Fusion can export a large amount of data to your CRM doesn』t mean it』s always the best tool for the job. WP Fusion needs to respect the API limits of your connected CRM, as well as the resource limits of your server.
For example, to run a Push User Meta batch operation to sync 30,000 users』 metadata with Ontraport would take about 28 hours to process.
As an alternative, you could use a plugin like WP All Export to export all of your user data to a .csv, and upload it into the CRM in only a few minutes.
The batch operations are best for syncing data that can』t be easily exported any other way, for example applying tags based on MemberPress subscription statuses, or exporting WooCommerce orders.
#Usage
To run a batch operation, select the operation you』d like to perform from the list of radio buttons and then click Create Background Task. A status indicator will appear at the top of the page showing the number of records to be processed and the number remaining.

Some notes:

You can leave the page while the background worker runs and it will continue to process the queue in the background.
If the background process gets stuck you can refresh the page and it will pick up where it left off.
It』s recommended to turn on the activity logs so you can see what data is being sent or loaded, as well as any potential errors.

Note on speed: Most CRMs have some kind of API limits with regards to the number of API calls you can make in a period of time. WP Fusion pauses in between each step in the background process to avoid exceeding these API limits. How long the pause is depends on your connected CRM.
Depending on the number of records you are processing, this can cause the background worker to take several hours (or even days) to complete. For example exporting 30,000 WooCommerce orders to Drip would take about 18 hours to fully process.

#Skip already processed
In some cases, you may be asked whether you』d like to Skip already processed records.
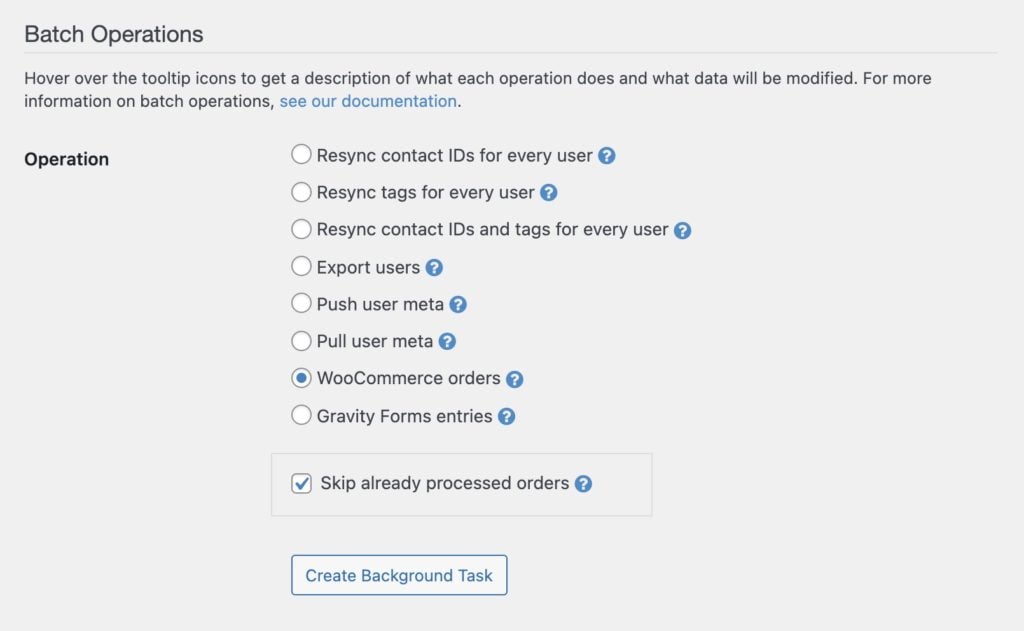
By default the batch exporter will not export the same order to your CRM twice.
By default, WP Fusion will not export an order, payment, or form entry to your CRM if it』s already been successfully exported. This is to prevent creating duplicate records.
If you want to go ahead and create duplicate records anyway (for example after switching CRMs or accounts), you can uncheck the Skip already processed box before clicking the start button. This will cause WP Fusion to export all orders, regardless of whether or not they were synced previously.
#Core methods
These operations are part of WP Fusion core and aren』t tied to any particular plugin integration. They are:
#Resync Contact IDs
Looks up every WordPress user by email address in your CRM, and updates their cached contact ID. This does not modify any tags or other data, or trigger automated enrollments.
When to use it: If the cached contact IDs for your WordPress users have gotten out of sync with the contact records in your CRM, this will update that cache, so profile updates and new tags get applied to the correct contact record.
This operation is sometimes preferable to Resync Contact IDs and Tags because if you』re using linked tags / auto-enrollment tags into courses or membership levels, you may not want to modify any tags until you』ve confirmed that every user is linked to the correct contact record.
#Resync Tags
Loads updated tags from your CRM for all WordPress users who already have a saved contact ID. This also triggers any automated enrollments via linked tags.
When to use it: If you』ve modified a lot of tags on a lot of contacts in your CRM (or deleted tags), this operation will bring the tags cached in WordPress for your users up to date with what』s in your CRM. This operation is faster than Resync Contact IDs and Tags because it doesn』t need to first confirm the contact』s email address.
Also, if you』ve recently changed an auto-enrollment tag on a course or membership (for example with a LearnDash course), you may want to update your users automated enrollments based on their current CRM tags. Running the Resync Tags operation will trigger any automated enrollments (and un-enrollments) when the tags are loaded from your CRM.
#Resync Contact IDs and Tags
All WordPress users will have their contact IDs checked / updated based on email address and tags will be loaded from their CRM contact record. This also triggers any automated enrollments via linked tags.
This operation is the same as running Resync Contact IDs and Resync Tags, it just does both at the same time.
When to use it: When a user registers in WordPress, WP Fusion stores their CRM contact ID on your site so that future updates can properly be synced. But if you manually merge a bunch of contacts (for example to remove duplicates), it』s possible that these IDs will no longer be accurate. Running a Resync Contact IDs and Tags operation ensures WP Fusion has all of your WordPress users linked to the correct contact record and has the latest copy of their tags.
#Export Users
All WordPress users without a matching CRM contact record will be exported as new contacts. Any fields configured on the Contact Fields tab will be synced. Any tags specified for Assign Tags on the General settings tab will be applied.
When to use it: If you』re just setting up WP Fusion for the first time, you may have WordPress users that aren』t already in your CRM or marketing automation tool. This tool lets you export those users.
#Apply registration tags
On the General tab in the WP Fusion settings, there』s an Assign Tags option that lets you specify tags to be applied in your CRM when a user registers a new WordPress user account.

These tags are only applied to new user registrations, but if you want to retroactively apply the same tags to every user already registered on the site, you can run the Apply registration tags operation.
When to use it: This operation is useful if you』re trying to reconcile the counts between users on your site and contact records in your CRM. By applying the same tag to every user on your site, you can easily see how many records are missing from your CRM.
#Push User Meta
All WordPress users with a contact record will have their meta data pushed to your CRM, overriding any data on the contact record with the values from WordPress. Any fields enabled on the Contact Fields tab will be synced.
When to use it: This is most commonly used when you』ve just enabled a new field for sync (for example User ID, or Date Registered), and need to export the values from that field to existing contact records in your CRM.
#Pull User Meta
All WordPress users with a contact record will have their meta data loaded from your CRM, overriding any data in their user record with the values from their contact record. Any fields enabled on the Contact Fields tab will be loaded.
When to use it: This operation would be used when you』ve just enabled a new WordPress field for sync with a custom field in your CRM that already contained data. This operation will load that custom field data into WordPress so it can then be displayed with a shortcode or used by other plugins.
#Troubleshooting
The background worker is a complex process. It』s designed to work across all hosting environments, without affecting the speed or stability of your site.
While it』s generally very reliable, we have encountered issues with both caching and security plugins. The most common issue is that it will process a single batch of records (20 or so) and then not proceed to the next batch until the page is reloaded.
To aid in troubleshooting the background worker, WP Fusion does a status check on it every 5 seconds, and outputs some status information to the JavaScript console in your browser.

This will output the total list of items in the queue, as well as information about the state of the process in terms of previous action, next action, and resource utilization.
Some things to note are:

Most servers have a max_execution_time of 30 seconds for PHP scripts. To get around this, the background worker will attempt to restart itself when the total_time value exceeds 20 (seconds). However, if the time_last_step value is greater than 10 (seconds), this could mean that the 30 second max_execution_time gets exceeded and the process times out.This most commonly happens on slower hosts when exporting WooCommerce orders, using the Enhanced Ecommerce addon. The process of creating a contact record, applying tags, creating products, registering an invoice, and adding the products to the invoice can take a long time for each order. You can speed up this process by first running an Export Users operation before exporting your orders. Since the contact records will already exist in your CRM, this reduces the time required to process each order.
WP Fusion tries to detect the available memory on your host and won』t let the background worker exceed 80% of available memory. However sometimes it』s not able to properly detect the available memory, and so memory_percent shows at 100% and the process prevents itself from running. You can disable this check by returning false from the wpf_batch_memory_exceeded filter.
Because WP Fusion makes sustained requests to admin-ajax.php over a long period of time, it can sometimes get blocked by security plugins. If you notice the batch status isn』t updating, it』s possible the background request is getting blocked. To see if that』s happening you can check your site』s access logs for any traffic to /wp-admin/admin-ajax.php?action=wpf_background_process is being blocked with a 403 (Unauthorized) status. If you』re using WordFence you can also put the plugin into Learning Mode before starting the batch operation to train it to allow this kind of traffic.

#Rate limiting
Most CRMs have some sort of API rate limiting. For example

ActiveCampaign: 5 requests per second
Drip: 3600 requests per hour
Infusionsoft: 1500 requests per minute
Ontraport: 3 requests per second
Zoho: 15000 requests per day

During batch operations it』s possible to hit these limits, after which you』ll begin to see error messages in the WP Fusion logs.
Because most CRMs reset their rate limiting every 60 seconds, WP Fusion does not cancel a batch operation when it it』s a rate-limiting error, it will continue to try to export data, and record errors as applicable.
With CRMs that have lower rate limits (such as Drip), WP Fusion artificially slows down any batch operations to avoid hitting any API limits. That is achieved using the wpf_batch_sleep_time filter. Returning a number from that filter causes WP Fusion to sleep() for the specified number of seconds before moving on to the next task.
For example, to add a one second pause between each batch step:
add_filter( 'wpf_batch_sleep_time', function() {
return 1;
});

#Was this helpful?

Let us know if you liked the post. That』s the only way we can improve.

Yes

No

ThriveCart

ThriveCart

#Overview
Using WP Fusion with ThriveCart you can create a success URL pointed at your site that will create a new WordPress user and log them in so they can access their purchased content.

Heads up! This is an advanced feature. It is one of the more difficult things to set up with WP Fusion. It often requires extra configuration time and doesn』t work reliably on all hosts. If you』re not comfortable debugging webhooks and running multiple tests, then consider selling your products with WooCommerce.

#Setup
First enable the setting for ThriveCart Auto Login from the Advanced settings tab in WP Fusion.

Then in ThriveCart on the Fulfillment tab for your product, choose Send them to a URL for the What should happen after purchase?  setting.

An example URL will look like https://mysite.com/?wpf_action=thrivecart&access_key=KEY&apply_tags=Membership%20Tag.
There are a few parts to this

https://mysite.com: This is the URL to your website. It can be the home page or any other page on your site.
?wpf_action=thrivecart: This tells WP Fusion to receive the data from ThriveCart, create a new user, and log them in.
&access_key=: This is the access key from the bottom of the General settings tab in WP Fusion.
&apply_tags=: Here you can optionally specify tags to be applied for the new user, for example to unlock content or trigger an automated enrollment.
You can use either tag IDs or tag names, separated by commas. The tags must be URL encoded. You can use urlencoder.org to encode your tags. For example &apply_tags=Tag%20One%2CTag%20Two

For more information on how to use success URLs in ThriveCart, see this article.
#How it works
When a customer checks out they』ll click the access link to be taken to your site. When WP Fusion detects the ThriveCart link it will create a new user based on the details provided at checkout.
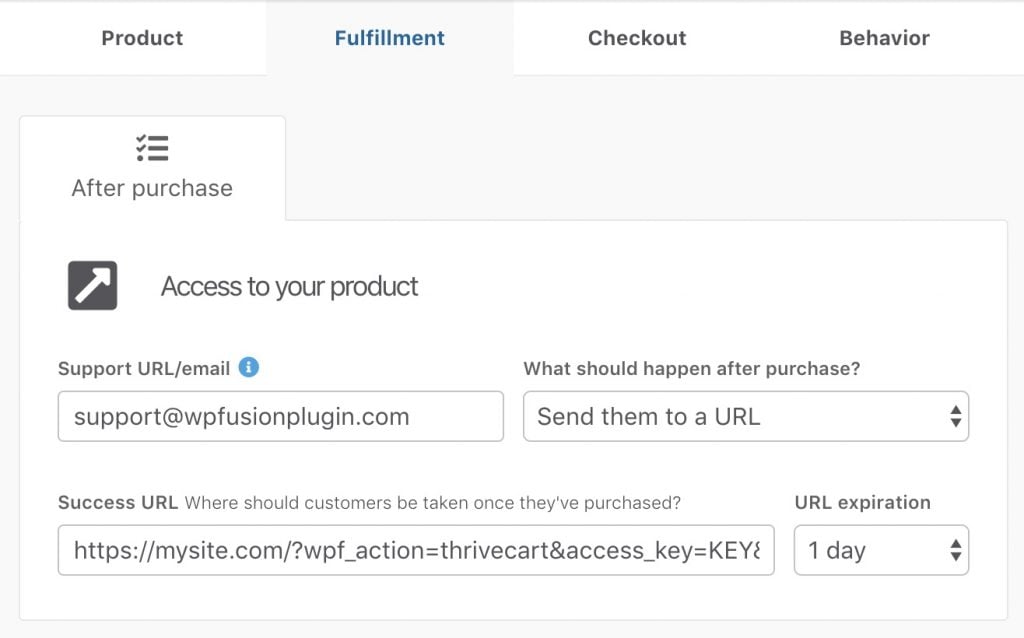
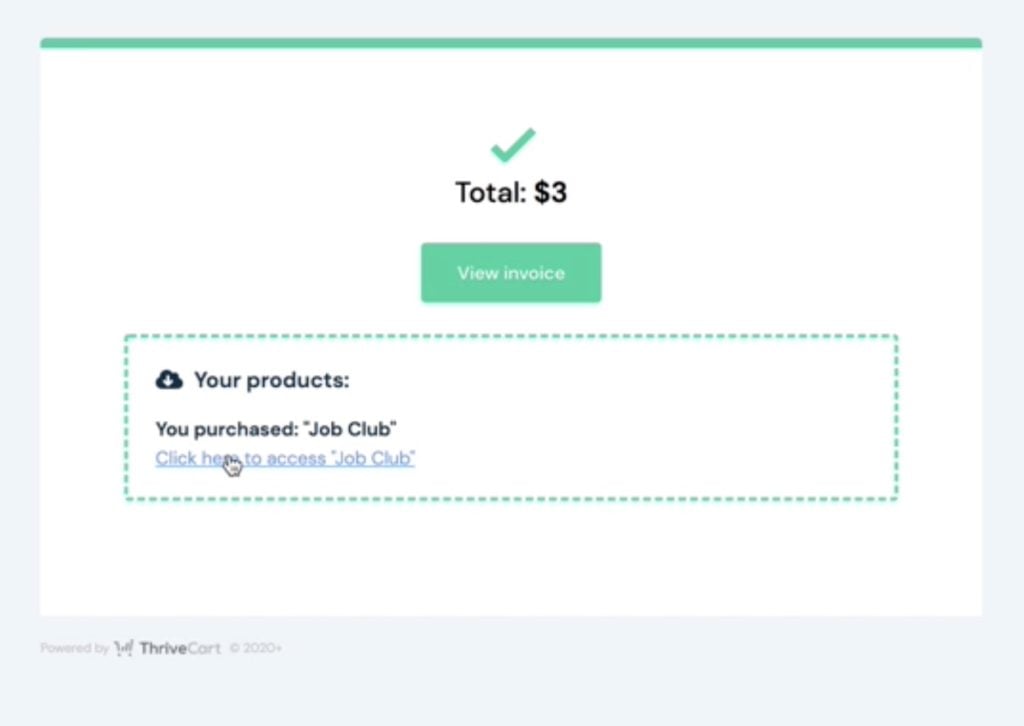
The customer must click the Click Here to Access link after checkout, or else no data will be synced.
The new user will be added to your active CRM, and any tags you』ve specified will be applied.
The new user will automatically be logged in and able to access their purchased content.
If a user already exists with the same email then the new tags will be applied and the existing user will be logged in.

Note: No data is sent to your site until the customer clicks the access link on the order confirmed page. If the customer doesn』t click the link, they won』t receive a new user account. For that reason it』s recommended to also connect ThriveCart to your CRM via a behavior rule, and use a webhook to ensure a user account is always created.

#Passwords
A random password will be generated for the new user.

If you』ve enabled the setting for Return Password from the WP Fusion settings then this password will be sent back to the specified custom field in your CRM.
You can then send the user a welcome email containing their password.
#Welcome email
For the best deliverability it』s recommended to send the welcome email containing the new user』s password from your CRM. However if you would prefer WordPress to send the welcome email, you can append &send_notification=true to your success URL.
WordPress will then send out the default welcome email inviting the new user to set their password.
#Troubleshooting
The first step in troubleshooting the ThriveCart user creation is to enable the WP Fusion activity logs. When a customer lands on the success URL, the logs will show the data that』s received from ThriveCart.

You will see a message ThriveCart user creation triggered, followed by the data that was loaded from ThriveCart. The logs will also show the password that was generated, and any tags that were applied.
If you』re having trouble with ThriveCart success URLs, please contact our support.
#Video – ThriveCart

#Was this helpful?

Let us know if you liked the post. That』s the only way we can improve.

Yes

No

Displaying CRM Data in WordPress

Displaying CRM Data in WordPress

#Overview
With WP Fusion it』s possible to display data from your CRM in WordPress, allowing you to personalize your site for logged-in users using data from their CRM contact record.
For example:
Welcome back, your next exam date is 9/9/2020.
Or
Your assigned advisor is Jim Jones, your learning style is Auditory.
#Shortcodes
Using WP Fusion』s user_meta shortcode, you can display any data in your site』s database for the current user.
You can see all the available meta field keys on the Contact Fields list in the WP Fusion settings.

The keys in the Meta Field column can be used to display a user』s data without any extra steps. For example to display the current user』s first name, the shortcode would be
[user_meta field="first_name"]
However, you may have data that only exists in your CRM, not in WordPress. To display that data, you』ll first have to create a place to store the data in WordPress, and then use WP Fusion to load the data from your CRM.
Note: While it might sound more convenient to load the data from your CRM every time the page is displayed, this actually can introduce performance problems if you have a lot of users on your site, since an API call needs to be made on every page load. For that reason it』s better to use WP Fusion to load the data into WordPress first, where it can be displayed without requiring an external API call.
#Managing custom fields
Before WP Fusion can load a custom field from your CRM, it needs a place to store the data on your site. For an overview on how data is synced between WordPress and your CRM, see the Syncing Contact Fields documentation.
An easy way to create a new field is to use a plugin that lets you manage custom fields for users, such as User Meta Pro, or Advanced Custom Fields. Or if you』re using a membership plugin like BuddyPress or MemberPress, these plugins have options for managing profile fields.
Once you』ve created a field to store your custom data, locate it on the Contact Fields list in the WP Fusion settings, and select a corresponding field in your CRM to enable the field for sync.

In this case, we』ve used User Meta Pro to create a field with key new_user_meta_field, and linked it to the Test Custom Field Two field in ActiveCampaign.
#Managing custom fields without a plugin
It』s also possible to register a new field in your database using just WP Fusion. Scroll down to the bottom of the Contact Fields list, and in the Additional Fields section, enter a unique key for the new field.

Select a corresponding custom field in your CRM from the dropdown on the right, and save the settings to enable the new field for sync.
#Loading the data
Now that you have the custom field created and linked with the corresponding CRM field, you need to load the data into WordPress. There are a few ways to do this:

Pull User Meta: From the Advanced tab in the WP Fusion settings you can run a Pull User Meta operation, which will load any enabled fields from your CRM into WordPress for all your users. More info on that here.
Webhooks: If you』re updating the custom field in your CRM over time, you can create an automation that sends a webhook back to WP Fusion when a contact has been modified, using the ?wpf_action=update method. This will load the updated values for that specific contact, and they can be displayed in WordPress. More info on webhooks here.
Shortcode: The [wpf_update_meta] shortcode can also be used to refresh the current user』s stored metadata from their CRM contact record when a page is viewed. To use the shortcode, put it above any [user_meta] shortcodes on the page so the data has been loaded by the time those shortcodes are executed. Note that the [wpf_update_meta] shortcode will slow down the page load by a few seconds, so it』s recommended to use it sparingly.
Login Meta Sync: You also have an option to load a user』s metadata from your CRM each time they log in, by enabling the option for Login Meta Sync.

Finally, if a [user_meta] shortcode is present on a page, and WP Fusion cannot find any data in the database for that field (for the current user), it will connect to your CRM one time to load the data for that field. This is a fallback just in case something got out of sync or a webhook failed to fire.
#Testing
Whichever method you use to load the data, the WP Fusion logs will show the data being loaded from your CRM into the user』s metadata in WordPress.

In this case, the new_user_meta_field we created earlier has loaded a value of http://test.com from ActiveCampaign.
Now if we use the [user_meta] shortcode, that value can be output on a page. For example
Your personalized results can be found at [user_meta field="new_user_meta_field"]
Would be output as
Your personalized results can be found at http://test.com.

#Was this helpful?

Let us know if you liked the post. That』s the only way we can improve.

Yes

No

Import Users

Import Users

import-users
WP Fusion includes an import tool that allows you to import existing contacts from your CRM as new WordPress users. If the password field is selected for sync on the Contact Fields tab, existing passwords can be imported as well. If the password field isn』t selected, a secure password will be automatically generated.
If you check the box next to Enable Notifications, WordPress will send a simple welcome email to the user with their username, and a link to log in on your website. You can customize this welcome email by using a plugin like SB Welcome Email Editor.
If you』re using a membership plugin like Ultimate Member, the plugin may send out its own welcome emails to new users, in which case you should leave Enable Notifications disabled.
#Passwords

You can also leave email notifications disabled and send the user』s password back to your CRM after import. Check the box next to Return Password on the main WP Fusion settings tab, and select a field in your CRM in which to store the generated passwords.
After each user is imported, their automatically generated password will now be saved back to their contact record, and you can use a merge field to include it in an email. The username will be the contact』s email address.
Note: Before importing a large number of users, first do a test import on your own contact record to ensure that all of the information is imported and the welcome emails are sent correctly.
By default WordPress will send a notification email to the site owner for every user imported. If you』re importing a large number of users you may wish to temporarily disable this using the Disable New User Notification Emails plugin.
#Username format
By default WP Fusion will set the username for all newly imported users to the contact』s email address.
You may not want the username to be the email address if you』re using a plugin (such as BuddyPress) which shows usernames on the frontend of the site. In that case you can change the default behavior.
This setting is found at the bottom of Settings » WP Fusion » General, in the Imported Users section.

The three Username Format options are:

Email Address: Usernames will be set to the contact』s emails address
FirstnameLastname: Usernames will be a combination of the contact』s first name and last name (i.e. JaneDoe)
Firstname12345: Usernames will be the contact』s first name, followed by a 5 digit random number (i.e. Jane36808)

For more control over how the usernames are generated, see the wpf_import_user filter.

#Was this helpful?

Let us know if you liked the post. That』s the only way we can improve.

Yes

No

Lead Source Tracking

Lead Source Tracking

#Overview
WP Fusion includes the ability to detect lead sources in URL parameters, such as those used with Google Analytics.
The system is quite versatile. It can look for a variety of common lead source parameters passed in URLs to your site and store these as a cookie when the user first visits your site.
If a visitor then registers on your site, makes a purchase, or submits a WP Fusion enabled form, the detected lead source parameters can be synced to custom fields in any one of WP Fusion』s 40+ supported CRMs and marketing automation platforms.
The cookie is valid for 90 days. So even if a user leaves your site and comes back later to make a purchase, you can still capture the source that brought them to you in the first place.
Note: This feature does not work properly on WP Engine or other hosts that don』t let you edit your site』s caching settings.
#Google Analytics
If you』re using Google Analytics』 Campaign URL Builder, Google will generate tracking links to your site that look like https://mysite.com/?utm_source=facebook&utm_campaign=summer_ad.

You can enable each of the various Google Analytics tracking variable for sync from the Contact Fields tab in the WP Fusion settings.
Note: By default WP Rocket caches URLs with Analytics leadsource variables in them. This will prevent WP Fusion』s lead source tracking from working. You can follow this tutorial to exclude the Google query string parameters from WP Rocket』s cache.
#Custom Lead Source Tracking
To enable custom lead source tracking, locate the leadsource field in the Contact Fields list and map it to a field in your CRM. Make sure to check the Sync box to enable the connection.
Structure the URL to your site like https://mysite.com/?leadsource=custom_leadsource. Anything after the leadsource parameter in the URL will be synced. Using this method you can set up your own lead source tracking strategy however you see fit.
#Referrer and Landing Page
The fields Original Referrer and Landing Page are a bit different in that they don』t use a URL parameter for tracking.

Original Referrer: This tracks the URL a user followed to get to your site. If this is enabled, the referrer URL will be recorded on their first visit.
Landing Page: This tracks the page the visitor landed on when they came to your site for the first time.

#How it works
When a visitor lands on your site with one of the tracked parameters, WP Fusion will set a cookie, either wpf_leadsource (for the UTM and URL parameters) or wpf_ref for the Original Referrer and Landing Page.
You can see the cookies set by WP Fusion using your browser』s developer tools. If the cookies aren』t being set, your page is probably cached.
This cookie is valid for 90 days. If any any time during that period, a contact record is created for that visitor by WP Fusion, the tracked values will be extracted from the cookie and merged into the API data sent to create the new contact record.
This works any time WP Fusion creates a contact record— a form submission, abandoned cart, product purchase, or regular registration. It does not work when a contact record is added to your CRM by another plugin, since other plugins wouldn』t know to look for cookies set by WP Fusion.
Also note that WP Fusion only sync the lead source data when a new contact record is created. It won』t send the data to an existing contact record, to avoid overwriting lead source data you may have already collected for a contact. This can be considered First Referrer tracking.
#Caching
Note that the lead source tracking relies on cookies, which often aren』t compatible with caching. For example this functionality does not work on WP Engine.
Generally speaking, if the cookies aren』t being set, make sure your landing page is excluded from cache, or the query variables you』re tracking are set to bypass the cache. It may also be helpful to bypass the cache when the wpf_leadsource or wpf_ref cookies are set (though this could degrade performance).
Note that with WP Rocket, any URL with UTM parameters is cached by default, which means the lead source tracking won』t work. To override that you』ll need to download and customize the helper plugin WP Rocket | Ignore Query Strings.
#Developers
#Register additional leadsource variables
You may want to register additional URL parameters that should be tracked as leadsource variables. You can do this using the wpf_leadsource_vars filter.
For example to register the URL parameter lang:
function my_wpf_custom_leadsource_vars( $vars ) {
$vars[] = 'lang';
return $vars;
}

add_filter( 'wpf_leadsource_vars', 'my_wpf_custom_leadsource_vars' );
Once the variable is registered it will be detected in the URL when someone visits your site (for example &lang=en) and saved to the wpf_contact cookie.
Any custom leadsource fields added via the wpf_leadsource_vars filter will automatically show up on the Contact Fields list for syncing with custom fields in your CRM:

Then, when WP Fusion adds a contact record to your CRM (via a registration, purchase, form submission, or any other source), the custom leadsource values will be synced to the corresponding custom fields in your CRM.
#Change the cookie name
If needed you can change the name of the cookies that are used for WP Fusion』s lead source tracking. The two filters are wpf_leadsource_cookie_name and wpf_ref_cookie_name.
For example to prefix the two cookie names with an underscore:
add_filter( 'wpf_leadsource_cookie_name', function() {
return '_wpf_leadsource';
} );

add_filter( 'wpf_referral_cookie_name', function() {
return '_wpf_ref';
} );

#Was this helpful?

Let us know if you liked the post. That』s the only way we can improve.

Yes

No

Link Click Tracking

Link Click Tracking

#Overview
WP Fusion』s link click tracking feature lets you apply tags in your CRM or marketing automation tool when links (or other elements) are clicked on your website.
To apply or remove tags when a user visits a specific page on your site, the simplest method is to use our meta box in the page settings to configure the tags to apply / remove.
However, you may want to track engagement with external links, file downloads, or other buttons that don』t qualify as separate pages. You can do so using this feature.
#Setup
First enable the feature from the Advanced section of the general WP Fusion settings tab.
link-tracking
When creating your links, switch into the 「Text」 mode of the editor, and structure your link HTML like the following:
Click Me
When the link is clicked, the tags will automatically be applied to the user.
To remove tags when a link or button is clicked, use the following:
Click Me
#Other Elements
You can also use link click tracking on other elements. For example, to apply a tag when a form is submitted, add the data-apply-tags parameter to the submit button like so:

The data-apply-tags attribute can be added to any HTML element.

#With Elementor Pro
Elementor Pro allows you to specify data attributes for any element, which means WP Fusion』s tracking can be used to track clicks. This setting can be found on the Advanced tab while editing any element.

Just enter data-apply-tags followed by a pipe | and then a comma-separated list of the tags you』d like applied when the element is clicked. For removing tags, use data-remove-tags.
#With Gutenberg
With the Gutenberg editor, we recommend the Block Data Attribute plugin for adding the data-apply-tags attribute to buttons or other blocks.

#Was this helpful?

Let us know if you liked the post. That』s the only way we can improve.

Yes

No