Shortcodes

Shortcodes

#Overview
WP Fusion includes a few shortcodes that let you display user meta, and show / hide content based on a user』s tags in your CRM. These can be used to personalize the site content based on a user』s custom fields or tags.
#Displaying user meta
You can use shortcodes to display meta data for logged in users. The syntax is pretty simple. For example, to show a user』s first name:
[user_meta field="first_name"]
Any field listed in the Contact Field tab of WP Fusion』s settings can be accessed in this way.
You can also display different information for users who haven』t registered yet, or aren』t logged in, like so:
Welcome, [user_meta field="first_name"]Guest[/user_meta]!
Logged in users will see their first name, while visitors will see 「Welcome, Guest!」
#User meta formatting
WP Fusion supports formatting date and time fields using PHP』s date function. For example:
[user_meta field="next_bill_date" date-format="Y-m-d"]
This will output the date like 2019-03-10.
For escaping text in the date format, use a double backslash. For example:
[user_meta field="next_bill_date" date-format="l \t\h\e jS \o\f F, Y"]
This will output the date like Friday the 22nd of March, 2019. For more information on the syntax see PHP』s date documentation.
#User meta formatting – timezone offset
WP Fusion syncs dates with most CRMs in UTC. To correct for this, the user_meta shortcode will adjust the date to local time (based on the site』s timezone) before displaying it.
Sometimes this can result in the time being displayed incorrectly, especially if you are entering dates via another plugin and they are already in local time. To manually correct the timezeone conversion, you can use the timezone-offset parameter, for example
[user_meta field="date_time" date-format="Y-m-d H:i:sa" timezone-offset="-2"]
This will display the date and time, corrected backwards two hours. The timezone-offset parameter accepts any positive or negative number.
#Video – Displaying user meta

#Displaying a contact ID
You can display the current user』s contact ID as well. The format is [user_meta field="{crm_slug}_contact_id"]. For example with Infusionsoft the shortcode would be:
[user_meta field="infusionsoft_contact_id"]
 
#Displaying content based on tags
You can use these shortcodes to show and hide content based on a user』s logged in status and CRM tags.
Note that WP Fusion also includes support for Elementor, Beaver Builder, Divi, Oxygen, and the Gutenberg Editor. If you』re using a page builder it may be easier to configure access rules using WP Fusion』s visual interfaces rather than a shortcode.
Note that while you can put other shortcodes inside the [wpf]] shortcode, you cannot put a [[wpf]] shortcode inside another [[wpf]] shortcode.
#Restricting content based on logged in status
You can use the following two shortcodes to show content based on whether or not a user is logged in, regardless of their tags. This works like:
[[wpf_loggedin]Only visible to logged in users[/wpf_loggedin]]
[[wpf_loggedout]Only visible to logged out visitors[/wpf_loggedout]]
#Restricting content based on tags
To restrict content based on a user』s CRM tags, wrap the desired content in the WP Fusion shortcode, using the examples below.
This content will only show if the user is logged in and has the tag 「New Customer」:
[[wpf tag="New Customer"]Restricted Content[/wpf]
This content will only show if the user is logged in and has both the tags 「New Customer」 and 「Purchased Course」:
[wpf tag="New Customer,Purchased Course"]Restricted Content[/wpf]
#Show the content if a user does not have a tag
To show content only if a user doesn』t have a certain tag, use the following syntax:
[wpf not="New Customer"]Restricted Content[/wpf]
You can also combine multiple tags for the not parameter, like
[wpf not="New Customer, Active Member"]Restricted Content[/wpf]
In that case the content will be hidden if the user has any of the tags. So if the user is tagged either New Customer or Active Member, the content will be hidden.
You can also combine parameters for more advanced locking, like so:
[wpf tag="New Customer" not="Payment Failed"]Restricted Content[/wpf]
#Requiring any tag, instead of all
By default, WP Fusion will only unlock the content if the user has all of the tags in the list. To make it so that the content will unlock when any of the tags are found, include method="any" in the shortcode, like:
[wpf tag="New Customer,Purchased Course" method="any"]Restricted Content[/wpf]
#Else conditions
The [wpf] shortcode also supports an 「else」 condition. The usage works like:
[wpf tag="New Customer"]
Shows only to users with the "New Customer" tag
[else]
Shows to all logged in users who don't have the "New Customer" tag
[/wpf]
#Logged out parameters
By default, content in the shortcode will always be hidden from users who aren』t logged in. You can change this by adding logged_out to the shortcode. For example:
[wpf not="New Customer" logged_out]
This will show to everyone who doesn't have the "New Customer" tag, including logged out visitors.
[/wpf]
or:
[wpf tag="New Customer" logged_out]
Shows only to users with the "New Customer" tag
[else]
Shows to all users who don't have the "New Customer" tag, as well as logged-out visitors.
[/wpf]
#Square brackets in tag names
WordPress does not allow square brackets in shortcode parameters. If your tag names have square brackets in them, you can use parentheses instead and they will be treated as equivalent by WP Fusion.
For example if your tag name is [Customer] Paid Course, your shortcode will work with [wpf tag="(Customer) Paid Course"].
#Displaying content based on page rules
Using the [wpf_user_can_access]] shortcode, you can show and hide content based on the access rules configured in the WP Fusion meta box on another post.
For example, this shortcode shows a message only if the current user has permission to access a course with post ID 456.
[[wpf_user_can_access id="456"]
Thanks for signing up for Awesome Course!
[/wpf_user_can_access]
#Else conditions
This shortcode also accepts an [else] condition:
[wpf_user_can_access id="456"]
Thanks for signing up for Awesome Course!
[else]
You might be interested in our Awesome Course
[/wpf_user_can_access]
#Within a loop
If the id= parameter is omitted, the shortcode will use the current post ID. This can be used in a loop or custom template to personalize the results.
For example to alternate the Elementor template displayed based on a user』s permissions:
[wpf_user_can_access]

[[elementor-template id="14331"]] // Enrolled template

[else]

[[elementor-template id="53371"]] // Unenrolled template

[/wpf_user_can_access]
#Displaying content based on user meta values
As of January 2021, WP Fusion includes a new [user_meta_if]] shortcode.
This can be used to conditionally display content based on user meta values of the current user, similar to Liquid Tags with Shopify or Drip.
Note: By their nature, shortcodes are difficult to work with. We recommend making use of these shortcodes sparingly, if at all. One typo in the attributes will make the whole shortcode not work. WP Fusion includes many PHP filters to control the visibility of content and these are generally easier to work with.
#Available attributes
The [[user_meta_if]] shortcode accepts 5 parameters:

field= The meta field on the current user to check (any value from the wp_users or wp_usermeta table)
value= The value to compare the user meta field against
field_format= The formatting for the user meta field. Can be any PHP function, for example strtotime(), strtolower(), or a custom function.
value_format= The formatting for the field to check against. Can be any PHP function.
compare= The comparison. Default is =, can be any comparison operator, or IN / NOT IN (see below)

#Simple example
The simplest example is comparing a user meta value to a text value. For example to check a user』s role:
[[user_meta_if field="role" value="customer"] Welcome back, Customer! [/user_meta_if]
Or to check someone』s BuddyPress account status:
[user_meta_if field="account_status" value="approved"]Thanks for verifying your email address![/user_meta_if]
#Numeric comparisons
As another example, you can compare numeric values using the compare= attribute, for example with lifetime value:
[user_meta_if field="lifetime_value" value="100" compare=">"] Hey hey, big spender! [/user_meta_if]
In that example the content will only be displayed if the user』s lifetime_value field is greater than 100.
Note that you must have a field called lifetime_value for the user in your database. WP Fusion does not track lifetime values.
#Date comparisons
You can get a little more fancy by making use of the field_format= and value_format= attributes, along with the strtotime() function.
For more info on valid inputs to strtotime() see the PHP manual.
[user_meta_if field="next_exam_date" field_format="strtotime" value="-5 days" value_format="strtotime" compare=">="]
Your exam is coming up soon, take the checklist to make sure you're ready on the big day!
[/user_meta_if]
This one is a bit complicated. Let』s break it down:

field=」next_exam_date」 This says we should use the field next_exam_date from the wp_usermeta table. It can be in any date string. For example 2021-01-25 8:15am
field_format=」strtotime」 This converts the exam date into a timestamp for comparison, i.e. 1611558900
value=」-5 days」 This is the value to compare against, 「five days ago」 relative to now
value_format=」strtotime」 This runs the value through strtotime() which gives us a timestamp for five days ago
compare=">="The greater than or equal to comparison. The condition will only be met if the student』s next exam date is greater than or equal to 5 days ago.

The end result is that the message will be hidden until five days before the student』s next exam date, at which point it will be shown.
#IN and NOT IN
WP Fusion can also evaluate against partial matches in a meta value. For this, use either compare="IN" to search for the value inside the user meta field, or compare="NOT IN" to invert the logic.
This works with either strings, or data stored as an array.
For example, let』s say you have a usermeta field called favorite_animals. For the current user, it is set to "Dogs, Horses, Cats". The following would display the content:
[user_meta_if field="favorite_animals" value="Cats" compare="IN"] Meow! [/user_meta_if]
The result is the same if favorite_animals is an array, like array( "Dogs", "Horses", "Cats" ).
#Updating data
You can insert a shortcode into your pages to force an update of a users tags and/or meta data before the rest of the page is displayed.
This can be used to force a refresh of data from your CRM before displaying content using the [wpf] or [user_meta] shortcodes.
To force an update of the current user』s tags, use:
[wpf_update_tags]
To force an update of the current user』s meta data, use:
[wpf_update_meta]
Note that these shortcodes will trigger an API call to your CRM and slow down your page load by several seconds. They should be used sparingly, if at all.

#Was this helpful?

Let us know if you liked the post. That』s the only way we can improve.

Yes

No

GamiPress

GamiPress

#Overview
GamiPress lets you 「gamify」 your WordPress site by granting achievements based on a wide variety of triggers.
WP Fusion integrates with GamiPress to allow you to apply tags in your CRM when achievements and ranks are earned, as well as to sync points and ranks to custom fields in your CRM, which can be used to drive your marketing campaigns.
#Achievements
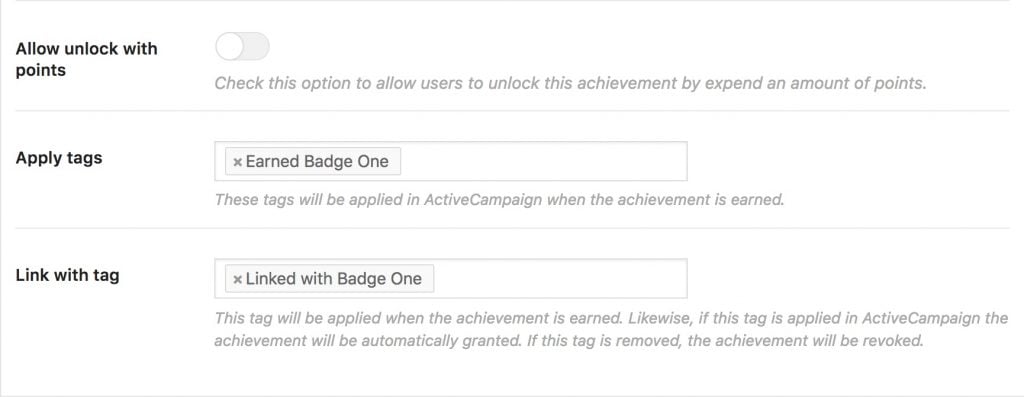
The WP Fusion settings can be found at the bottom of the Achievement Data box while editing an Achievement (note that to use achievements with Gamipress you need to first create an achievement post type at Gamipress » Achievement Types).

There are two options:

Apply tags: These tags will be applied in your CRM when the achievement or badge is earned.
Link with tag: This allows you to automatically grant an achievement by applying a tag. The tag is 「linked」 to the achievement, and if the tag is removed, the achievement will likewise be revoked.

#Ranks
WP Fusion also integrates with the Ranks system in Gamipress. The settings are found when editing any single rank.

Here you can specify tags to be applied in your CRM when the rank is earned.
#Requirements
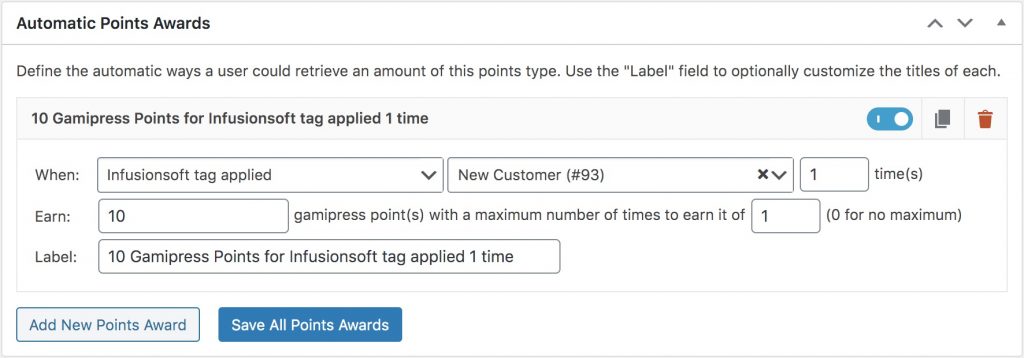
When editing any Points Type, Achievement, or Rank, you can use tags being applied or removed in your CRM as a condition.
For example when a Profile Complete tag is applied by WP Fusion, grant the user 10 points.

To set this up, in the condition dropdown under the WP Fusion header, select either CRM tag applied or CRM tag removed. Then you will be able to select the tag from the next dropdown that appears.
When the specified tag is applied or removed, the requirement will be met, and the Points, Achievement, or Rank will be awarded.
#Syncing points and ranks
WP Fusion also allows you to sync a user』s earned Gamipress points and ranks to your CRM.
Head to the Contact Fields list in the WP Fusion settings, and scroll down to the Gamipress section.

For each point type and rank type on your site, you』ll be able to select a corresponding custom field in your CRM.

When points are earned the new point value will be synced to the selected custom field in your CRM
When a rank is earned, the title of the new rank will be synced to the selected custom field in your CRM

The sync with points and ranks is bidirectional, meaning you can update a user』s points or ranks in your CRM and the data will automatically be updated in WordPress.
This can also be used to keep Gamipress points and ranks in sync across multiple sites, as long as they are all connected to your CRM with WP Fusion.

#Was this helpful?

Let us know if you liked the post. That』s the only way we can improve.

Yes

No

pull_user_meta()

pull_user_meta()

#Overview
This function triggers WP Fusion to load data from your CRM back to the WordPress user record. Any fields enabled for sync on the Contact Fields tab will be loaded.
#Parameters

$user_id: the WordPress user ID to load the metadata for

#Returns

$user_meta: array of key / value pairs of WordPress meta

#Examples
#Load a number and increment it
This example loads a custom field from the CRM, adds 1 to it if it』s numeric, and syncs the field value back to the CRM.
$user_meta = wp_fusion()->user->pull_user_meta( $user_id );

if ( ! empty( $user_meta['number_field'] ) && is_numeric( $user_meta['number_field'] ) ) {

$user_meta['number_field']++;

wp_fusion()->user->push_user_meta( $user_id, array( 'number_field' => $user_meta['number_field'] ) );

}

#Was this helpful?

Let us know if you liked the post. That』s the only way we can improve.

Yes

No
Showing and Hiding Widgets

Showing and Hiding Widgets

Heads up! Since WordPress 5.8, widgets are now managed using the block editor. To show and hide widgets based on CRM tags, we recommend the Block Visibility plugin, which includes an integration with WP Fusion. Or, to use the classic widgets editing experience, install the Classic Widgets plugin.
#Overview
WP Fusion also has the ability to control widget visibility based on a logged-in user』s tags.
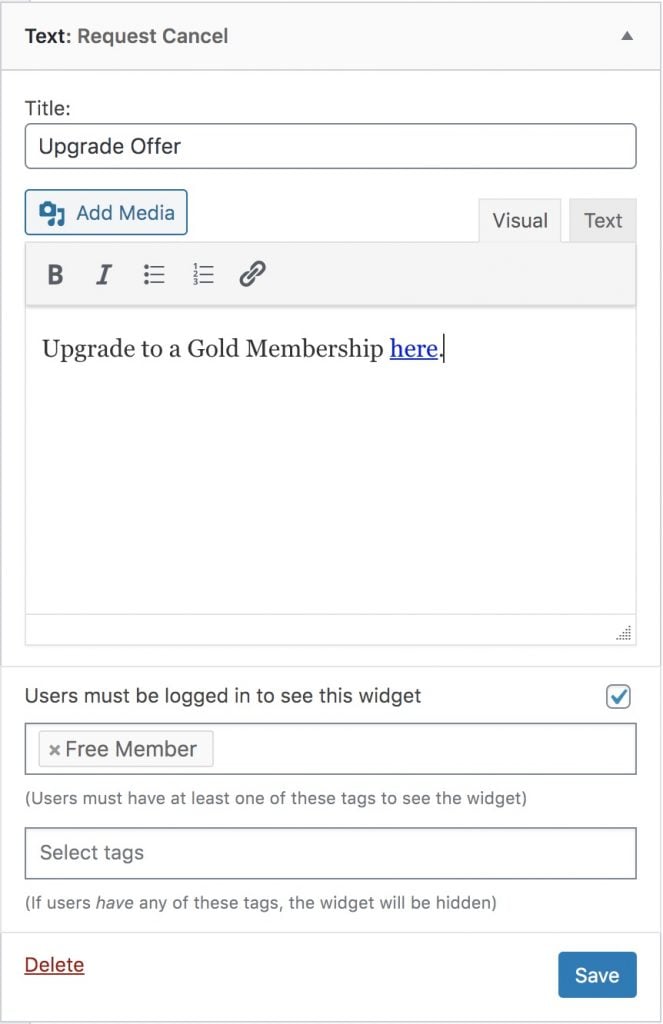
By checking the box next to Users must be logged in to see this widget, the widget only be visible to logged in users.

There are two tag select boxes. The first lets you specify a list of tags required  to view the widget. The widget will be hidden from users who don』t have these tags.
The second box lets you hide the widget from people who have certain tags. This might be useful in removing a promotion after the customer has already purchased the product, for example.
#Additional Widget Options
For additional widget visibility options, like logged in vs. logged out, or mobile vs. desktop, check out the free If Widget plugin.

#Was this helpful?

Let us know if you liked the post. That』s the only way we can improve.

Yes

No

add_object()

add_object()

#Overview
This helper function is available with Ontraport, Zoho, Salesforce, HubSpot, and other CRMs which use custom objects.
It』s a shortcut / alternative to using the wpf_crm_object_type filter, for cases where you just need to add a custom object one time, without changing the object type used for WP Fusion globally.
#Parameters

$data: (array) An associative array of data to sync to the CRM, using CRM field IDs for the keys
$object_type: (string) The object type you wish to update

#Examples
#Create a new Lead in Salesforce
$data = array(
'Email' => '[email protected]',
'FirstName' => 'Jane',
'LastName' => 'Doe',
);

$lead_id = wp_fusion()->crm->add_object( $data, 'Lead' );
#Update an Event object in Zoho when an Event post type is updated in WordPress
// Runs on any post with post type "event" and updates the "Event" custom object with values Title and EventDate

function create_update_event_object( $post_id, $post, $update ) {

// Don't run if WP Fusion isn't active, otherwise you'll get an error

if ( ! function_exists( 'wp_fusion' ) ) {
return;
}

// This is the data to be sent to the CRM

$event_data = array(
'Title' => $post->post_title,
'EventDate' => get_post_meta( $post_id, 'event_date', true )
);

// See if this object has already been synced

$object_id = get_post_meta( $post_id, wp_fusion()->crm->slug . '_event_id', true );

if ( empty( $object_id ) {

// New event

$object_id = wp_fusion()->crm->add_object( $event_data, 'Event' );

if ( ! is_wp_error( $object_id ) ) {

// Save the ID of the new record for future updates.

update_post_meta( $post_id, wp_fusion()->crm->slug . '_event_id', $object_id );

} else {

// Error, log it.

wpf_log( 'error', 0, 'Error creating event:' . $object_id->get_error_message() );

}

} else {

// Existing event

wp_fusion()->crm->update_object( $object_id, $event_data, 'Event' );

}

}

// save_post_event runs whenever an "event" post type is created or updated (see https://developer.wordpress.org/reference/hooks/save_post_post-post_type/)

add_action( 'save_post_event', 'create_update_event_object', 10, 3 );
#Create a custom Car object in HubSpot and associate it with a contact
For more information on working with custom objects in HubSpot, see Custom Objects with HubSpot.
define( 'HUBSPOT_API_KEY', 'xx599590-7888-43ed-a896-5abbc2ef9aa2' );

$properties = array(
'condition' => 'used',
'date_received' => '1582416000000',
'year' => '2014',
'make' => 'Nissan',
'model' => 'Frontier',
'vin' => '4Y1SL65848Z411439',
'color' => 'White',
'mileage' => '80000',
'price' => '12000',
'notes' => 'Excellent condition. No accidents.',
);

$object_type_id = '2-4370788';

$object_id = wp_fusion()->crm->add_object( $properties, $object_type_id );

if ( is_wp_error( $object_id ) ) {
wpf_log( 'error', wpf_get_current_user_id(), 'Error adding object: ' . $object_id->get_error_message() );
return false;
}

// Do what you want with $object_id here.

// For example to associate it with a contact (https://developers.hubspot.com/docs/api/crm/crm-custom-objects).

$contact_id = '101';
$association_type_id = '3';

$request = "https://api.hubapi.com/crm/v3/objects/{$object_type_id}/{$object_id}/associations/contacts/{$contact_id}/{$association_type_id}/?hapikey=" . HUBSPOT_API_KEY;

$params = array( 'method' => 'PUT' );
$response = wp_safe_remote_request( $request, $params );

if ( is_wp_error( $response ) ) {
wpf_log( 'error', wpf_get_current_user_id(), 'Error associating object with contact: ' . $response->get_error_message() );
return false;
}

#Was this helpful?

Let us know if you liked the post. That』s the only way we can improve.

Yes

No
wpf_woocommerce_attendee_data

wpf_woocommerce_attendee_data

#Overview
This filter is run during a WooCommerce checkout, while WP Fusion is preparing to sync FooEvents event attendees to your CRM. It can be used to modify the data that is synced for each attendee.
To use the code examples below, add them to your active theme』s functions.php file.
#Parameters

$update_data: (array) This is an array of key value pairs representing WordPress meta fields and their corresponding values.
$attendee: (array) The FooEvents attendee data.
$order_id: (int) The WooCommerce order ID

#Examples
#Sync event dates in separate fields
This example syncs the event date in a separate field, identified by the event ID (like event_date_123).
It can be used to store event dates in multiple custom CRM fields when a customer registers for multiple events simultaneously.
function sync_booking_dates( $update_data, $attendee, $order_id ) {

$product_id = $attendee['WooCommerceEventsProductID'];

$update_data[ 'event_date_' . $product_id ] = get_post_meta( $product_id, 'WooCommerceEventsDate', true );

return $update_data;

}

add_action( 'wpf_woocommerce_attendee_data', 'sync_booking_dates', 10, 3 );

#Was this helpful?

Let us know if you liked the post. That』s the only way we can improve.

Yes

No

wpf_should_filter_query

wpf_should_filter_query

#Overview
WP Fusion』s Filter Queries option allows you to modify the results of database queries to exclude content that a user can』t access (based on WP Fusion』s access rules).
There are some situations where you may need to bypass query filtering on a specific post type or in a certain context, in that case you can use the wpf_should_filter_query filter.
#Parameters

$should_filter (bool): Whether or not to apply query filtering to the query
$query (WP_Query): The query

#Examples
#Bypass query filtering on the home page if the post type is an event
This example bypasses query filtering on the The Events Calendar events list if the current page is the home page.
function bypass_filter_queries_for_events( $should_filter, $query ) {

if ( is_front_page() && 'tribe_events' == $query->get( 'post_type' ) ) {
return false;
}

return $should_filter;

}

add_filter( 'wpf_should_filter_query', 'bypass_filter_queries_for_events', 10, 2 );

#Was this helpful?

Let us know if you liked the post. That』s the only way we can improve.

Yes

No
apply_tags()

apply_tags()

#Overview
This function allows you to apply an array of tags to a user.
The function expects an array of tag IDs. Some CRM』s, like Infusionsoft, Ontraport, and ConvertKit use internal tag IDs to designate their tags. Other CRMs, like ActiveCampaign, Drip, AgileCRM, and Mautic don』t use tag IDs, and a tag label is sufficient.
If you』re unsure, you can always use get_tag_id() to get the appropriate tag ID for this function:
$tag_id = wp_fusion()->user->get_tag_id( 'Tag Name' );
#Apply tags to the current user (Infusionsoft and others which use tag IDs)
$tags = array(123, 456, 789);
wp_fusion()->user->apply_tags( $tags );
#Apply tags to the current user (ActiveCampaign and others which don』t use tag IDs)
$tags = array('Tag One', 'Tag Two', 'Tag Three');
wp_fusion()->user->apply_tags( $tags );
#Apply tags to a specific user ID
$tags = array(123, 456, 789);
wp_fusion()->user->apply_tags( $tags, $user_id );
The function will return true if the tags were applied successfully, and false if there was a connection error or the user wasn』t found in the CRM.

#Was this helpful?

Let us know if you liked the post. That』s the only way we can improve.

Yes

No

wpf_woocommerce_customer_data

wpf_woocommerce_customer_data

#Overview
This filter is run during a WooCommerce checkout, after WP Fusion has extracted the customer data from the order object. It can be used to sync additional data from a WooCommerce order to custom fields in your CRM.
To use the code examples below, add them to your active theme』s functions.php file.
#Parameters

$customer_data: This is an array of key value pairs representing WordPress meta fields and their corresponding values.
$order: The WooCommerce order object

#Examples
#Sync the WooCommerce total order value to a custom field
function get_order_total( $customer_data, $order ) {

$customer_data['order_total'] = $order->get_total();

return $customer_data;

}

add_filter( 'wpf_woocommerce_customer_data', 'get_order_total', 10, 2 );

#Sync the coupon code used on an order to a custom field
// Add the coupon field as available for sync on the Contact Field tab in the WPF settings

function wpf_coupon_meta_fields( $fields ) {

$fields['wc_coupon'] = array( 'label' => 'Coupon', 'type' => 'text', 'group' => 'woocommerce' );

return $fields;

}

add_filter( 'wpf_meta_fields', 'wpf_coupon_meta_fields' );

// Get the coupon code of the first coupon used on the order and add it to the order data

function wpf_sync_coupon( $customer_data, $order ) {

$coupons = $order->get_coupon_codes();

if( ! empty( $coupons ) ) {
$customer_data['wc_coupon'] = $coupons[0];
}

return $customer_data;

}

add_filter( 'wpf_woocommerce_customer_data', 'wpf_sync_coupon', 10, 2 );
#Get a custom date field off an order product and sync it to the contact record
// Add the date field as available for sync on the Contact Field tab in the WPF settings

function wpf_product_meta_fields( $fields ) {

$fields['course_date'] = array( 'label' => 'Course Date', 'type' => 'date', 'group' => 'woocommerce' );

return $fields;

}

add_filter( 'wpf_meta_fields', 'wpf_product_meta_fields' );

// Get the date field off the product and merge it into the customer data

function get_product_data( $customer_data, $order ) {

foreach ( $order->get_items() as $item ) {

$product_id = $item->get_product_id();

$meta_value = get_post_meta( $product_id, 'course_date_field_key', true );

if ( ! empty( $meta_value ) ) {
$customer_data['course_date'] = $meta_value;
}
}

return $customer_data;

}
add_filter( 'wpf_woocommerce_customer_data', 'get_product_data', 10, 2 );
#Sync the customer』s lifetime value to a custom field
function example_sync_lifetime_value_with_order( $customer_data, $order ) {

$customer_orders = get_posts(
array(
'posts_per_page' => -1,
'post_type' => 'shop_order',
'post_status' => wc_get_is_paid_statuses(),
'meta_key' => '_billing_email',
'meta_value' => $customer_data['billing_email'],
'orderby' => 'ID',
'order' => 'DESC',
)
);

$customer_data['lifetime_value'] = 0;

if ( ! empty( $customer_orders ) ) {

foreach ( $customer_orders as $order_id ) {

$order = wc_get_order( $order_id );

$order_total = $order->get_total();

$customer_data['lifetime_value'] += floatval( $order_total );

}
}

return $customer_data;
}

add_filter( 'wpf_woocommerce_customer_data', 'example_sync_lifetime_value_with_order', 10, 2 );
#Ignore an order
You can return an empty value from the wpf_woocommerce_customer_data filter in order to have WP Fusion ignore a WooCommerce order. In this example we』re going to ignore orders unless their status is completed:
function wpf_only_allow_completed( $customer_data, $order ) {

if ( 'completed' !== $order->get_status() ) {
return null;
}

return $customer_data;

}

add_filter( 'wpf_woocommerce_customer_data', 'wpf_only_allow_completed', 10, 2 );
#Only sync existing customers
This example will only sync the order data to your CRM if the customer is logged in and already has a CRM contact record. If it』s a new customer they will not be synced.
function only_sync_existing_contacts( $customer_data, $order ) {

if ( empty( wpf_get_contact_id( $order->get_user_id() ) ) ) {
return false;
}

return $customer_data;

}

add_filter( 'wpf_woocommerce_customer_data', 'only_sync_existing_contacts', 10, 2 );

#Was this helpful?

Let us know if you liked the post. That』s the only way we can improve.

Yes

No

wpf_user_can_access

wpf_user_can_access

#Overview
This filter is run when determining whether a user can access any piece of content on your site that can be protected by WP Fusion, including:

Posts
Pages
Custom post types
Widgets
Content protected by shortcodes
Gutenberg Blocks
Page builder modules (like Beaver Builder, Elementor, Oxygen, and Divi)

You can use this filter to create your own dynamic access rules based on criteria that aren』t available through WP Fusion』s meta boxes.
To use the code examples below, add them to your active theme』s functions.php file.
#Parameters

$can_access: This variable represents whether or not the user can access the content, as determined by your existing access rules. It will either be true or false.
$user_id: ID of the current logged in user. Will be false if the user isn』t logged in.
$post_id: Post ID for the post being requested. Will be false if the item isn』t a post (for example a Gutenberg block)

#See also

wpf_user_can_access_post_type: Runs on a post type, in conjunction with wpf_post_type_rules
wpf_user_can_access_archive: Runs on a taxonomy term ID instead of a post ID, determines if a user has access to a term archive
wpf_user_can_access_widget: Runs on widgets
wpf_user_can_access_block: Runs on Gutenberg blocks

#Examples
#Deny access to posts within a certain category
The example below will allow access to posts in the category 「My Category」 only to users who have the tag 「Special Tag」.
function restrict_post_categories( $can_access, $user_id, $post_id ) {

if ( in_category( 'My Category', $post_id ) && ! wp_fusion()->user->has_tag( 'Special Tag', $user_id ) ) {
return false;
} else {
return true;
}

}

add_filter( 'wpf_user_can_access', 'restrict_post_categories', 10, 3 );

#Restrict past content by registration date
This example denies access to any content that was published before the user』s registration date:
function disallow_before_date_published( $can_access, $user_id, $post_id ) {

$published = get_the_date( 'U', $post_id );
$userdata = get_userdata( $user_id );

if ( strtotime( $userdata->user_registered ) < $published ) {
$can_access = false;
}

return $can_access;

}

add_filter( 'wpf_user_can_access', 'disallow_before_date_published', 10, 3 );
#Restrict past content by date tag applied
As an alternative, you can track the date that a specific tag was applied (for example Paying Member) using the wpf_tags_applied action, and then deny access to any content published before that tag was applied.
This is similar to the functionality with the Restrict Past Content addon by Restrict Content Pro.
function disallow_before_date_published_alt( $can_access, $user_id, $post_id ) {

$published = get_the_date( 'U', $post_id );
$startdate = get_user_meta( $user_id, 'startdate', true );

// If the content was published before the user's startdate field, deny access

if ( empty( $startdate ) || $startdate < $published ) {
$can_access = false;
}

return $can_access;

}

add_filter( 'wpf_user_can_access', 'disallow_before_date_published_alt', 10, 3 );

function update_tag_applied_timestamp( $user_id, $tags ) {

// When TAGNAME is applied, save the current time to the startdate field

if ( in_array( 'TAGNAME', $tags ) ) {
update_user_meta( $user_id, 'startdate', time() );
}

}

add_action( 'wpf_tags_applied', 'update_tag_applied_timestamp', 10, 2 );
#Restrict content by a user』s age
In this example, any post protected by the tag Adult will require the user to be 18 years old or older to view the post.
For this to work you need to collect the user』s birthday in the date_of_birth usermeta field.
function restrict_content_by_age( $can_access, $user_id, $post_id ) {

$settings = get_post_meta( $post_id, 'wpf-settings', true ); // Get the settings

if ( false == $settings || empty( $settings['allow_tags'] ) ) {
return $can_access; // Not protected by WP Fusion
}

$tag_to_check = wpf_get_tag_id( 'Adult' );

if ( in_array( $tag_to_check, $settings['allow_tags'] ) ) {

// The post is protected by the "Adult" tag, check the user's age

$age = strtotime( get_user_meta( $user_id, 'date_of_birth', true ) );

if ( false == $age ) {

// The user's age is unknown, access is denied
return false;

} else {

$minimum_age = strtotime( '+18 years', $age );

if ( time() < $minimum_age ) {

// The user is not 18 or older, access is denied
return false;

} else {

// The user is old enough, access is granted
return true;

}
}
}

return $can_access;

}

add_filter( 'wpf_user_can_access', 'restrict_content_by_age', 10, 3 );
#Requiring an onboarding course completion before accessing the rest of the site
This example uses the presence of an Onboarded tag to lock all content on the site until the user has completed a LearnDash course with ID 123.
Configure the LearnDash course to apply the Onboarded tag when it』s marked complete, and the rest of the site content will then be unlocked.
function require_onboarding( $can_access, $user_id, $post_id ) {

if ( false !== $post_id // If the content being accessed is a post...
&& ! wpf_has_tag( 'Onboarded' ) // and the user doesn't have the tag Onboarded...
&& 123 != learndash_get_course_id( $post_id ) // and the content isn't part of the course ID 123...
) {
return false; //... then access is denied.
}

return $can_access; // Otherwise use the default access rules

}

add_filter( 'wpf_user_can_access', 'require_onboarding', 10, 3 );
#Unlock any locked content when visited from a Facebook link
This example bypasses WP Fusion』s access rules when the visitor is coming to the site from a Facebook link.
function unlock_for_fb_referral( $can_access, $user_id, $post_id ) {

if( isset( $_SERVER['HTTP_REFERER'] ) && strpos( $_SERVER['HTTP_REFERER'], 'facebook') !== false ) {
return true; // http referrer
} elseif ( isset( $_GET['fbclid'] ) ) {
return true; // the ?fbclid= URL parameter
}

return $can_access;

}

add_filter( 'wpf_user_can_access', 'unlock_for_fb_referral', 10, 3 );
#Bypass query filtering on a specific post
When WP Fusion』s query filtering is enabled, any posts that a user doesn』t have access to will be completely hidden from your site, including all listings, course grids, navigation, archives, etc.
There may be cases when you want to exclude a single post from being hidden. For example you might want to show a restricted course in your course catalog, so that when the user clicks on it they』re redirected to a sales page.
By checking if the pre_get_posts action is currently running, we can tell if WP Fusion is filtering the query results, and exclude specific items from being hidden. In this example the post with ID 123 is excluded if the current user has the tag 「Group A」.
function bypass_query_filtering( $can_access, $user_id, $post_id ) {

if ( doing_action( 'pre_get_posts' ) ) {

if ( wpf_has_tag( 'Group A', $user_id ) && 123 == $post_id ) {
$can_access = true;
}
}

return $can_access;

}

add_filter( 'wpf_user_can_access', 'bypass_query_filtering', 10, 3 );
#Unlock everything
Sometimes you might want to temporarily deactivate WP Fusion』s access controls, either for troubleshooting, or a special 「open day」 promotion. This code disables all WP Fusion access rules and grants access to everything.
add_filter( 'wpf_user_can_access', '__return_true' );

#Was this helpful?

Let us know if you liked the post. That』s the only way we can improve.

Yes

No