wpf_redirect_url

wpf_redirect_url

#Overview
This filter is run when a user is redirected from a restricted post or page. It can be used to override the redirect configured in the WP Fusion meta box. To use the code examples below, add them to your active theme』s functions.php file.
#Parameters

$redirect: Represents the URL the user will be redirected to.
$post_id: Post ID for the post being requested.

#Examples
#Send logged out users to a login page, and send logged-in users to upsell pages based on their applied tags
Say you have a page, 「Level 2 Membership Content」. This page has 「Restrict Access」 checked and requires the 「Level 2 Member」 tag to view the page. Configure the redirect in the meta box settings on the 「Level 2 Membership Content」 page to point your login page.
This will redirect all users who either don』t have the 「Level 2 Member」 tag, or any logged out users, to the login page. However if a user is already logged in, we may want to modify the redirect depending on their membership level.
The code below redirects users who don』t have the tag 「Level 1 Member」 to the sales page for Level 1 Membership. It redirects users who don』t have the tag 「Level 2 Member」 to the sales page for Level 2 Membership.
function wpf_redirect_users( $redirect, $post_id ) {

// Go to the default redirect (the login page) for non-logged in users
if ( ! wpf_is_user_logged_in() ) {
return $redirect;
}

// If they don't have the tag Level 2 Member, go to the Buy Level 2 Membership page
if ( ! wpf_has_tag( 'Level 2 Member' ) ) {
return 'http://mysite.com/buy-level-2-membership';
}

// If they don't have the tag Level 1 Member, go to the Buy Level 1 Membership page
if ( ! wpf_has_tag( 'Level 1 Member' ) ) {
return 'http://mysite.com/buy-level-1-membership';
}

}

add_filter( 'wpf_redirect_url', 'wpf_redirect_users', 10, 2 );

#Was this helpful?

Let us know if you liked the post. That』s the only way we can improve.

Yes

No

wpForo

wpForo

#Overview
WP Fusion integrates with wpForo to protect access to forums on your site by a logged in user』s CRM tags. WP Fusion also allows you to auto-assign usergroups in your wpForo forums by assigning tags in your CRM
#Forum access control
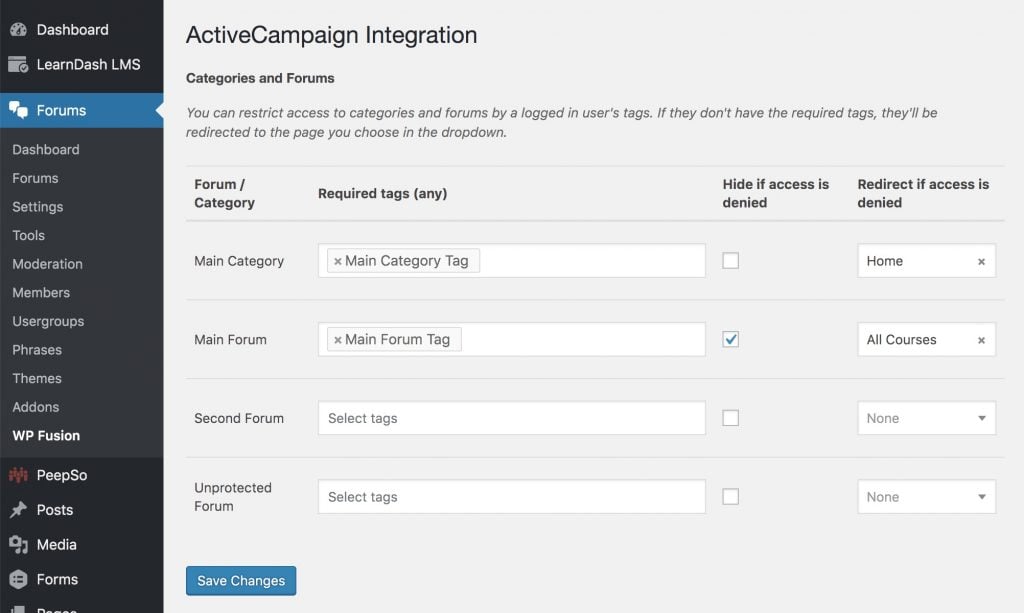
To set up forum access control, navigate to Forums » WP Fusion in the WordPress admin.

For each of your forums and categories, you can specify tags that are required to view that forum. If the user does not have any of the specified tags they will be redirected to a the page you select in the dropdown.
You can also check the box for Hide if access is denied to completely hide the restricted forum from the forums list.
#Usergroups
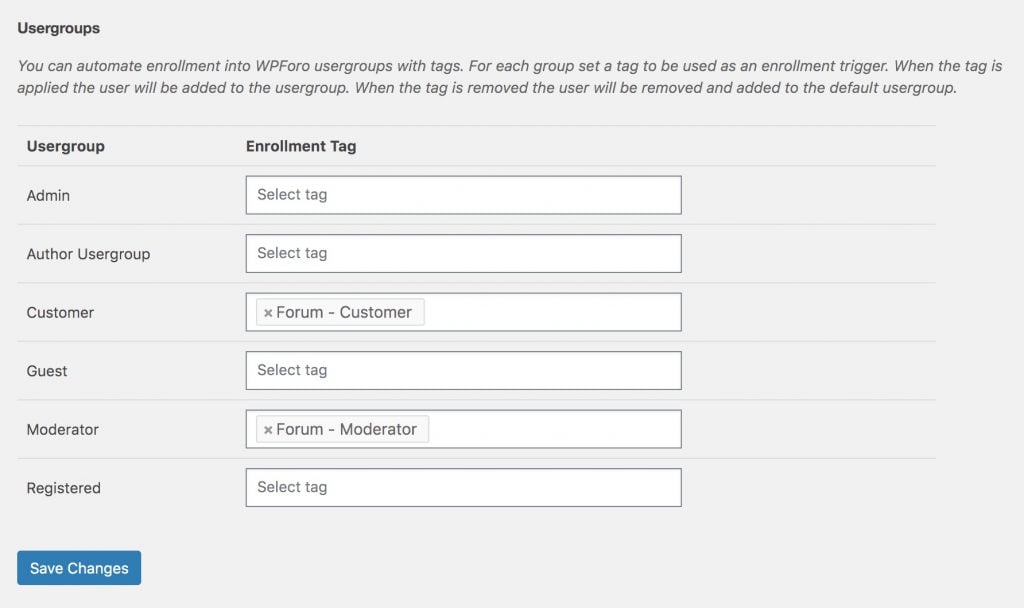
WP Fusion includes the ability to auto-assign usergroups in your forums by applying and removing tags in your CRM. This can also be configured under Forums » WP Fusion in the admin.

For each usergroup in wpForo you can select a tag in your CRM. When this tag is applied to a user they will be added to the associated usergroup. If the tag is removed they will revert to the default wpForo usergroup.
You can set the default usergroup in the wpForo settings under Forums » Usergroups.

#Was this helpful?

Let us know if you liked the post. That』s the only way we can improve.

Yes

No

wpf_woocommerce_apply_tags_checkout

wpf_woocommerce_apply_tags_checkout

#Overview
This filter is run during a WooCommerce checkout, before WP Fusion has applied any tags to the customer.  It can be used to modify the tags that will be applied to the customer. To use the code examples below, add them to your active theme』s functions.php file.
#Parameters

$apply_tags: This is an array of tags that will be applied to the customer
$order: The WooCommerce order object

#Examples
#Apply an additional tag if the order value is over $100
function high_value_tag( $apply_tags, $order ) {

if ( $order->get_total() > 100 ) {
$apply_tags[] = 'High value customer';
}

return $apply_tags;

}

add_filter( 'wpf_woocommerce_apply_tags_checkout', 'high_value_tag', 10, 2 );

#Was this helpful?

Let us know if you liked the post. That』s the only way we can improve.

Yes

No

wpf_salesforce_query_args

wpf_salesforce_query_args

#Overview
WP Fusion uses the Salesforce Object Query Language (SOQL) to search for records in your Salesforce account.
For example when searching for a contact record by email address, loading the tags or topics for a contact, and applying / removing tags or topics from a contact.
Before WP Fusion executes any Salesforce query, the query is passed through the wpf_salesforce_query_args filter, which allows you to modify the query before it』s sent.
#Parameters

$query_args (array): The query arguments
$method (string): The API method being performed
$searchfield (string): The value being searched for

The default query arguments, by method, are:
Method: get_contact_id
array( "q" => "SELECT Id from Contact WHERE Email = '{$email_address}'" )
Method: get_topics
array( "q" => "SELECT TopicId from TopicAssignment WHERE EntityId = '{$contact_id}'" );
Method: load_contacts
array( "q" => "SELECT EntityId from TopicAssignment WHERE TopicId = '{$topic_id}'" );
#Examples
#Use a custom email field for contact lookups
By default WP Fusion uses the Email field for looking up a contact ID. This example changes that lookup field to a custom field on a custom object type, Email__c:
function custom_wpf_query_args( $query_args, $method, $searchfield ) {

if ( 'get_contact_id' == $method ) {

// In this case the $searchfield is the email address we're trying to get the contact ID of
// The default value of wp_fusion()->crm->object_type is Contact

$query_args['q'] = "SELECT Id from {wp_fusion()->crm->object_type} WHERE Email__c = '{$searchfield}'";

}

return $query_args;
}

add_filter( 'wpf_salesforce_query_args', 'custom_wpf_query_args', 10, 3 );

#Was this helpful?

Let us know if you liked the post. That』s the only way we can improve.

Yes

No

Is WP Fusion hard to use?

Is WP Fusion hard to use?

「Is WP Fusion hard to use?」 That』s a question we get asked a lot.
The answer is yes, and no.
#Where it』s easy
When you first connect WP Fusion to your CRM, it will automatically configure itself based on the plugins you have installed on your site.
New users who register or customers who make a purchase will be added to your CRM as contact records with their name and email address, all automatically.
It』s a really easy, one-click solution to start syncing data from WordPress into your CRM.
#Where it gets hard
WP Fusion can connect a lot of different things between your CRM and across 70+ plugin integrations, and has a lot of advanced features that can be enabled.
As an example let』s say you want to:

Create a opt-in form in Elementor Forms which adds a contact to ActiveCampaign
Using Form Auto Login, the new lead is identified to both WP Fusion and the ActiveCampaign tracking script on form submission
You require the lead to watch at least 15 minutes of a video on the next page to get free access to your course. WP Fusion Media Tools applies a tag to the lead in ActiveCampaign when they hit the right timecode
This tag triggers an automation in ActiveCampaign which sends a webhook to WordPress, to create a new WordPress user account and generate a password
Using a linked tag in a LearnDash course, the new user is automatically enrolled in the free course
An automated email is sent from ActiveCampaign to the new student containing their login information

These kinds of setups are also possible with WP Fusion, and they can be super effective, but they necessarily require a lot more time and patience to set up.
You』d want to be comfortable with understanding how caching on your site might interfere with tracking guests, troubleshooting webhooks getting blocked by your firewall, reading the WP Fusion logs, and understanding how automations are processed in your marketing platform.
#Our advice
Our advice is to start with your goals. Figure out what you want to automate, what data is most valuable for you to track, and what』s going to make the biggest impact on your outcomes— whether that』s increasing member engagement, driving more sales, collecting more leads, or recovering more abandoned carts.
Then start slow with trying out new strategies and components one by one, and measuring their effectiveness.
The greatest frustration we see from customers is people who』ve turned on every setting and enabled every integration all at once. Suddenly people can』t log in, they』re getting un-enrolled from courses, or they』re getting unwanted emails.
With great power comes great responsibility. Go slow, and feel free to contact us at any time with any questions about your setup or strategy, we』re here for you.

#Was this helpful?

Let us know if you liked the post. That』s the only way we can improve.

Yes

No

wpf_import_user

wpf_import_user

#Overview
This filter runs when a new user is being imported, either via the import tool or a webhook. It allows you to modify a user』s meta data after it』s been loaded from the CRM, but before the new user has been inserted.
To use the code examples below, add them to your active theme』s functions.php file.
#Parameters

$user_meta: Array of user meta data, in the format array('meta_field' => 'value').
$contact_id: CRM contact ID of the user being imported

#Examples
#Set imported users to have usernames generated from their first and last names, instead of email address
function wpf_use_names_as_logins( $user_meta ) {

$user_meta['user_login'] = strtolower( $user_meta['first_name'] . $user_meta['last_name'] );

return $user_meta;

}

add_filter( 'wpf_import_user', 'wpf_use_names_as_logins' );
#Set imported users to have usernames generated from their first name and a random number, instead of email address
function wpf_use_names_as_logins( $user_meta ) {

$user_meta['user_login'] = strtolower( $user_meta['first_name'] ) . rand(10, 1000);

return $user_meta;

}

add_filter( 'wpf_import_user', 'wpf_use_names_as_logins' );

#Was this helpful?

Let us know if you liked the post. That』s the only way we can improve.

Yes

No

wpf_event_espresso_customer_data

wpf_event_espresso_customer_data

#Overview
This filter is run during an Event Espresso registration, after WP Fusion has extracted the customer data from the registration object. It can be used to sync additional data from an Event Espresso registration to custom fields in your CRM.
To use the code examples below, add them to your active theme』s functions.php file.
#Parameters

$order_data: This is an array of key value pairs representing WordPress meta fields and their corresponding values.
$registration: The Event Espresso registration object

#Examples
#Override attendee emails
This example overrides the email addresses of attendees to include the event name that the attendee registered for.
The email address synced to the CRM will then be formatted like email+{event_name}@domain.com
function alt_emails_for_attendees( $update_data, $registration ) {

$email_parts = explode( '@', $update_data['user_email'] );

// Convert [email protected] to [email protected]:
$update_data['user_email'] = $email_parts[0] . '+' . strtolower( $update_data['first_name'] ) . '@' . $email_parts[1];

// Or, __alternate method__: Convert [email protected] to [email protected]:
$event = $registration->event();
$event_name = sanitize_title( $event->name() );
$event_name = str_replace( '-', '_', $event_name );

$update_data['user_email'] = $email_parts[0] . '+' . $event_name . '@' . $email_parts[1];

return $update_data;

}

add_filter( 'wpf_event_espresso_customer_data', 'alt_emails_for_attendees', 10, 2 );
#Sync event meta
This example grabs two postmeta keys (custom_field_one and custom_field_two) off the Event Espresso event and merges them into the data synced to the CRM for the attendee. This can be used to sync additional event properties to the attendee』s contact record in the CRM.
To enable the custom fields for sync they must first be enabled for sync and mapped to custom fields in your CRM via the Contact Fields settings.
function sync_event_custom_fields( $update_data, $registration ) {

$event_id = $registration->event_ID();

$update_data['custom_field_one'] = get_post_meta( $event_id, 'custom_field_one', true );
$update_data['custom_field_two'] = get_post_meta( $event_id, 'custom_field_two', true );

return $update_data;

}

add_filter( 'wpf_event_espresso_customer_data', 'sync_event_custom_fields', 10, 2 );

#Was this helpful?

Let us know if you liked the post. That』s the only way we can improve.

Yes

No

Misc. FAQ

Misc. FAQ

#Can I generate an invoice / provide my VAT number?
Yes you can generate an invoice within your account area on our site. In the Purchases & Subscriptions section click Generate Invoice next to your order, and you』ll be able to provide your invoice details.
#Does WP Fusion work on WordPress multisite?
Yes, WP Fusion works on multisite WordPress installs. It is installed and configured at the site level, not the network level.
#Does WP Fusion work with Thrive products?
(Like Thrive Leads, Thrive Architect, and Thrive Apprentice)
No. Thrive products are coded in such a way that they』re not able to be extended by other plugins, and so we』re not able to make WP Fusion work with them (we』ve tried).
As an alternative to Thrive Architect, check out Elementor. It』s a much more powerful page builder and has a deep integration with WP Fusion.
As an alternative to Thrive Apprentice, check out LifterLMS. It』s a modern, powerful, LMS plugin with a wide ecosystem of extensions and is fully compatible with WP Fusion.
#Can I connect WP Fusion to multiple CRMs?
The short answer is no.
Because WP Fusion provides a bi-directional sync between your WordPress site and your CRM, it』s not practical to connect to multiple CRMs simultaneously.
In an ideal setup, your CRM or marketing automation platform is the hub of your business online, and the master record of your contacts and their data. Your WordPress site is a spoke connected to your CRM via WP Fusion.
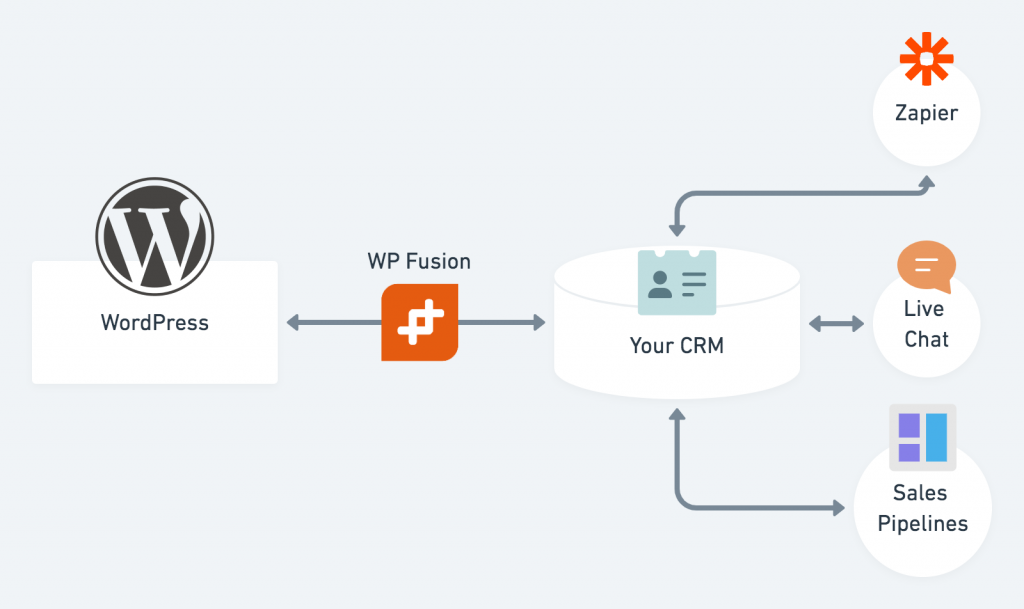
A good configuration
When you connect multiple platforms bi-directionally with WP Fusion, your WordPress site becomes responsible for keeping data in sync between your other services. For example an email address change in Intercom gets synced to WordPress, and then WP Fusion needs to sync it onwards to ActiveCampaign.
This will quickly overwhelm your website since it』s not optimized for routing data in real time between third-party services. For something like that Zapier is much more appropriate.
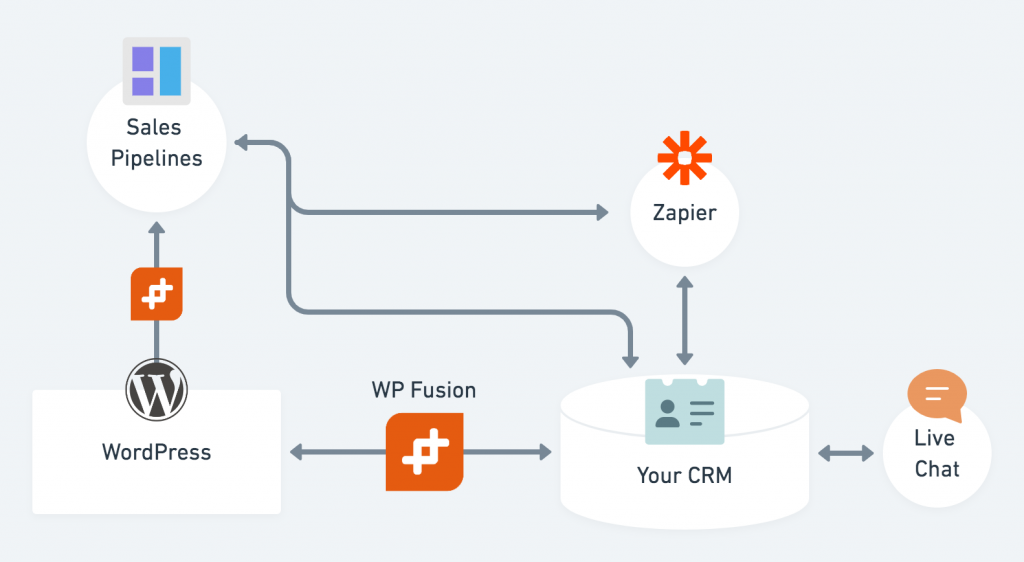
A bad configuration with multiple external services routing data through WordPress
#What are my options?
WP Fusion works best when it』s connected to your marketing automation platform, since it』s syncing data related to individual customers and contacts.
If you need to use an additional service in addition to this (for example Pipedrive to manage sales pipelines), it』s best to connect it directly to your marketing automation tool, with Zapier or another integration tool. Then you can trigger an opportunity to be created in your sales automation platform based on activity in your marketing automation platform.
In some cases you may want to trigger an outside service directly from WordPress. Using WP Fusion』s Webhooks / Zapier Addon you can ping an external URL based on user activity on your site, such as completing a course or making a purchase. Since this is a one-way sync of data, it doesn』t impact performance or create a risk of data loss.
#Why can』t I use multiple tags for auto-enrollments / Link With Tag?
WP Fusion includes a feature with most LMS and membership plugins that we call 「Link with Tag「. This lets you specify a CRM tag that can be used as a trigger to auto-enroll someone into a course or membership.
When the tag is applied the user is enrolled, and when the tag is removed the user is unenrolled.
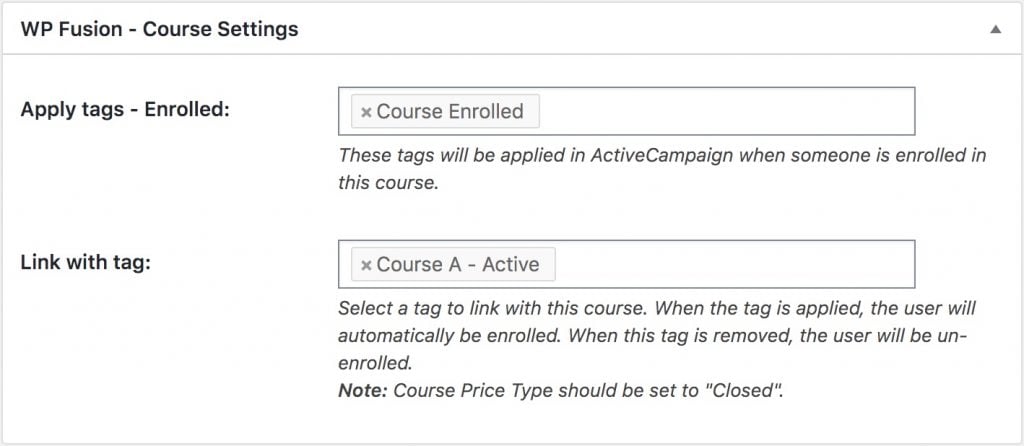
Auto-enrollment settings on a LearnDash course
The link with tag setting is limited to one tag, if you try to select more than one tag you will see a message saying 「You can only select one item「.
#Why can』t you select multiple tags?
The reason you can only select one tag is comes from the fact that the linked tag is also used as an un-enrollment trigger.
Look at the following example:
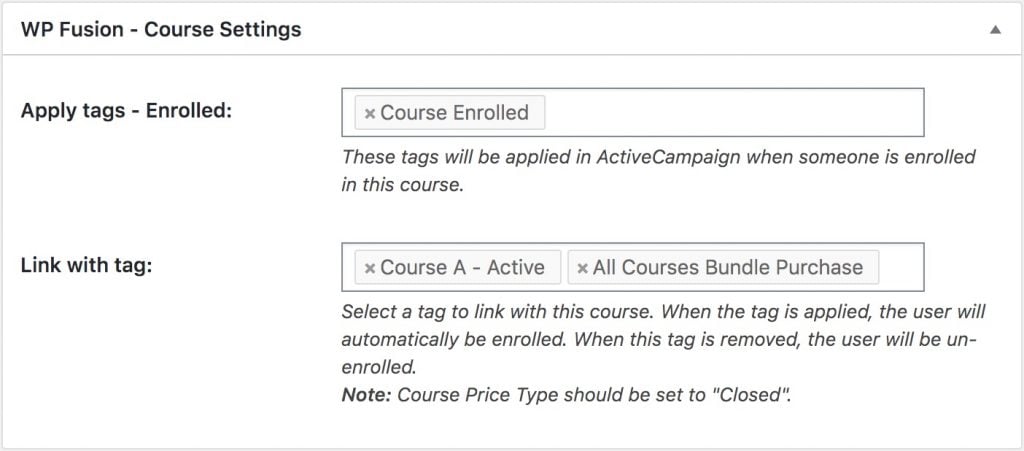
In this example, someone is selling access to courses individually by applying the Course A – Active tag, and also selling bundled course access by applying the All Courses Bundle Purchase tag.
Imagine a scenario where an admin needs to manually add a user to the course, or course access is granted by another plugin like WooCommerce or Uncanny Automator:

The user is enrolled in the course. However, if the linked tag isn』t applied, the user will be immediately removed from the course, since the linked tag is also an un-enrollment trigger
To keep the user from being unenrolled, WP Fusion must apply the linked tags whenever a user is added to a course, from any source
This applied both tags Course A – Active and All Courses Bundle Purchase
The All Courses Bundle Purchase tag is also linked with 4 other courses, this triggers the user to be enrolled in all of those courses as well
When the user is enrolled in those courses, they are auto-assigned those linked tags, Course B – Active, Course C – Active, Course D – Active, and Course E – Active
Now the user has access to all of the courses on your site and a bunch of undesired tags
In situations where you have a lot of courses or memberships linked together (i.e. 20+) this can also cause your website to crash, as the user is enrolled in everything on your site simultaneously and dozens of API calls are sent to your CRM

For this reason WP Fusion doesn』t allow you to use multiple tags for auto-enrollment triggers.
#How can I sell bundled courses using auto-enrollment tags?
A simple way to auto-enroll people into multiple courses is to simply apply all of the linked tags when a bundle purchase is made. Then by looking at a contact』s tags in your CRM you can easily see exactly which courses they are in. Removing a linked tag will unenroll them from that course, and a refund or subscription cancellation will remove all the linked tags and unenroll them from all the associated courses.
That works fine with a small bundle of two or three courses, but it ends up being a lot of tags if you have a large bundle, and becomes hard to manage.
There is a great alternative to that if you』re using either LearnDash or LifterLMS:
LearnDash
With LearnDash you can create a Group for your course bundle, and set a linked tag on this group.
In our example above, the All Courses Bundle Purchase tag would be associated with an All Access group. When the tag is applied the user will be added to the group, which then grants access to all courses, even though the user doesn』t have the linked tags from any of the individual courses.
Removing the linked tag removes the user from that group, and their course access is revoked.
LifterLMS
Likewise, with LifterLMS you can create a Membership for your course bundle, and set a linked tag on this membership.
In our example above, the All Courses Bundle Purchase tag would be associated with an All Courses membership. When the tag is applied the user will be added to the membership, which then grants access to all courses, even though the user doesn』t have the linked tags from any of the individual courses.
By using Groups or Memberships as an extra level of access control, you can create different overlapping bundles of access to your courses which still use a single linked tag for auto-enrollment.
#How do I use external shopping carts with WP Fusion?

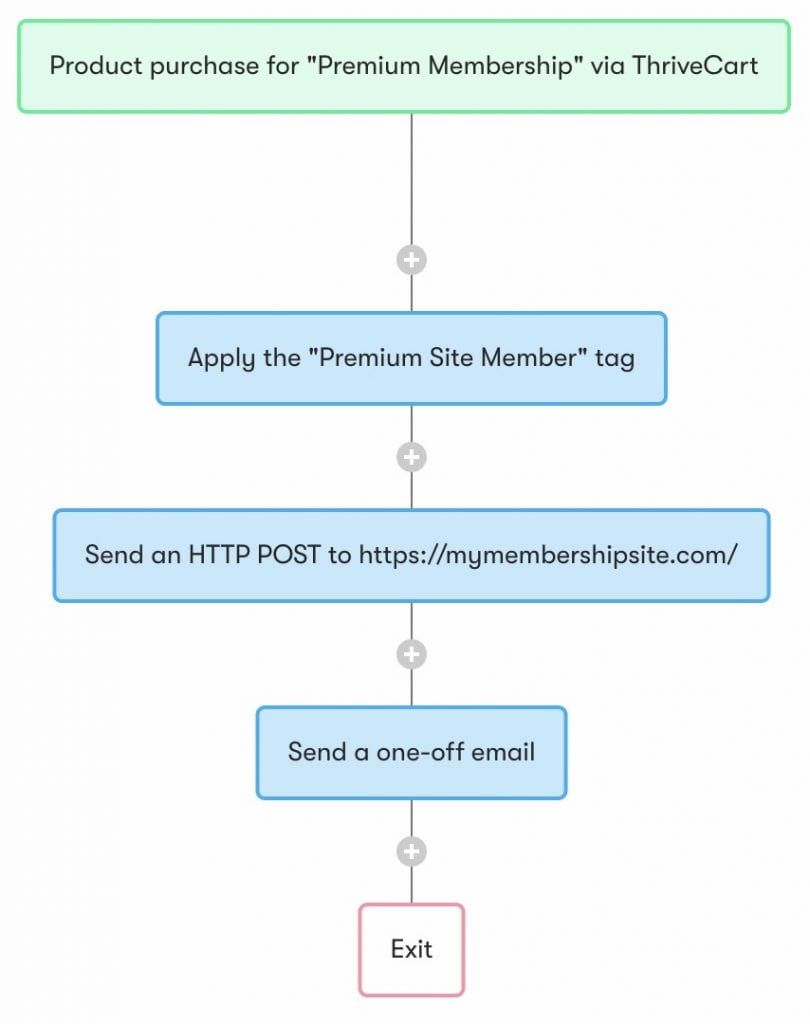
Any external system that connects to your CRM, like ThriveCart or SamCart, can be used with WP Fusion. The principles are universal, but at right you can see an example workflow using Drip.
The purchase in ThriveCart triggers the automation. Then a tag is applied to the new subscriber. This is the tag that you will use to unlock content in WordPress. Or it can be used to trigger an automated enrollment in any of our supported membership or LMS plugins.
After the tag is applied, a webhook is sent to your site. This tells WP Fusion to create a new WordPress user and load their tags. WP Fusion generates a password and stores it back in a custom field in Drip.
The final step is sending a welcome email with the subscriber』s password included. When they log into your site, they』ll be able to access their content right away.
#Was this helpful?

Let us know if you liked the post. That』s the only way we can improve.

Yes

No

wpf_meta_fields

wpf_meta_fields

#Overview
This filter lets you register custom meta fields to show up in the Contact Fields list. From there you can map them to a field in your CRM, and sync data either manually using push_user_meta() or automatically by registering the field using wpf_watched_meta_fields.
To use the code examples below, add them to your active theme』s functions.php file.
#Parameters

$fields: An array of fields to add

#Examples
The example below will add a new field for sync with key primary_membership.
function add_custom_meta_field( $meta_fields ) {

$meta_fields['primary_membership'] = array( 'label' => 'Membership', 'type' => 'text', 'group' => 'wordpress' );

return $meta_fields;

}

add_filter( 'wpf_meta_fields', 'add_custom_meta_field' );

#Was this helpful?

Let us know if you liked the post. That』s the only way we can improve.

Yes

No

wpf_event_tickets_attendee_data

wpf_event_tickets_attendee_data

#Overview
This filter is run during an Event Tickets registration, after WP Fusion has collected the event and attendee data. It can be used to sync additional data from an Event Tickets registration to custom fields in your CRM.
To use the code examples below, add them to your active theme』s functions.php file.
#Parameters

$update_data: (array) This is an array of key value pairs representing WordPress meta fields and their corresponding values.
$attendee_id: (int) The Event Tickets attendee ID

#Examples
#Override attendee emails
This example overrides the email addresses of attendees to include the event name that the attendee registered for.
The email address synced to the CRM will then be formatted like email+{event_name}@domain.com
function alt_emails_for_attendees( $update_data, $attendee_id ) {

$email_parts = explode( '@', $update_data['user_email'] );

// Convert [email protected] to [email protected]:
$update_data['user_email'] = $email_parts[0] . '+' . strtolower( $update_data['first_name'] ) . '@' . $email_parts[1];

// Or, __alternate method__: Convert [email protected] to [email protected]:
$event_name = sanitize_title( $update_data['event_name'];
$update_data['user_email'] = $email_parts[0] . '+' . $event_name . '@' . $email_parts[1];

return $update_data;

}

add_filter( 'wpf_event_tickets_attendee_data', 'alt_emails_for_attendees', 10, 2 );

#Was this helpful?

Let us know if you liked the post. That』s the only way we can improve.

Yes

No