ActiveCampaign Webhooks

ActiveCampaign Webhooks

#Overview
You can use webhooks in ActiveCampaign to send data back to your WordPress site using WP Fusion. Using webhooks you can create new users on your WordPress site based on automations in ActiveCampaign, or update existing users』 meta data and tags.
Note: As of March 2021, SiteGround』s anti-bot captcha system automatically blocks all incoming ActiveCampaign webhooks. If webhooks aren』t working on SiteGround, contact SiteGround support and ask for the bot protection to be turned off for your account.
Having trouble receiving webhooks? Check out our troubleshooting guide.
There are two ways to manage webhooks in ActiveCampaign, either via an Automation or in the Developer Settings.
#Automation Method
(Recommended) The automation method is best if you need to send a webhook to create or update a WordPress user as part of a specific process. For example:

Tag 「Website Access」 is added
Send webhook to create WordPress user
Send welcome email
Wait 3 days
Apply tag 「Unlock Course Two」
Send webhook to update tags

Using a webhook in an automation lets you easily visualize the entire automation flow, and see where individual contacts are in the process.
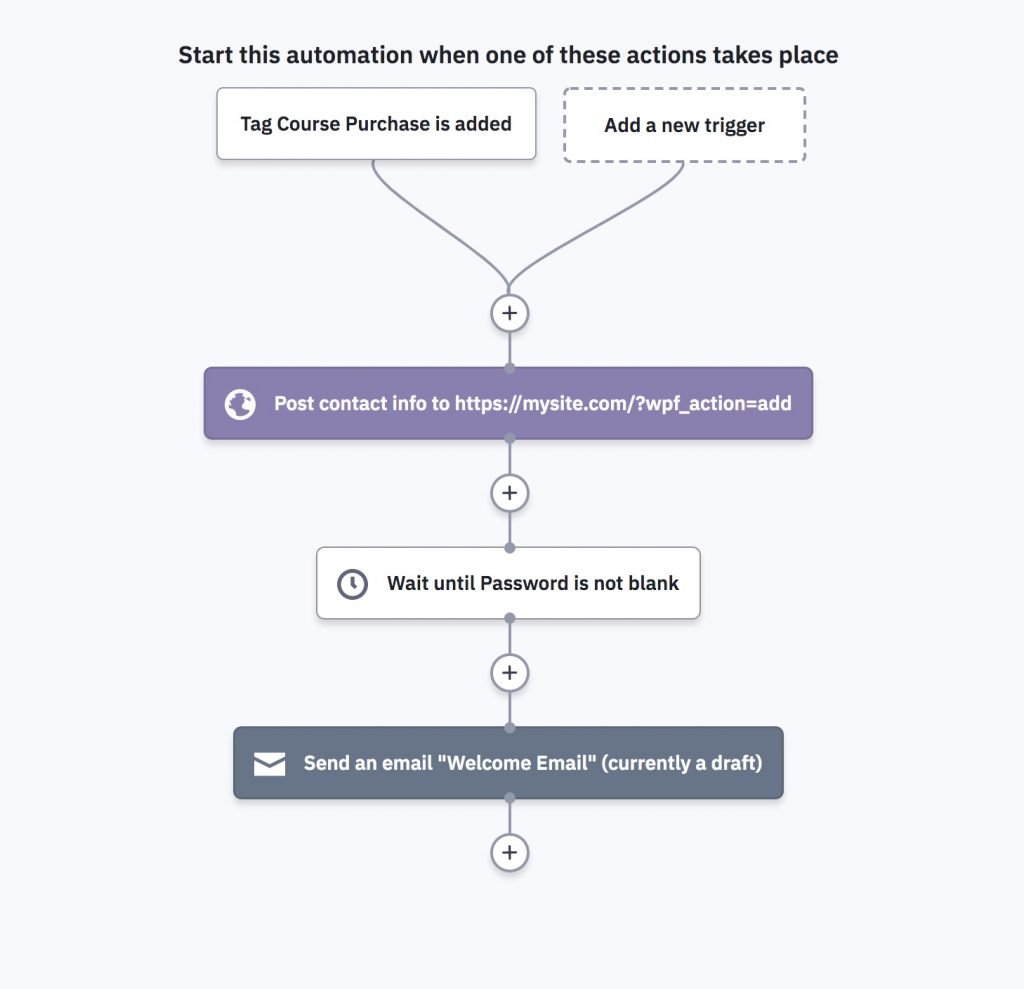
You』ll also be able to visualize where a single contact is in the automation, when the webhook was sent, and whether or not it was received successfully. Using webhooks in automations gives you a lot more control and better reporting than using Global Webhooks (see below).
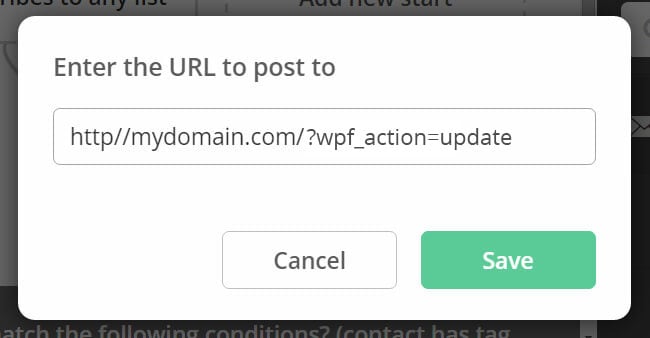
To use webhooks in automations first create an automation and add a webhook to it, like in the example above. You have three options for the webhook, update, update_tags and add (explained below). For each you will need to supply your access key, which can be obtained from the main panel in your WP Fusion settings.
ac-webhook2
When the contact reaches the webhook step in the automation ActiveCampain will notify WP Fusion to load the contact』s data from ActiveCampaign.
#A note on 「failed」 webhooks
When viewing automation reports you may see your webhooks being marked as 「failed」 by ActiveCampaign, like in the screenshot below.
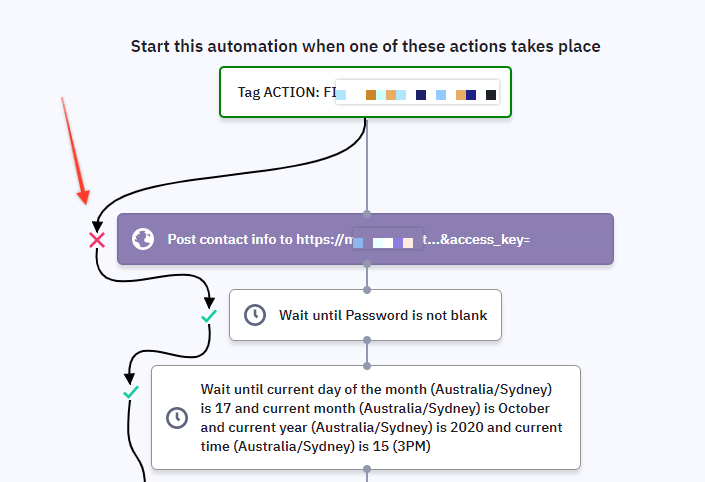
This does not necessarily mean that the webhook failed. ActiveCampaign will mark any webhook as failed if your server takes longer than 5 seconds to respond.
Since there』s a fair deal of processing involved in receiving a webhook (see some average timings here), it』s not uncommon for your server to take longer than 5 seconds, especially with shared hosting.
For a definitive answer as to whether the webhook was processed, you can check the WP Fusion logs.
If you』d prefer not to see the Failed symbol in the automation reports, you can also set your webhooks to run asynchronously.
This does not speed up the time required to process the webhook, or make webhooks more reliable, it just means that WP Fusion will immediately respond to ActiveCampaign that every webhook was successful, and then actually process the webhook a few seconds later.
#Developer Settings Method
(Advanced) You can also set up webhooks which are global to your account. This is best if you』re manually editing contact records in ActiveCampaign (outside of an automation) and need these changes synced to WordPress.
Note: It』s not recommended to set up global webhooks with the add method, as then every contact in ActiveCampaign will be given a WordPress user account.
To set up a webhook navigate to Developer » Webhooks in your ActiveCampaign admin settings, and click Add to create a new webhook.

Under Type select the events that should trigger the webhook.

For Initialize From, select which types of events should trigger the webhook. ActiveCampaign has a description of the types here.
You shouldn』t enable By the API as this will send a webhook after WP Fusion sends an API call to apply a tag, which is redundant.
Note that, despite the descriptions in the ActiveCampaign help portal, we have tested and found that tags applied in automations will trigger a global webhook if it is set to By an admin user. If you』re experiencing unexpected webhooks or a high volume of webhooks, it』s recommended to disable that trigger.
Help us our by voting on this feature request with ActiveCampaign to create a webhook trigger specific to manual contact edits.
Keep in mind that, because these webhooks are global to your ActiveCampaign account, bulk editing contacts will trigger webhooks to be sent to your site for every edited contact, which may make your WordPress site temporarily unstable.
Note: If you』ve set up global webhooks with the update or update_tags method it』s not necessary to also include those same webhooks in automations.
#Webhook URL parameters
You can format your webhook URL in a few different ways to customize the behavior:
#To update a user』s tags
To update an existing WordPress user』s tags from the contact record, the URL for the webhook should look like the following:
http://mydomain.com/?wpf_action=update_tags&access_key=YOURACCESSKEY
#To update a user』s tags and meta data
To update a user』s tags and pull any new meta data from ActiveCampaign for that contact, the URL for the webhook should look like the following:
http://mydomain.com/?wpf_action=update&access_key=YOURACCESSKEY
#Create a new user
To create a new user, use the following URL:
http://mydomain.com/?wpf_action=add&access_key=YOURACCESSKEY
You can also specify additional parameters in user creation. For example, to send the user a welcome email containing a link to log in on your site, use the following:
http://mydomain.com/?wpf_action=add&access_key=YOURACCESSKEY&send_notification=true
You can also specify a specific user role to be assigned to the new user. For example, to set the new user to the 「customer」 role, use the following:
http://mydomain.com/?wpf_action=add&access_key=YOURACCESSKEY&role=customer
Note that you have to have registered a 「customer」 role on your site for this to work. By default users will be assigned the role of 「subscriber」.
The add method will update a user if an existing user already exists. It will not create a duplicate user.
Note: By default, user accounts will be created with their email address as the username and a randomly generated password. However, if you have created a custom username field and password field in your ActiveCampaign application, and enabled these fields in WP Fusion for sync with user_login and user_pass on your website, the new users will be given the usernames and passwords stored in their ActiveCampaign contact record.
#User passwords
New user accounts will be created with an automatically generated password. If you』d like to use this password in your email marketing, you can send the password back to ActiveCampaign after it has been generated.
In the Webhooks section of the General settings tab, check the box for Return Password, and select a field in ActiveCampaign where the password should be stored.

After a new user is created, their automatically generated password will now be saved back to their contact record, and you can use a merge field to include it in an email. The username will be the contact』s email address.

#Was this helpful?

Let us know if you liked the post. That』s the only way we can improve.

Yes

No

Zapier Guide

Zapier Guide

#Overview
Using this addon with Zapier allows you to trigger Zaps when users register on your site, update their profile, or when a tag is applied or removed.
For an example we』ll set up a workflow that triggers an on-site message in Intercom when someone completes a course.
#Setup
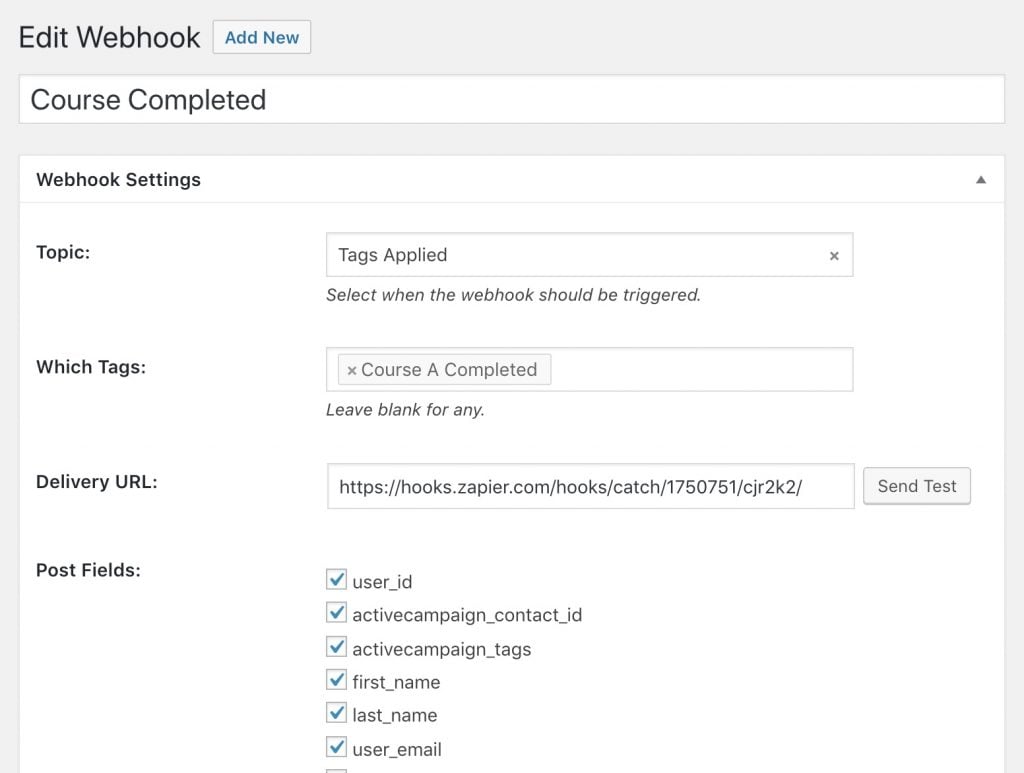
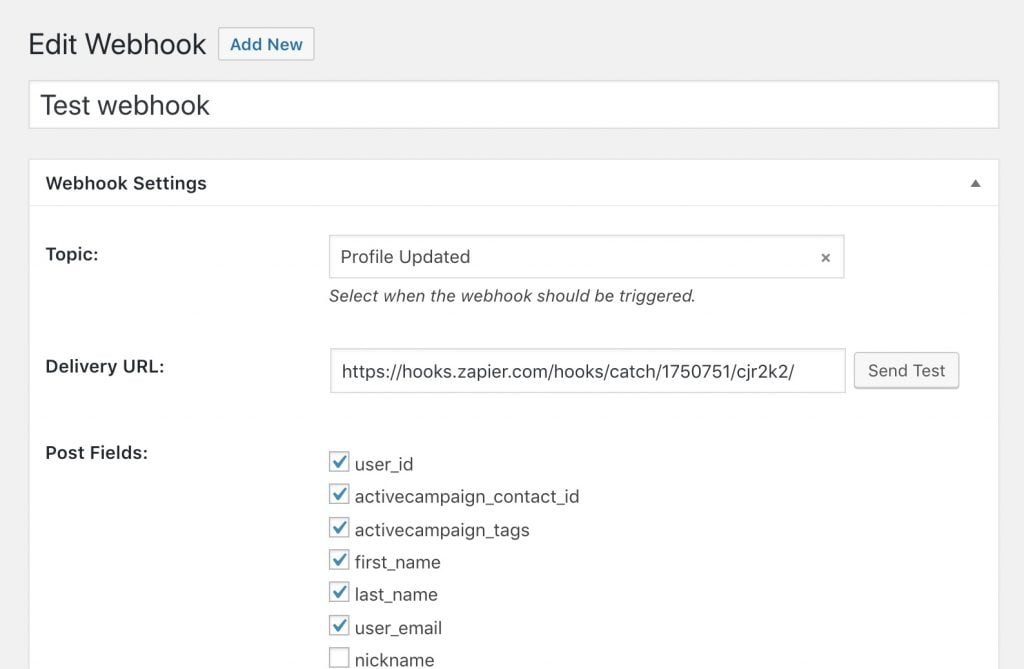
Navigate to Settings » WP Fusion and click on the webhooks tab to access the webhooks list. Click 「Add New」 to create a new webhook.

For the trigger select Tags Applied, and in the tag selection box select the tag that will be applied when the course is completed. For the Post Fields you』ll want to enable at least user_email so the user can be identified in Intercom.
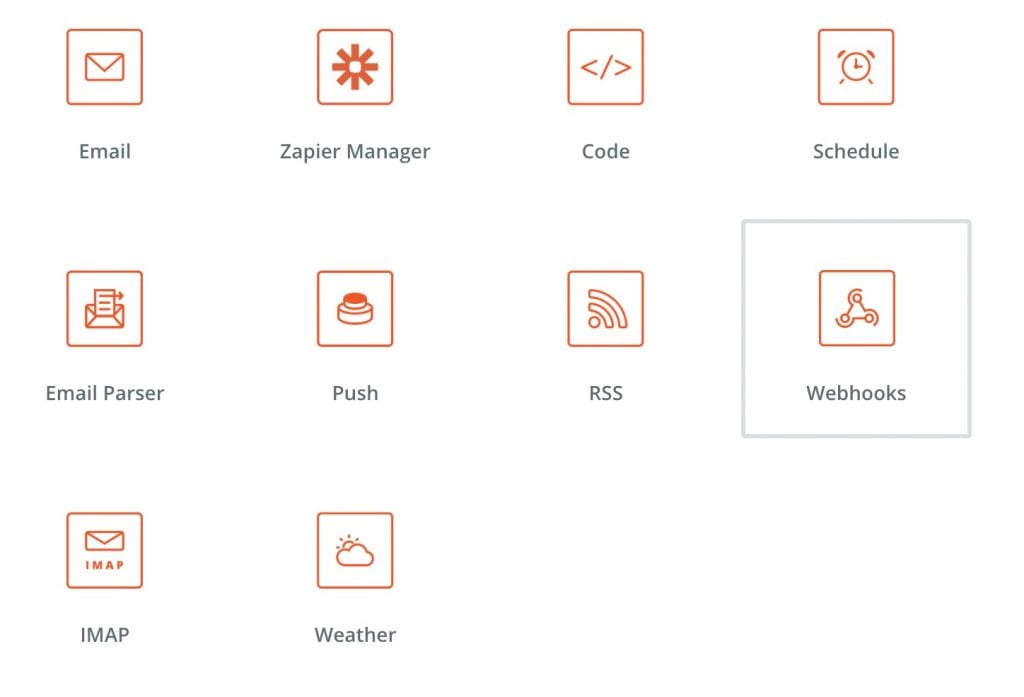
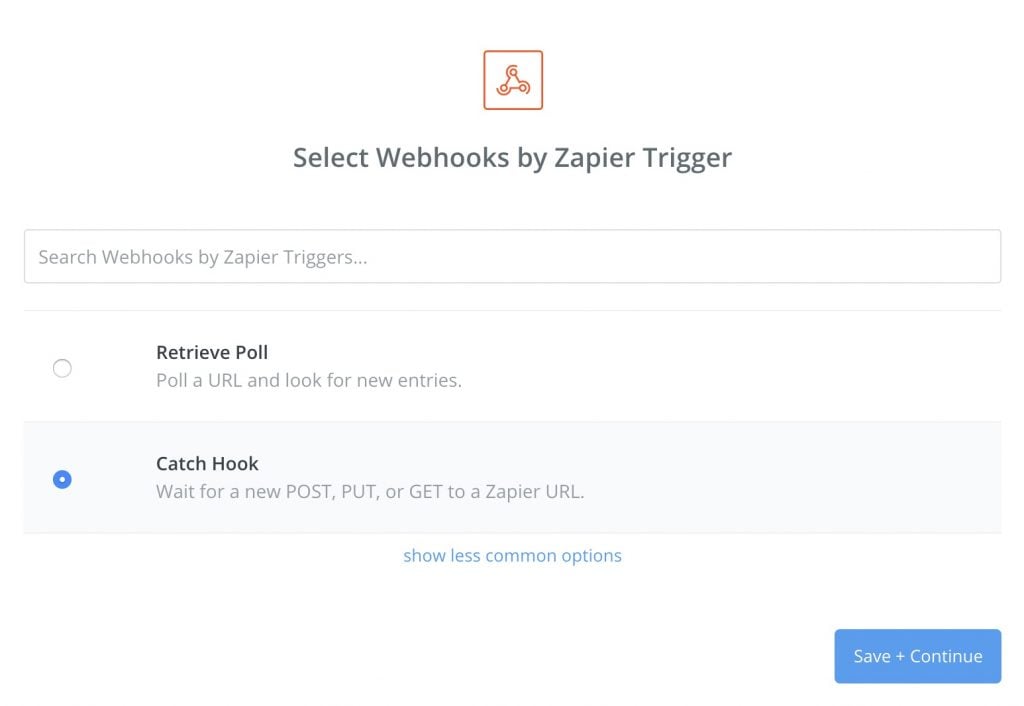
Then head over to Zapier and create a new Zap. For the trigger select Webhooks.


For the trigger type, select Catch Hook, and click Save + Continue.

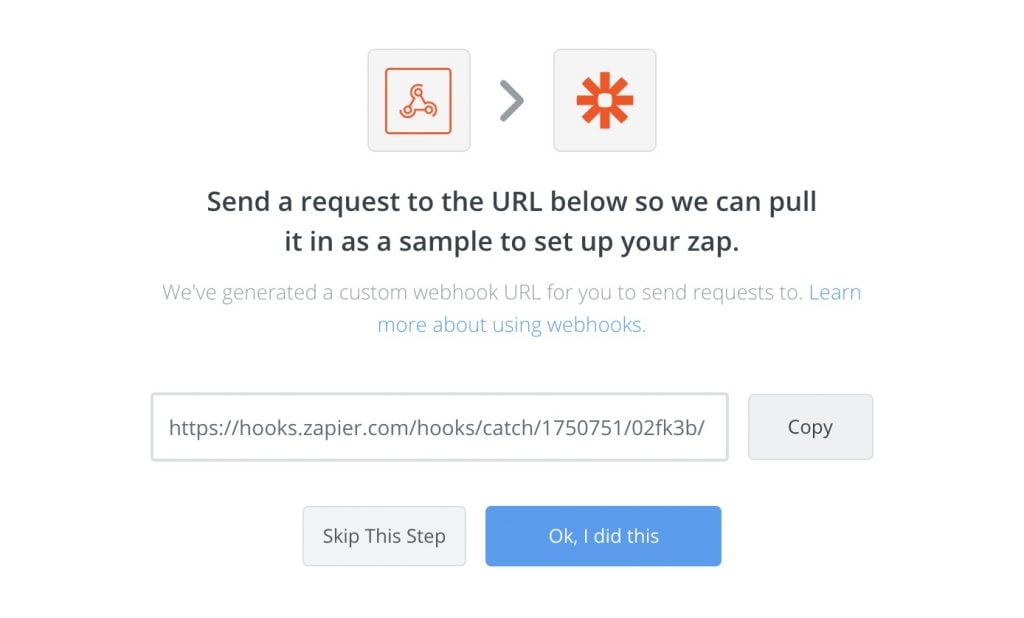
Zapier will give you a unique URL to use for your webhook. Copy this URL into the Delivery URL field in the webhook settings, and click the Send Test button. Then switch back to Zapier and click 「Ok, I did this」.
On the next page you should see your incoming webhook listed, and you can expand it to see all of the data that was captured. If everything looks right, proceed to the next step.
#Actions
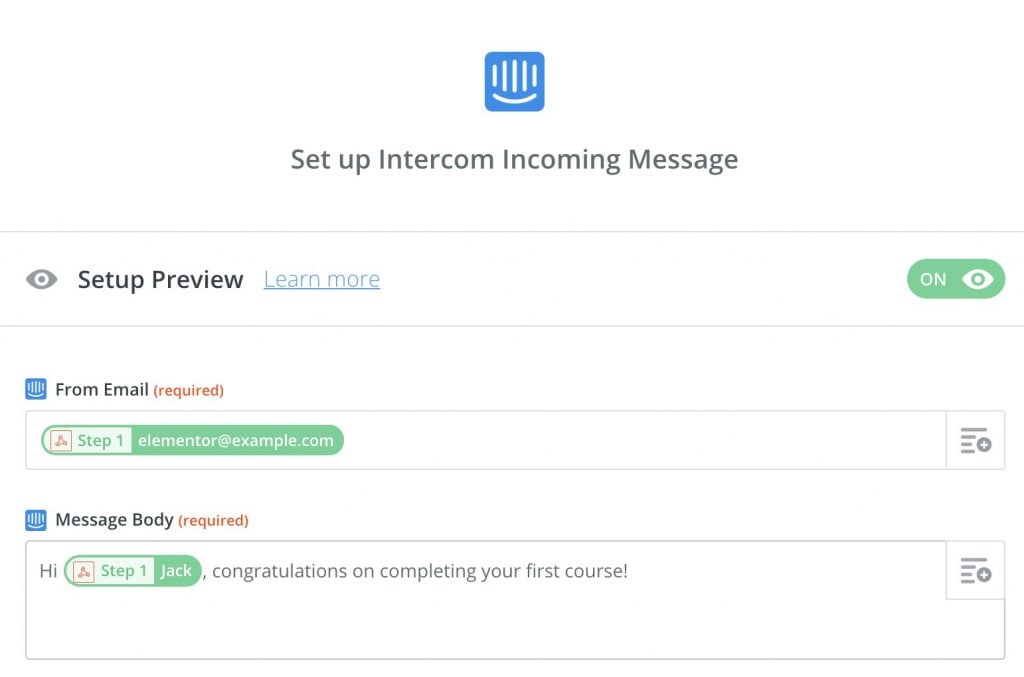
Now that the data is set up to be captured, you can use that data in any Zapier action. Here we』ve created a 「Incoming Message」 action in Intercom, which uses the data from the webhook to target the user and personalize the message.

You can use the 「Insert A Field」 button to insert any dynamic data from the webhook.

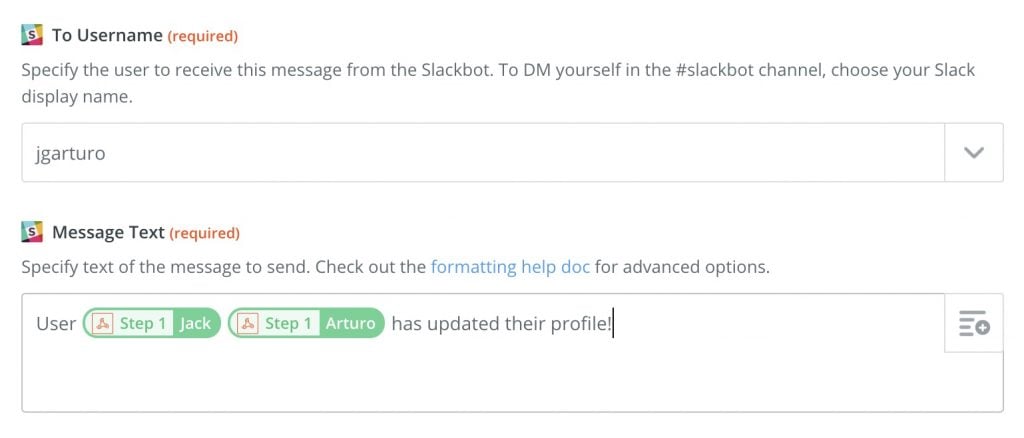
Above is another example, sending a direct message in Slack when a webhook has been received. If you use Slack to support your membership community you could use this to automatically congratulate members in a Slack channel when they reach goals on your website.

#Was this helpful?

Let us know if you liked the post. That』s the only way we can improve.

Yes

No

Overview

Overview

#Overview
The Webhooks addon (or 「Zapier addon」) allows you to ping a third party URL when events happen in WP Fusion, similar to WooCommerce』s webhooks. This is advanced functionality, so if you』re not sure if you need it, you probably don』t.
We advise you to keep as much of your automation rules and sequences in your CRM as you can, but sometimes that』s not possible and in those cases this addon can fill the gap.

The available triggers are:

User registered
Profile updated
Tags applied (can specify which tags)
Tags removed (can specify which tags)
Tags modified
Form submitted

The available fields are any fields in the wp_usermeta table, as well as the user』s contact ID and tags.
When using the Form Submitted trigger any data submitted with the form will be included in the webhook payload.
#How it works
When the selected event is triggered, the enabled fields will be extracted from the database and sent to your selected webhook URL.
Note that the only data that can be synced is data attached to the current logged in user in the wp_usermeta table of your database.
#How it works – Form submitted
The Form Submitted trigger is a bit different in that it pings your webhook URL with the same data that WP Fusion has just sent to your connected CRM. This is the only trigger that works with visitors who aren』t logged in to your site.
 
#Supported services
#With Zapier
Using this addon allows you to trigger Zaps when users register on your site, update their profile, or when a tag is applied or removed.
An example use case is someone who is using Ontraport as their primary tool for CRM and marketing automation, but wants to trigger an on-site message in Intercom when a course is completed. For a walkthrough on that scenario, check out our Zapier guide.
Because the data is sent from WordPress to Zapier, the Zaps are processed instantly, which means this tool can be used effectively even with a free Zapier account.
#With Zoho Flow
Zoho Flow can also capture the incoming data and route it across the various Zoho apps. This lets you update invoices, companies, leads, and other objects in Zoho that would normally be inaccessible to WP Fusion.
#With other services
This addon can be used with any service that can capture an incoming webhook, like IFTTT, Automate.io, or even your own custom script or application.

#Was this helpful?

Let us know if you liked the post. That』s the only way we can improve.

Yes

No
Changelog

Changelog

1.3.1 - 10/24/2019

Submitted form data will now be included in Register and Update webhooks

1.3 - 8/5/2019

Added "Form Submitted" trigger
Fixed tag setting box not saving when empty

1.2 - 2/7/2019

Added check all and uncheck all option for Post Fields setting
Fix for data in wp_users table not being sent

1.1 - 12/22/2018

Fixed "Send Test" button for unpublished webhooks

1.0 - 12/21/2018

Initial release

#Was this helpful?

Let us know if you liked the post. That』s the only way we can improve.

Yes

No
ThriveCart

ThriveCart

#Overview
Using WP Fusion with ThriveCart you can create a success URL pointed at your site that will create a new WordPress user and log them in so they can access their purchased content.

Heads up! This is an advanced feature. It is one of the more difficult things to set up with WP Fusion. It often requires extra configuration time and doesn』t work reliably on all hosts. If you』re not comfortable debugging webhooks and running multiple tests, then consider selling your products with WooCommerce.

#Setup
First enable the setting for ThriveCart Auto Login from the Advanced settings tab in WP Fusion.

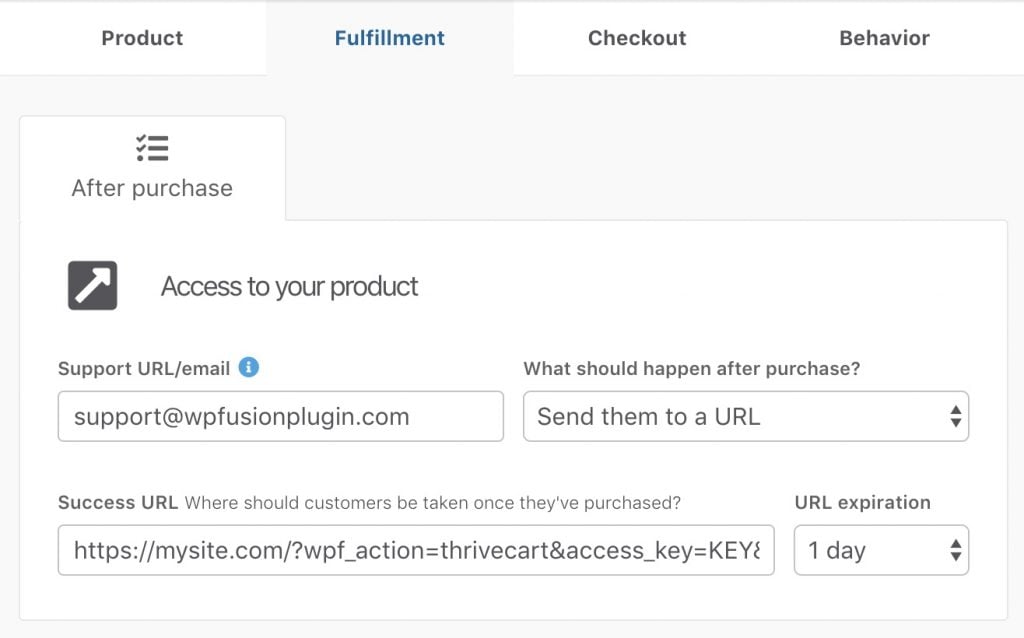
Then in ThriveCart on the Fulfillment tab for your product, choose Send them to a URL for the What should happen after purchase?  setting.

An example URL will look like https://mysite.com/?wpf_action=thrivecart&access_key=KEY&apply_tags=Membership%20Tag.
There are a few parts to this

https://mysite.com: This is the URL to your website. It can be the home page or any other page on your site.
?wpf_action=thrivecart: This tells WP Fusion to receive the data from ThriveCart, create a new user, and log them in.
&access_key=: This is the access key from the bottom of the General settings tab in WP Fusion.
&apply_tags=: Here you can optionally specify tags to be applied for the new user, for example to unlock content or trigger an automated enrollment.
You can use either tag IDs or tag names, separated by commas. The tags must be URL encoded. You can use urlencoder.org to encode your tags. For example &apply_tags=Tag%20One%2CTag%20Two

For more information on how to use success URLs in ThriveCart, see this article.
#How it works
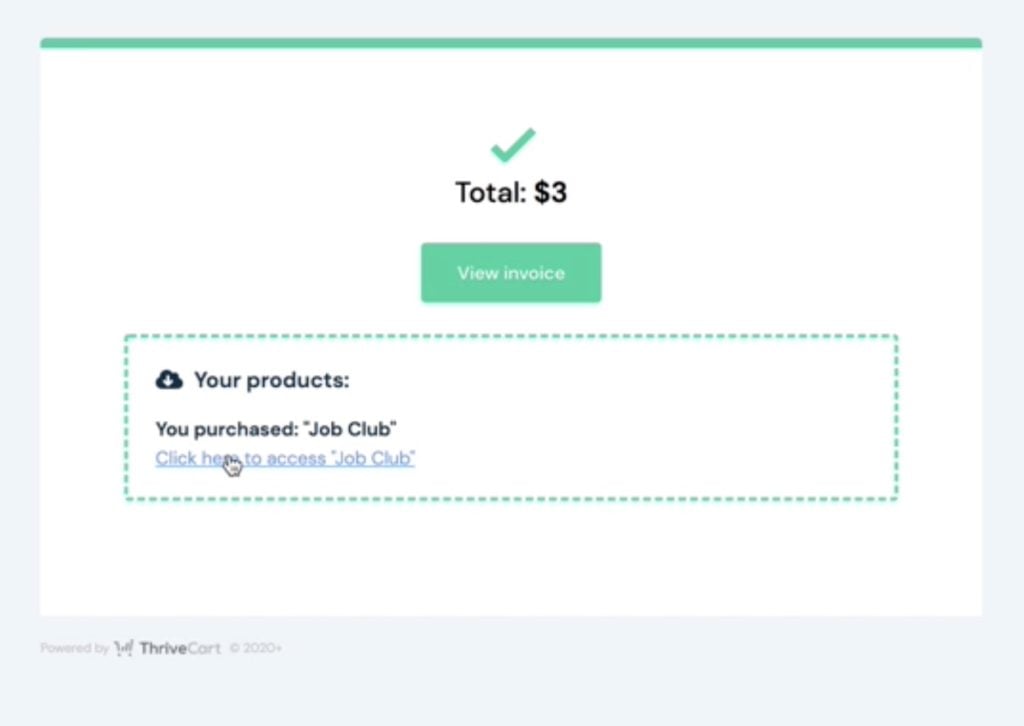
When a customer checks out they』ll click the access link to be taken to your site. When WP Fusion detects the ThriveCart link it will create a new user based on the details provided at checkout.
The customer must click the Click Here to Access link after checkout, or else no data will be synced.
The new user will be added to your active CRM, and any tags you』ve specified will be applied.
The new user will automatically be logged in and able to access their purchased content.
If a user already exists with the same email then the new tags will be applied and the existing user will be logged in.

Note: No data is sent to your site until the customer clicks the access link on the order confirmed page. If the customer doesn』t click the link, they won』t receive a new user account. For that reason it』s recommended to also connect ThriveCart to your CRM via a behavior rule, and use a webhook to ensure a user account is always created.

#Passwords
A random password will be generated for the new user.

If you』ve enabled the setting for Return Password from the WP Fusion settings then this password will be sent back to the specified custom field in your CRM.
You can then send the user a welcome email containing their password.
#Welcome email
For the best deliverability it』s recommended to send the welcome email containing the new user』s password from your CRM. However if you would prefer WordPress to send the welcome email, you can append &send_notification=true to your success URL.
WordPress will then send out the default welcome email inviting the new user to set their password.
#Troubleshooting
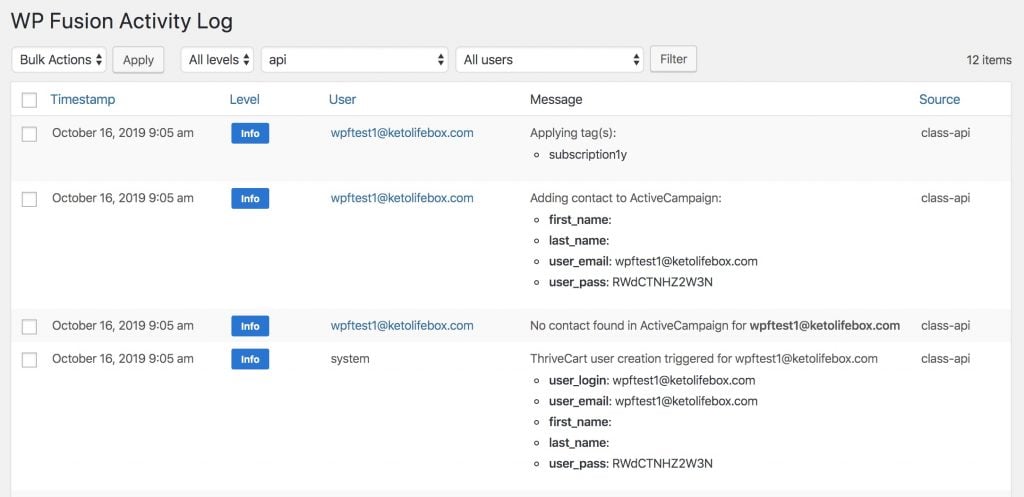
The first step in troubleshooting the ThriveCart user creation is to enable the WP Fusion activity logs. When a customer lands on the success URL, the logs will show the data that』s received from ThriveCart.

You will see a message ThriveCart user creation triggered, followed by the data that was loaded from ThriveCart. The logs will also show the password that was generated, and any tags that were applied.
If you』re having trouble with ThriveCart success URLs, please contact our support.
#Video – ThriveCart

#Was this helpful?

Let us know if you liked the post. That』s the only way we can improve.

Yes

No
Sync Users Between Sites

Sync Users Between Sites

#Overview
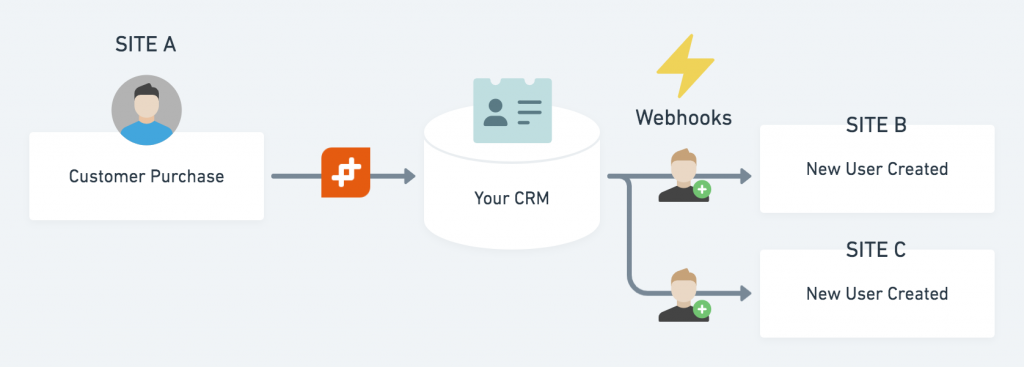
If you have a sales site separate from your learning or membership site, you』ll need to keep users in sync between the two sites. You may also want to keep user passwords in sync, and enable single-sign-on, so users only have to log in once.
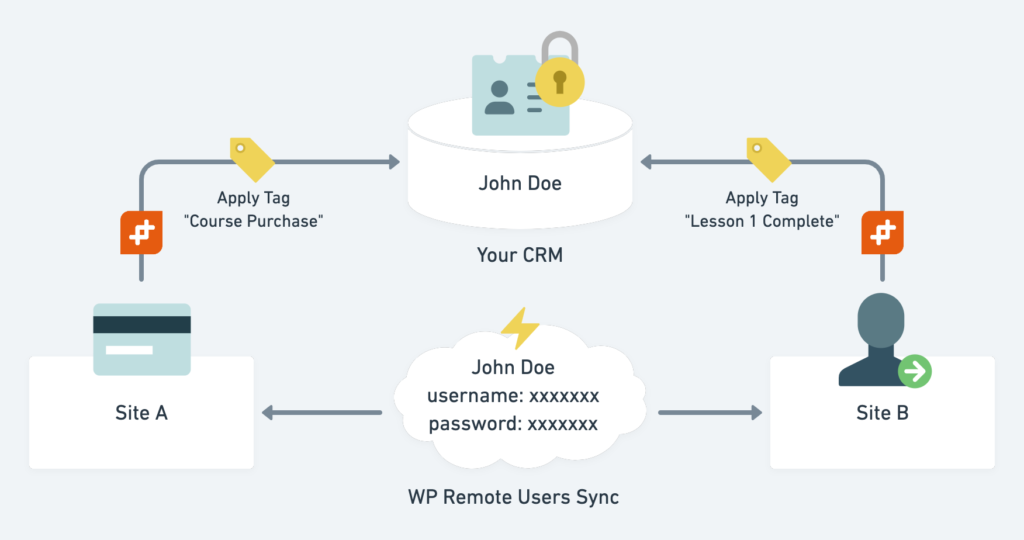
Because WP Fusion uses tags in your CRM or marketing automation platform to grant access to content, a tag applied on Site A can unlock content on Site B (or C, D, and E).
For example, a WooCommerce purchase applies a tag to the new customer on Site A, which then triggers an automatic enrollment into a LearnDash course on Site B.
#Setup and strategy
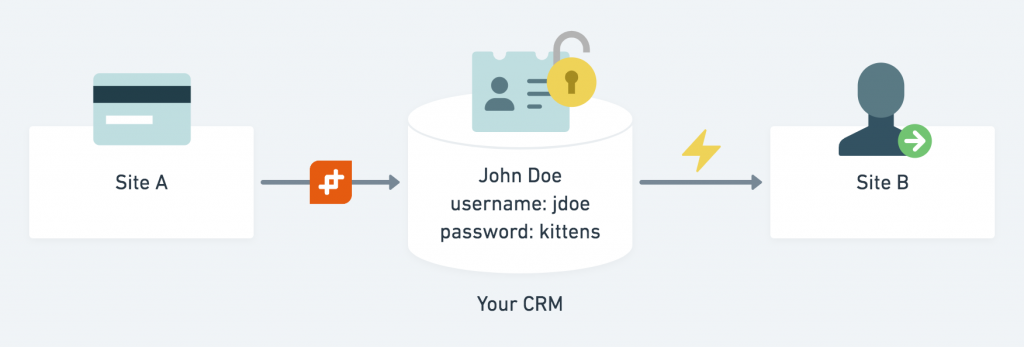
While WP Fusion can be used to sync user accounts between sites, we don』t recommend it because to keep passwords in sync they need to be stored in plain text in your CRM, which is a major security concern.
When you use your WP Fusion to sync users between sites, your user passwords end up stored in your CRM in plain text
For that reason we recommend using a plugin that allows you to sync user data directly between the sites, such as WP Remote Users Sync or Uncanny Automator.
It』s preferable to sync user passwords directly between your sites, and then WP Fusion can sync non-sensitive data such as tags with your CRM
In that scenario, WP Fusion can still connect both sites to your CRM, but it will just be responsible for applying tags and syncing other non-sensitive information.
#Using WP Remote Users Sync
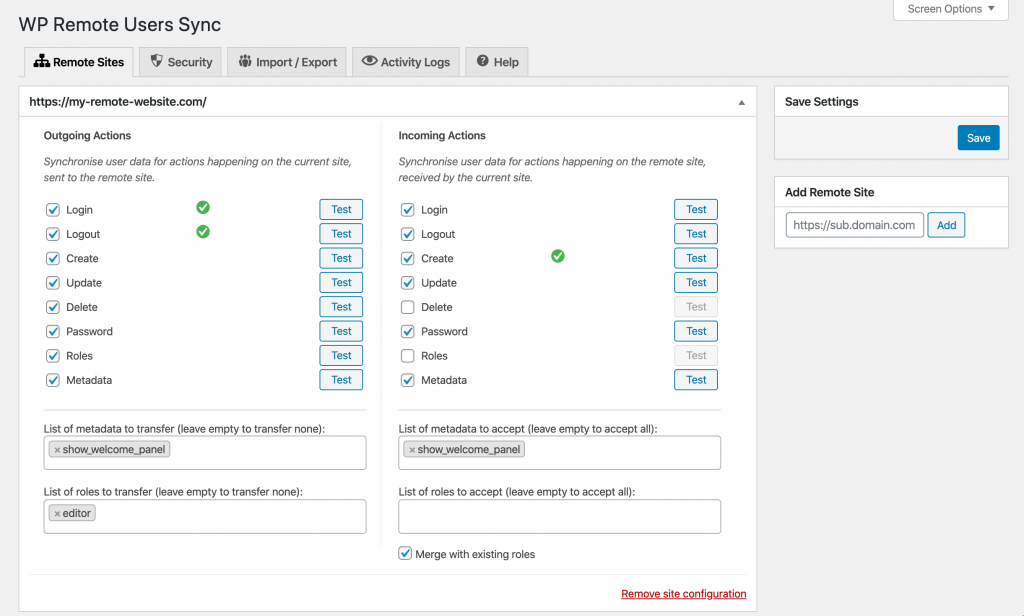
Our recommended solution syncing users between sites is with the WP Remote Users Sync plugin.
It lets you connect your sites directly to each other, so new user accounts are immediately created on your membership site when a customer registers on your sales site.

It also enables single sign on, so customers don』t need to log in a second time on your membership site.
#Example
For example if you wanted to sell a product with WooCommerce on Site A, and deliver access to a course on Site B, you would first set up your WooCommerce product to apply an access tag via WP Fusion, and then in your course use that same tag for auto-enrollment (for example with LearnDash or LifterLMS).
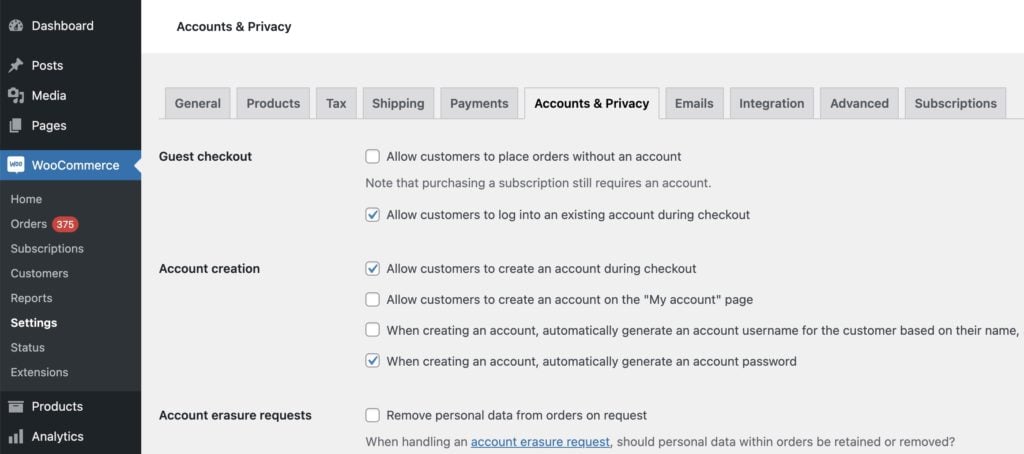
You would then connect Site A to Site B using WP Remote Users Sync, and make sure that guest checkout is disabled in the WooCommerce settings.
Make sure that guest checkout is disabled in the WooCommerce settings on Site A.
Now, when the customer checks out, they will automatically be logged in to their new user account.
WP Remote Users Sync will sync the new user to Site B, along with their tags and logged-in status. This means the customer doesn』t have to log in again to access their course on Site B.

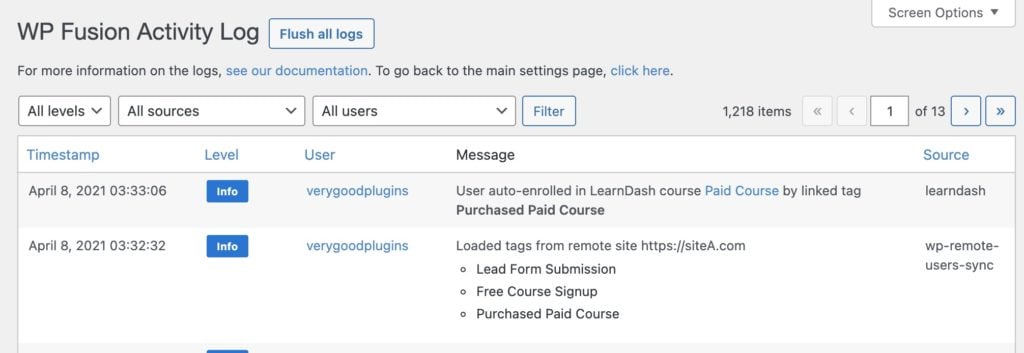
When the tags are loaded on Site B, WP Fusion will automatically enroll the new user into any courses linked to those tags, and record a message in the logs.
For more information on setting up WP Remote Users Sync, see our documentation.
#Using Uncanny Automator
Uncanny Automator allows you to set up a webhook between two sites which automatically creates a new WordPress user. You can use this to have your checkout on one site which automatically creates a user and enrolls them into a course on a second site.
For more info on using Uncanny Automator to sync users between sites, see this tutorial.
#Using WP Fusion
It』s also possible to sync user accounts between multiple websites with WP Fusion, using your CRM to store the data and push it onwards to multiple sites. This method is more advanced and requires additional setup, but doesn』t require installing another plugin.
#No user account
The simplest way to use WP Fusion to sync user data is to require guest checkout on your sales site. In this case WP Fusion syncs your customer data to your CRM, but no user account is generated on the sales site (so there』s no password that needs to be synced).
Then you can create an automation in your CRM that sends a webhook to Site B, with wpf_action=add in the webhook URL. This will create a new user account, generate a random password, and enroll the new user in any purchased courses or memberships.
This is quite secure because the password is randomly generated, and relatively easy to manage because once the user account has been created, the user only exists on that one site (you』re not trying to keep passwords and other details in sync on an ongoing basis).
#Syncing user accounts
Using WP Fusion it』s possible to sync a user』s user name and password to custom fields on their contact record in your CRM.
To do this enable the fields user_login and user_pass for sync from the Contact Fields tab in the WP Fusion settings, and select corresponding custom fields in your CRM in which to store the data.
You can then set up WP Fusion on a different WordPress site, and use WP Fusion to pull the latest user name and password from your CRM, effectively keeping your customer logins in sync across two or more WordPress sites.

#Setup
To set up the integration, first navigate to the Contact Fields tab and click the check boxes next to Password and Username to enable them for sync.

Then go to the General Settings tab and make sure the checkbox next to the Push option is checked.
Note: All data is synchronized with SSL encryption but passwords are stored in your CRM application as plain text. Make sure that everyone who has access to your application is trusted before you choose to synchronize passwords.
Now, when a user creates an account or updates their information, their username and password will be synced to to your CRM. You』ll then want to configure a webhook to push the information to the other site(s).

#Was this helpful?

Let us know if you liked the post. That』s the only way we can improve.

Yes

No
Switching CRMs

Switching CRMs

#Overview
The time may come when you need to move from one marketing automation platform to another. Thankfully WP Fusion makes this pretty easy. Here are the steps:
#1. Move your data
To ensure that no data gets lost in the transfer, the best way to move your contacts over is to do an export of all contacts from your old CRM and import that data into the new CRM.
Make sure that your contacts』 tags get transferred over, as WP Fusion can』t migrate contact tags between platforms.
#2. Clear out linked tags
If you』re using 「Linked tags」 to trigger automated enrollments into courses or membership levels, it works best if you remove the linked tags before switching CRMs.
Since every user』s tags will be updated during the migration, this could cause people to temporarily be removed from courses or membership levels. After you』ve connected to your new CRM you can go back in and restore the tag link settings.
#3. Reset WP Fusion
Go to Settings » WP Fusion » Advanced and check the box at the bottom for Reset Settings. Save the settings.
#4. Connect
Select your new CRM from the dropdown, enter your API credentials, and click Test Connection. Once it』s connected save the settings.
WP Fusion will continue to work in the background on matching up your existing users with their new contact IDs in your new CRM, and loading their tags.
#5. Update your settings
The only settings that have been completely reset are the main WP Fusion settings. You』ll want to go through those and re-associate any WordPress fields with custom fields in your new CRM, and generally make sure everything is configured how you』d like.
If you are using any of our form integrations, like Gravity Forms, make sure you edit your form feeds to use the new custom fields as well.
The next part depends on what you』re switching from, and what you』re switching to, and has to do with whether the CRM supports creating new tags 「on the fly」.

For example in switching from ActiveCampaign to Drip, no additional configuration is required. Your products, membership levels, and courses will all continue to use the same tags from ActiveCampaign.
If you』re switching from a CRM with numeric tag IDs, like Infusionsoft or Ontraport, to one without, like Drip, then you will need to go through and update all of your tagging settings across all of your content. Until you do you will continue to see numeric IDs applied as tags instead of the new tag names. To troubleshoot any mystery tags being applied we recommend turning on WP Fusion』s activity logs.
If you』re switching between CRMs with numeric tag IDs, like from Infusionsoft to Ontraport, you will also need to update all your tagging settings.

For a list of platforms that support 「Dynamic Tags」, see the compatibility table.
Switching between any two platforms that support Dynamic Tags does not require any additional reconfiguring of your products or access rules— all of your tags will copy over automatically.

#Was this helpful?

Let us know if you liked the post. That』s the only way we can improve.

Yes

No
Site Tracking Scripts

Site Tracking Scripts

#Overview
For your convenience, WP Fusion includes bundled copies of the site tracking scripts for:

ActiveCampaign
AgileCRM
Bento
Drip
Emercury
EngageBay
HubSpot
Infusionsoft
Mautic
and Ontraport

To enable site tracking, check the box on the main WP Fusion settings page, on the General settings tab.

Once enabled, visitors and users will be tracked using each CRM』s tracking methods, and tracking data will appear on contact records in your CRM.
#How it works
#ActiveCampaign
Site tracking data shown in the ActiveCampaign contact record.
In addition to loading the ActiveCampaign site tracking script in the footer of your site, WP Fusion will also identify any logged in users to the tracking script by email address. This also works with auto login links and form auto login.
In cases where a guest (not logged-in) makes a purchase or fills out a form using a supported form plugin, WP Fusion will try to set a cookie wpf_guest, containing the person』s email address.
When this cookie is present, the email address in the cookie will also be passed to the ActiveCampaign site tracking script. This makes it possible to start tracking a site visitor after a guest checkout or form submission, despite them not having a user account on the site,
#AgileCRM
Site tracking data shown in the AgileCRM contact record.
In addition to loading the AgileCRM site tracking script in the footer of your site, WP Fusion will also identify any logged in users to the tracking script by email address. This also works with auto login links and form auto login.
#Bento
With Bento site tracking enabled, you』ll be able to see your visitors pageviews in Bento, as well as initial landing page and geo location.
In addition to loading the Bento site tracking script in the header of your site, WP Fusion will also identify any logged in users to the tracking script by email address.
This also works with auto login links and form auto login.
#Drip
Site tracking data shown in the Drip contact』s Activity Log.
In addition to loading the Drip site tracking script in the footer of your site, WP Fusion will also identify any logged in users to the tracking script by email address. This also works with auto login links and form auto login.
#Emercury
To enable Emercury site tracking, check the box for Site Tracking on the General tab in the WP Fusion settings.
Note that you must be on a Pro or Scale plan with Emercury to use site tracking. If site tracking is not available for your account, WP Fusion will display an error message when you attempt to enable site tracking.
For site tracking to work you need to add your site』s domain inside the site tracking settings of your Emercury account. For more information on how site tracking works with Emercury, see this guide.
If your users are logged in or otherwise identified to WP Fusion (for example via an Auto Login Link) WP Fusion will also pass the user』s email address to the tracking script, which will associate their activity with their corresponding Emercury contact record.
#EngageBay
To enable EngageBay』s site tracking, first check the box for Site Tracking in the WP Fusion settings.

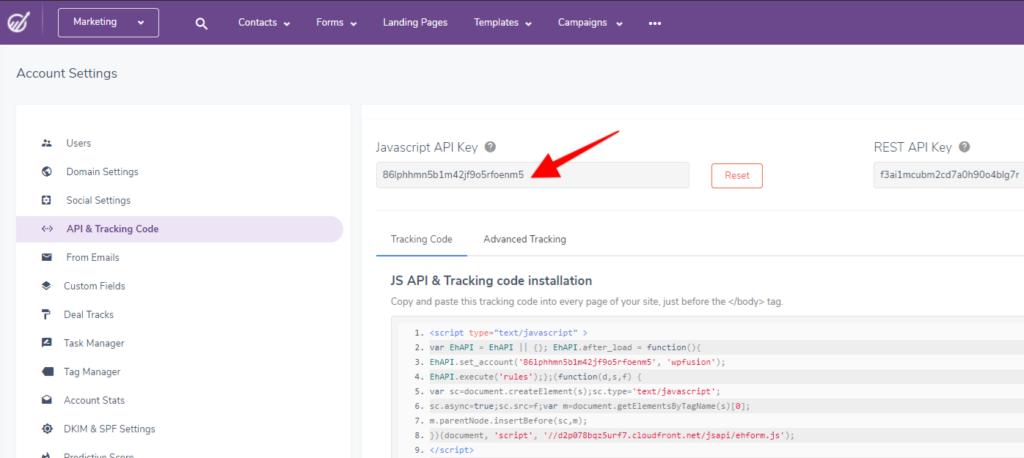
You will need your JavaScript API Key, which can be found in your EngageBay account.
You can find your EngageBay JavaScript API key in your account under Admin Settings » API and Tracking Code
Once enabled, WP Fusion will output the EngageBay tracking code in the header of every page of your site.
If your users are logged in or otherwise identified to WP Fusion (for example via an Auto Login Link) WP Fusion will also pass the user』s email address to the tracking script, which will associate their activity with their corresponding EngageBay contact record.
#HubSpot
If site tracking is enabled for HubSpot, WP Fusion will load the site tracking scripts into the header of your site. WP Fusion will also identify any logged in users to the tracking script, by email address.
If a guest visitor submits a form or makes a checkout, WP Fusion will also identify the guest to the tracking script by email address, which allows the anonymous tracking data to be merged retroactively with the guest』s contact record.
Site tracking data is shown on a contact』s Activity stream in HubSpot, including pages visited and forms submitted.
The visitor』s page views are tracked and recorded up to the time of submitting the lead form.
HubSpot』s tracking scripts are a little more sophisticated than our other supported CRMs. They will automatically detect when a form is on a page, and try to sync the submitted form values to HubSpot.
Submitted forms on your website are automatically displayed on the contact』s Activity stream.
This generally works quite well, but can sometimes cause problems. For example the WooCommerce 「Billing Email」 can get synced to HubSpot and overwrite the customer』s account email.
If you encounter unexpected property changes in HubSpot, try deactivating site tracking.
Note: If you』re using the HubSpot for WordPress plugin, then the tracking scripts are already loaded on your site. In that case you should keep site tracking disabled in WP Fusion.
#Infusionsoft
Site tracking data shown in the Web Profile tab for an Infusionsoft contact.
#Mautic
Mautic site tracking is a little more complicated than site tracking with our other supported CRMs.
Set up properly it can be very effective, but it can also cause problems with misidentified contacts, or contact records getting merged.
Note: Mautic site tracking will not work if you are currently logged into Mautic as a user with the same email address as your WordPress user email. To test Mautic site tracking always use an incognito browser window.
WP Fusion』s two options for site tracking with Mautic
WP Fusion includes two options for Mautic site tracking:

Site Tracking: Enabling this option includes the Mautic tracking script in the footer of your page and sends a mt('send', 'pageview'); event with each page view. This is the same as if you were using the WP Mautic plugin, or had added the tracking code manually.
Advanced Site Tracking: Enabling this option activates some additional tracking methods unique to WP Fusion. When Advanced Site Tracking is active:

If an anonymous visitor on your site is being tracked in Mautic, and later registers an account, submits a form, or makes a purchase, WP Fusion will merge the anonymous tracking data with the new contact record. This gives you a more complete picture of the visitor』s history on your site before they provided an email address.
If a user is logged in to your site, WP Fusion will send a mt('send', 'pageview', {"email":"EMAILADDRESS"} ); event to Mautic』s tracking script, to track pageviews for logged in users in cases where they default Mautic tracking can』t properly identify them.

Where you need to be careful with Advanced Site Tracking is caching.
If [email protected] is logged into your site, and the Mautic tracking script is output to the footer of your page with Jane』s email address, then this could become cached.
If [email protected] later visits the same cached page, the tracking script would send a mt('send', 'pageview', {"email":"[email protected]"} ); event.
This would update Steve』s contact ID in Mautic with Jane』s email. Since the email address field in Mautic must be unique, this would merge the two contact records and delete Steve』s data and tags.
With Mautic site tracking enabled, anonymous visitors are tracked in Mautic.
When a visitor registers an account, makes a purchase, or submits a form, their tracking data is merged into the new contact record (using Advanced Site Tracking).
#Developers
Site tracking will automatically be disabled when WP Fusion is set to Staging Mode (on the Advanced settings tab).
If needed you can also conditionally load the site tracking scripts via the wpf_get_setting_site_tracking filter.
For example, to disable site tracking for logged in administrators:
function disable_site_tracking() {

if ( current_user_can( 'manage_options' ) ) {
add_filter( 'wpf_get_setting_site_tracking', '__return_false' );
}

}

add_action( 'init', 'disable_site_tracking' );
Or to disable site tracking on a specific page:
function disable_site_tracking() {

if ( is_page( 'login' ) ) {
add_filter( 'wpf_get_setting_site_tracking', '__return_false' );
}

}

add_action( 'init', 'disable_site_tracking' );

#Was this helpful?

Let us know if you liked the post. That』s the only way we can improve.

Yes

No
Link Click Tracking

Link Click Tracking

#Overview
WP Fusion』s link click tracking feature lets you apply tags in your CRM or marketing automation tool when links (or other elements) are clicked on your website.
To apply or remove tags when a user visits a specific page on your site, the simplest method is to use our meta box in the page settings to configure the tags to apply / remove.
However, you may want to track engagement with external links, file downloads, or other buttons that don』t qualify as separate pages. You can do so using this feature.
#Setup
First enable the feature from the Advanced section of the general WP Fusion settings tab.
link-tracking
When creating your links, switch into the 「Text」 mode of the editor, and structure your link HTML like the following:
Click Me
When the link is clicked, the tags will automatically be applied to the user.
To remove tags when a link or button is clicked, use the following:
Click Me
#Other Elements
You can also use link click tracking on other elements. For example, to apply a tag when a form is submitted, add the data-apply-tags parameter to the submit button like so:

The data-apply-tags attribute can be added to any HTML element.

#With Elementor Pro
Elementor Pro allows you to specify data attributes for any element, which means WP Fusion』s tracking can be used to track clicks. This setting can be found on the Advanced tab while editing any element.

Just enter data-apply-tags followed by a pipe | and then a comma-separated list of the tags you』d like applied when the element is clicked. For removing tags, use data-remove-tags.
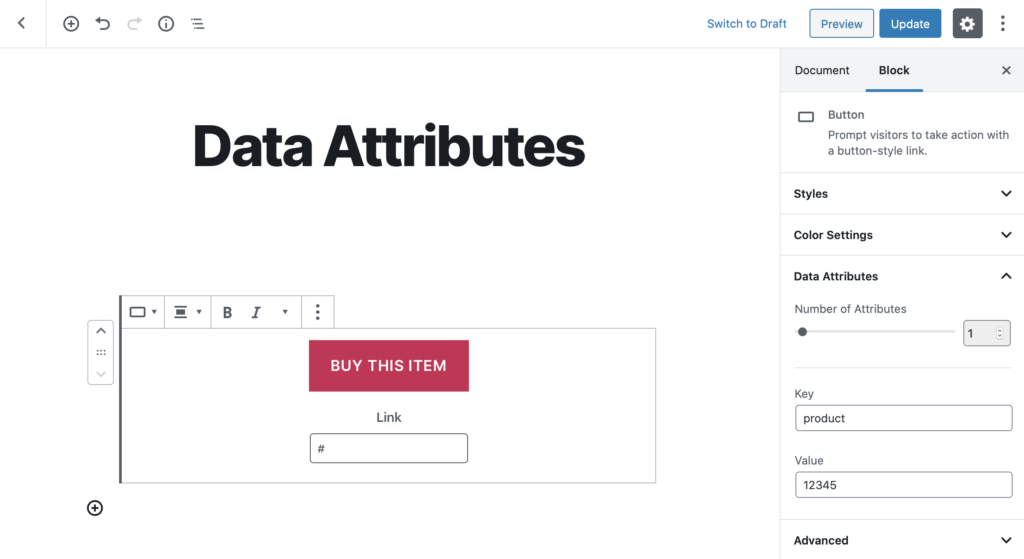
#With Gutenberg
With the Gutenberg editor, we recommend the Block Data Attribute plugin for adding the data-apply-tags attribute to buttons or other blocks.

#Was this helpful?

Let us know if you liked the post. That』s the only way we can improve.

Yes

No
Lead Source Tracking

Lead Source Tracking

#Overview
WP Fusion includes the ability to detect lead sources in URL parameters, such as those used with Google Analytics.
The system is quite versatile. It can look for a variety of common lead source parameters passed in URLs to your site and store these as a cookie when the user first visits your site.
If a visitor then registers on your site, makes a purchase, or submits a WP Fusion enabled form, the detected lead source parameters can be synced to custom fields in any one of WP Fusion』s 40+ supported CRMs and marketing automation platforms.
The cookie is valid for 90 days. So even if a user leaves your site and comes back later to make a purchase, you can still capture the source that brought them to you in the first place.
Note: This feature does not work properly on WP Engine or other hosts that don』t let you edit your site』s caching settings.
#Google Analytics
If you』re using Google Analytics』 Campaign URL Builder, Google will generate tracking links to your site that look like https://mysite.com/?utm_source=facebook&utm_campaign=summer_ad.

You can enable each of the various Google Analytics tracking variable for sync from the Contact Fields tab in the WP Fusion settings.
Note: By default WP Rocket caches URLs with Analytics leadsource variables in them. This will prevent WP Fusion』s lead source tracking from working. You can follow this tutorial to exclude the Google query string parameters from WP Rocket』s cache.
#Custom Lead Source Tracking
To enable custom lead source tracking, locate the leadsource field in the Contact Fields list and map it to a field in your CRM. Make sure to check the Sync box to enable the connection.
Structure the URL to your site like https://mysite.com/?leadsource=custom_leadsource. Anything after the leadsource parameter in the URL will be synced. Using this method you can set up your own lead source tracking strategy however you see fit.
#Referrer and Landing Page
The fields Original Referrer and Landing Page are a bit different in that they don』t use a URL parameter for tracking.

Original Referrer: This tracks the URL a user followed to get to your site. If this is enabled, the referrer URL will be recorded on their first visit.
Landing Page: This tracks the page the visitor landed on when they came to your site for the first time.

#How it works
When a visitor lands on your site with one of the tracked parameters, WP Fusion will set a cookie, either wpf_leadsource (for the UTM and URL parameters) or wpf_ref for the Original Referrer and Landing Page.
You can see the cookies set by WP Fusion using your browser』s developer tools. If the cookies aren』t being set, your page is probably cached.
This cookie is valid for 90 days. If any any time during that period, a contact record is created for that visitor by WP Fusion, the tracked values will be extracted from the cookie and merged into the API data sent to create the new contact record.
This works any time WP Fusion creates a contact record— a form submission, abandoned cart, product purchase, or regular registration. It does not work when a contact record is added to your CRM by another plugin, since other plugins wouldn』t know to look for cookies set by WP Fusion.
Also note that WP Fusion only sync the lead source data when a new contact record is created. It won』t send the data to an existing contact record, to avoid overwriting lead source data you may have already collected for a contact. This can be considered First Referrer tracking.
#Caching
Note that the lead source tracking relies on cookies, which often aren』t compatible with caching. For example this functionality does not work on WP Engine.
Generally speaking, if the cookies aren』t being set, make sure your landing page is excluded from cache, or the query variables you』re tracking are set to bypass the cache. It may also be helpful to bypass the cache when the wpf_leadsource or wpf_ref cookies are set (though this could degrade performance).
Note that with WP Rocket, any URL with UTM parameters is cached by default, which means the lead source tracking won』t work. To override that you』ll need to download and customize the helper plugin WP Rocket | Ignore Query Strings.
#Developers
#Register additional leadsource variables
You may want to register additional URL parameters that should be tracked as leadsource variables. You can do this using the wpf_leadsource_vars filter.
For example to register the URL parameter lang:
function my_wpf_custom_leadsource_vars( $vars ) {
$vars[] = 'lang';
return $vars;
}

add_filter( 'wpf_leadsource_vars', 'my_wpf_custom_leadsource_vars' );
Once the variable is registered it will be detected in the URL when someone visits your site (for example &lang=en) and saved to the wpf_contact cookie.
Any custom leadsource fields added via the wpf_leadsource_vars filter will automatically show up on the Contact Fields list for syncing with custom fields in your CRM:

Then, when WP Fusion adds a contact record to your CRM (via a registration, purchase, form submission, or any other source), the custom leadsource values will be synced to the corresponding custom fields in your CRM.
#Change the cookie name
If needed you can change the name of the cookies that are used for WP Fusion』s lead source tracking. The two filters are wpf_leadsource_cookie_name and wpf_ref_cookie_name.
For example to prefix the two cookie names with an underscore:
add_filter( 'wpf_leadsource_cookie_name', function() {
return '_wpf_leadsource';
} );

add_filter( 'wpf_referral_cookie_name', function() {
return '_wpf_ref';
} );

#Was this helpful?

Let us know if you liked the post. That』s the only way we can improve.

Yes

No