Changelog

Changelog

1.2.4 - 4/15/2021

Stale account tags will now be removed during "Once a day on site visit" daily check, instead of waiting for a wp_login event
Reduced number of database queries required displaying admin settings panel
Fixed login redirects running during AJAX requests
Fixed errors during login if WP Fusion wasn't active

1.2.3 - 11/16/2020

Fixed login count not updating when login count method was set to "When a user actually logs in"
"Recovered" account tags will now be removed if the account becomes stale again

1.2.2 - 9/28/2020

Updated for tags select compatibility with WP Fusion 3.35

1.2.1 - 9/7/2020

Re-enabled login redirects on WooCommerce's My Account page
Fixed changed date( 'z' ) to current_time( 'z' ) for determining the current day when using Once A Day on Site Visit login tracking
Fixed stale account tags only being applied if the cron job was triggered by an admin
Fixed Uncaught ArgumentCountError during login with WooCommerce on some configs

1.2 - 7/20/2020

Blocked login redirects from running on WooCommerce checkout / account logins
Moved last_login usermeta key to wpf_last_login to prevent plugin conflicts
Added .pot file

1.1.3 - 5/12/2020

Changed time() to current_time() to respect the site's timezone
Fixed login count rules not respecting required tags

1.1.2 - 4/1/2020

Fixed login count not updating when someone logged in and count method was set to Daily

1.1.1 - 3/25/2020

Made daily login check the default
Fixed login daily check not updating last login date
Removed use of transients in daily login check

1.1 - 3/17/2020

Added Last Login column to users view
Added WooCommerce checkout redirects
Stopped setting last_login when users are imported

1.0.1 - 8/27/2019

Fixed last_login not being tracked for admins
Added catchall redirect

1.0 - 8/6/2019

Increased limit on number of posts shown in dropdowns
Fixed Stale Accounts tags not applying

0.9 - 6/2/2019

Prevented last_login field from loading during a webhook

0.8 - 5/31/2019

Added last login to admin user profile
Fix for login count field not syncing
last_login will now be set when a user is imported

0.7 - 5/21/2019

Added recovered stale login tagging
Added compatibility class
Fixed login count rules not applying tags

0.6 - 5/6/2019

Improved login redirect method to be better compatible with other plugins
Added login counting
Added login count redirect / tagging rules

0.5 - 3/17/2019

Added last_login field to be available for syncing
PilotPress compatibility fixes

0.4 - 12/19/2018

Made redirects more aggressive to prevent being overruled by other plugins
Fix for redirects to a protected page ignoring current user's tags

0.3 - 10/13/2018

Compatibility fixes with Ultimate Member
Made public class publicly accessible

0.2 - 6/12/2018

Fix for incorrect update notices

0.1 - 6/9/2018

Initial release

#Was this helpful?

Let us know if you liked the post. That』s the only way we can improve.

Yes

No

Elementor Integration

Elementor Integration

#Overview
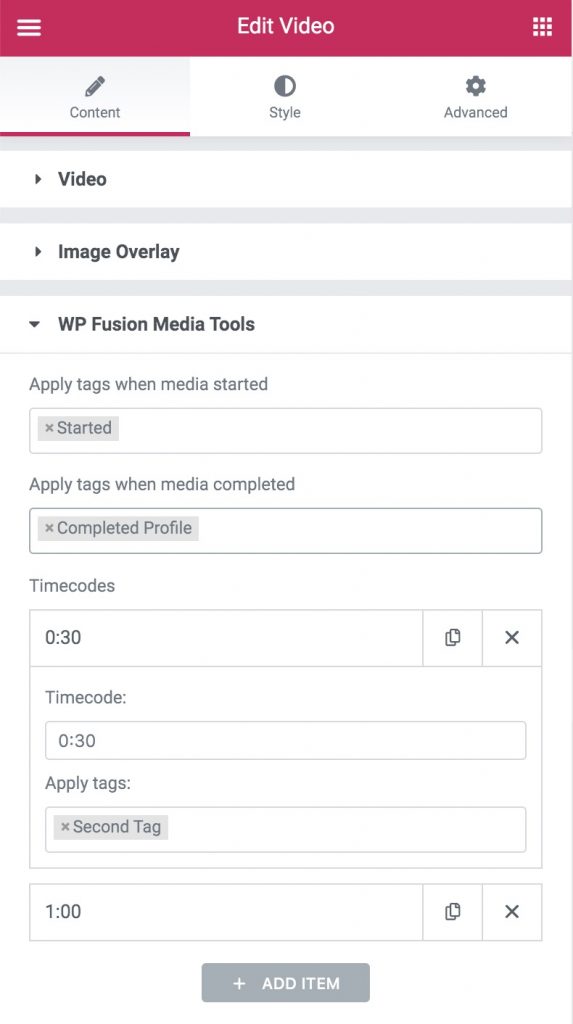
The Media Tools addon also has an integration with Elementor to allow configuring the settings inside the Video widget.
These settings appear in the WP Fusion Media Tools panel, and are the same as the options when using the Classic Editor.

Apply tags when media started: These tags will be applied to the user as soon as they click the 「Play」 button.
Apply tags when media completed: These tags will be applied to the user once the media file completes playing.
Timecodes: Here you can specify multiple timecodes, and for each set tags to be applied when the video progress has passed the timecode.

#Was this helpful?

Let us know if you liked the post. That』s the only way we can improve.

Yes

No

Overview

Overview

#Overview
WP Fusion』s Media Tools addon allows you to track engagement with embedded videos and audio on your site by applying tags in your CRM based on different types of user interaction— like video started, completed, and timecode(s) reached.
By using tag triggers in combination with WP Fusion』s content restriction features you can restrict access to pages your site until users have completed watching a video or a percentage of a video.
editor-vimeo
Using this addon with a learning management system such as LifterLMS or LearnDash adds a new level of control to your LMS, letting you unlock courses or lessons only after students have completed watching a video or listening to an audio file.
Note: The Media Tools Add-on supports videos embedded with the standard WordPress media player, Vimeo, YouTube, Wistia, Spotlightr and Presto Player.

#Was this helpful?

Let us know if you liked the post. That』s the only way we can improve.

Yes

No
Presto Player Integration

Presto Player Integration

#Overview
WP Fusion』s Media Tools addon includes an integration with Presto Player, which allows you to apply tags in your CRM when:

A video is played
A video is completed
One or more video timecodes are reached

#Setup
First create your Presto Player video, and the from the Media Hub page, copy the shortcode.

Then paste the shortcode into the post or page where you』d like your video displayed.
#Shortcode parameters
WP Fusion』s media engagement tracking with Presto Player is handled via shortcode attributes added to the [presto_player] shortcode.
Each parameter can accept any number of tags (comma-separated), and you can use tag names or tag IDs interchangeably.
The shortcode parameters are:

wpf_tags_start: These tags will be applied when the video is first played
wpf_timecode: This is a specific timecode at which you』d like to apply tags, either in seconds, or mm:ss
wpf_tags_timecode: These tags will be applied at the timecode specified by wpf_timecode
wpf_tags_complete: These tags will be applied when the video is complete (when play percentage is greater than 95%)

For example:
[presto_player id=8912 wpf_tags_start="Video A Play, Media Engagement" wpf_timecode="1:30" wpf_tags_timecode="Watched Half - Video A" wpf_tags_complete="Video A Complete"]
That shortcode would apply the tags Video A Play and Media Engagement when the video is first played, Watched Half – Video A after 90 seconds, and then Video A Complete once the progress had reached 95%.
#Multiple Timecodes
Multiple timecodes can be added in the format wpf_timecode_2="mm:ss" wpf_tags_timecode_2="123,456" where the tags for the second property are a comma separated list of tags to be applied.
For example, to apply tags at 1:20, 1:40, and 2:40, your shortcode would look something like the following:
[presto_player id=8912 wpf_timecode="1:20" wpf_tags_timecode="Min Twenty" wpf_timecode_2="1:40" wpf_tags_timecode_2="Min Forty" wpf_timecode_3="2:40" wpf_tags_timecode_3="Two Mins Forty"]

#Was this helpful?

Let us know if you liked the post. That』s the only way we can improve.

Yes

No
Usage Guide

Usage Guide

#Classic editor
To set up tracking for media content on your site, first click 「Add Media」 in the WordPress post editor and upload the audio or video file to your site. After the upload is finished, click 「Insert Into Post」 to add the player to your post.
Note: At this time WP Fusion』s Media Tools addon only works properly when using the Classic Editor, not the Gutenberg editor.
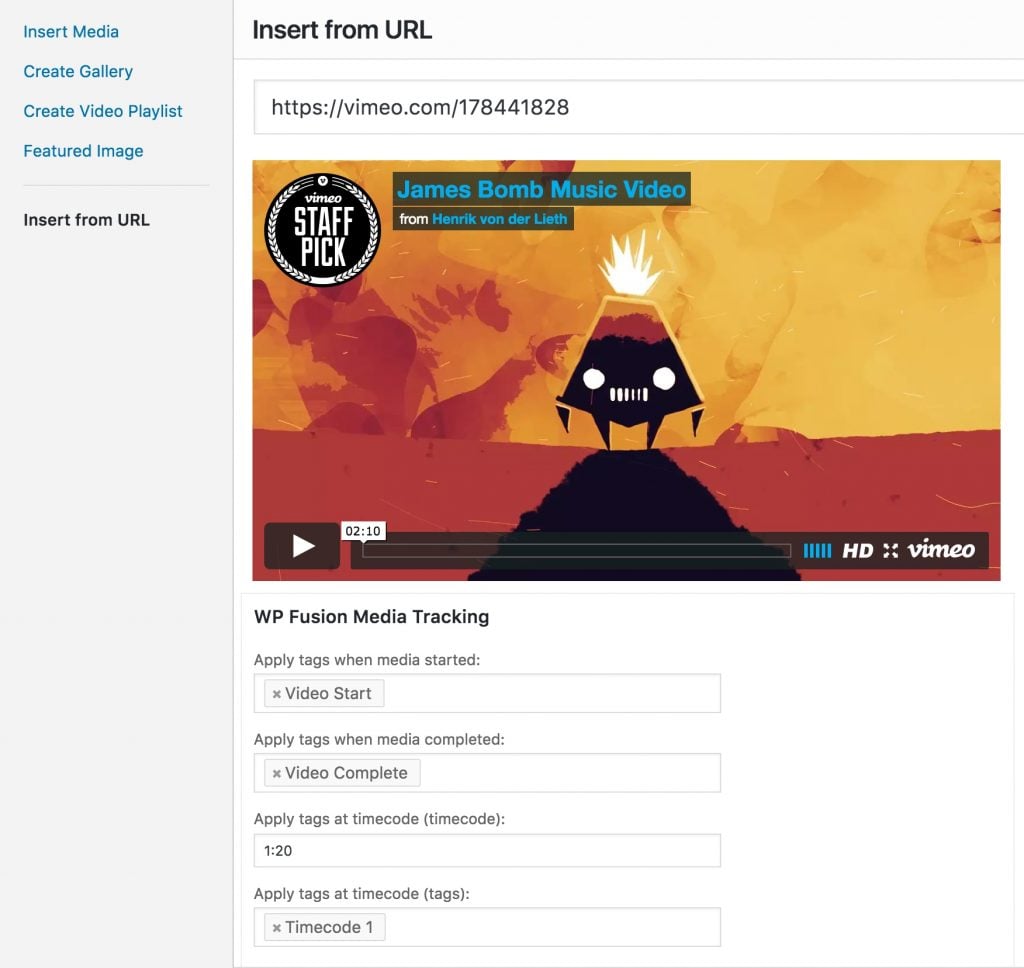
You can also add embedded media by going to the Insert from URL tab and including a link to a video hosted elsewhere.
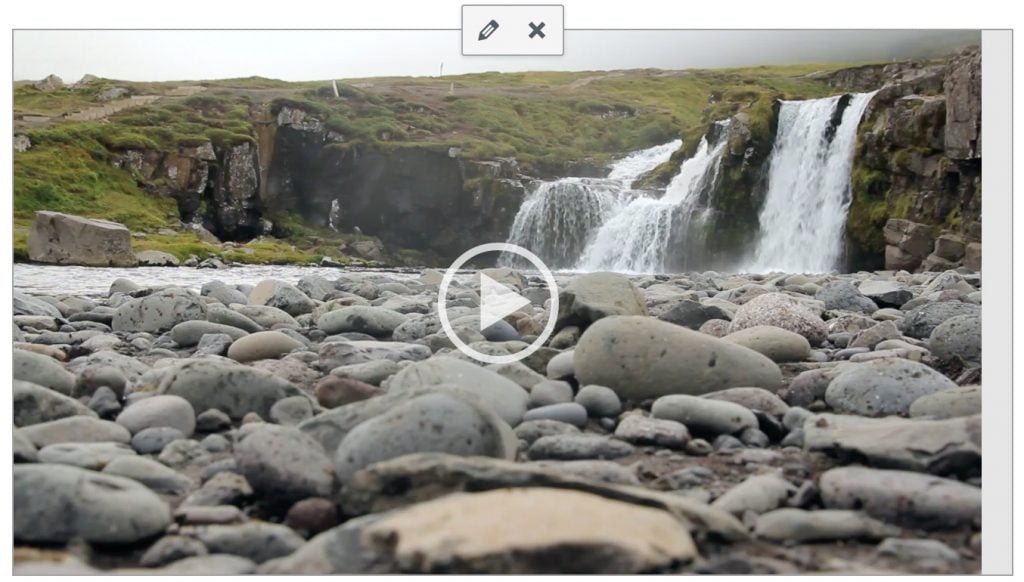
After the media is inserted, you』ll see a preview in the post editor. Click once on the preview and click the pencil icon to open up the media details window.
editor1
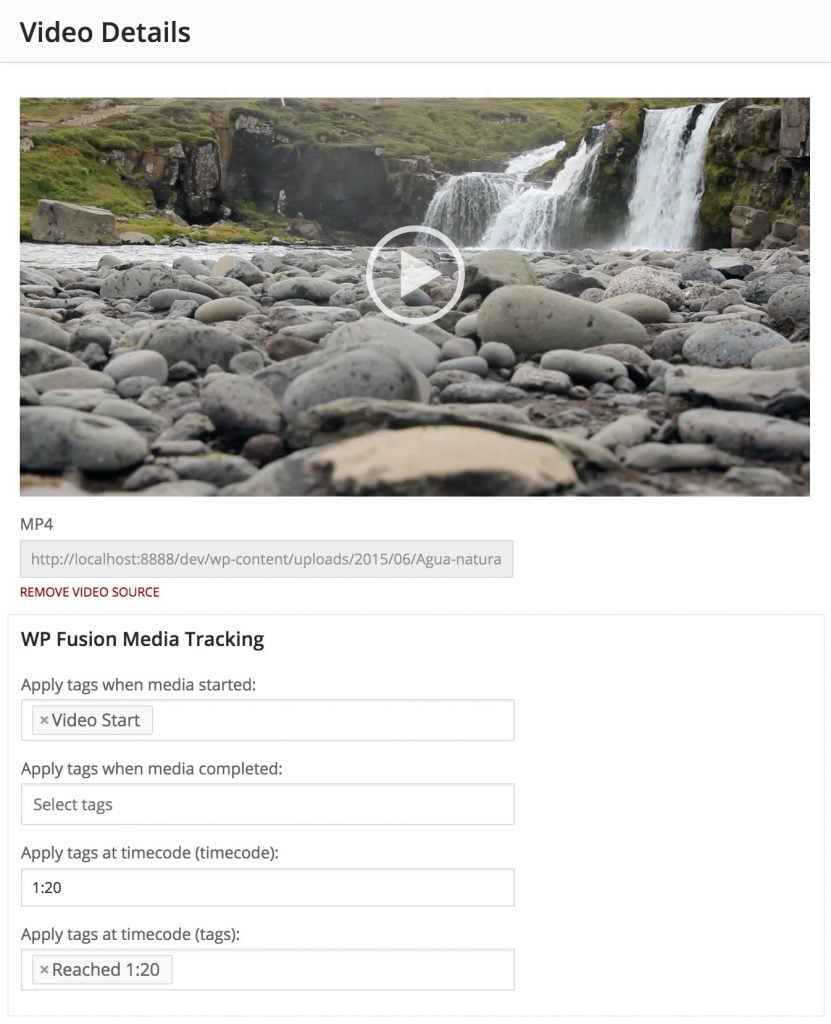
In the media details window, you』ll see the WP Fusion Media Tracking box appear below the video, with several settings:

Apply tags when media started: These tags will be applied to the user as soon as they click the 「Play」 button.
Apply tags when media completed: These tags will be applied to the user once the media file completes playing.
Apply tags at timecode (timecode): Enter a timecode at which additional tags (configured in the next field) should be applied. Timecode can either be in seconds (like 「45」), or in delineated time notation (like 「1:45」, for 1 minute 45 seconds).
Apply tags at timecode (tags): These tags will be applied when the timecode specified in the field above is reached.

Any of these fields can be left blank to disable that specific trigger.
editor2
#Multiple timecodes
For those with more advanced tracking needs, you can track multiple timecodes by editing the shortcode directly. Switch over to the Text tab in the editor, and you』ll see the embed code for your media, something like:
https://www.youtube.com/watch?v=1234567
Multiple timecodes can be added in the format wpf_timecode_2="mm:ss" wpf_tags_timecode_2="123,456" where the tags for the second property are a comma separated list of tag IDs to be applied (Infusionsoft and Ontraport) or tag names for other CRMs.
For example, to apply tags at 1:20, 1:40, and 2:40, your shortcode would look something like the following:
]https://www.youtube.com/watch?v=1234567
#Spotlightr (formerly vooPlayer)
WP Fusion doesn』t support vooPlayer』s 「vooPlayer Shortcode」 popup, but you can still configure media tracking by editing the shortcode it generates. After insering a video, you』ll see a shortcode like:
[vooplayer type="video" id="OTU3MzM="]
You can configure tags to be applied by editing the shortcode attributes. The parameters are:

wpf_tags_start: Comma separated list of tags to apply when the video begins to play
wpf_timecode: A timecode at which to apply specific tags
wpf_tags_timecode: The tags to apply at the timecode specified with wpf_timecode
wpf_tags_complete: The tags to apply when the video is finished

For example:
[vooplayer type="video" id="OTU3MzM=" wpf_tags_start="VooStart" wpf_tags_complete="VooComplete" wpf_timecode="1:20" wpf_tags_timecode="Voo120"]
#(Advanced) iFrame tracking
It』s preferable to use an embed shortcode (or the Elementor or Presto Player integrations) with the Media Tools addon, since this allows WP Fusion to detect which videos (and which types of videos) are being tracked, and thus the required tracking scripts are only loaded on those specific pages.
But there are some cases where you may want to set up WP Fusion』s media tracking directly on an embed code.
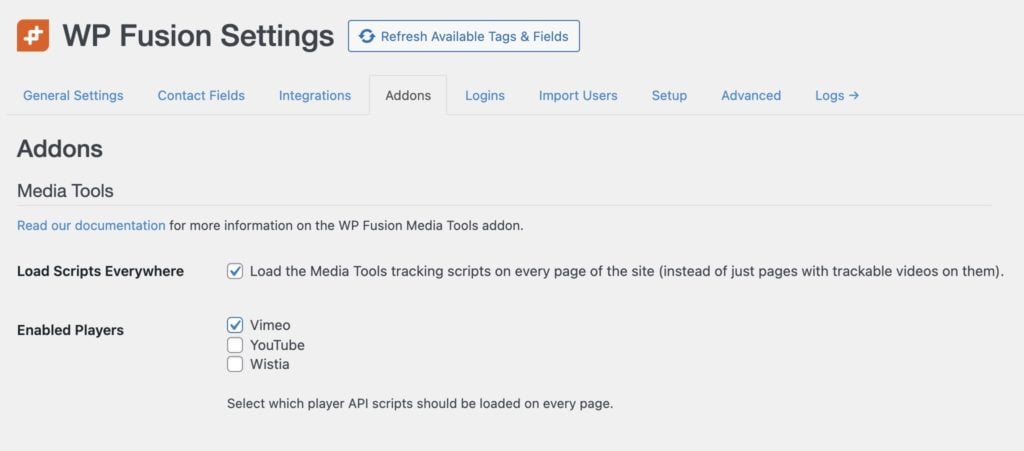
To do that, first enable the setting Load Scripts Everywhere at Settings » WP Fusion » Addons, and then select which players you will be using.

This will enqueue WP Fusion』s tracking script, as well as the video player APIs for any selected players, on every page of your site.
Then, you can add data attributes directly to the of any of the supported players to enable tracking on that player.
For example:

The parameters are:

id: (required) Every iFrame must have a unique ID to be tracked correctly
data-player_type: (required) The type of player, either youtube, vimeo, or wistia
data-wpf_tags_start: Comma separated list of tags to apply when the video begins to play
data-wpf_timecode: A timecode at which to apply specific tags
data-wpf_tags_timecode: The tags to apply at the timecode specified with wpf_timecode
data-wpf_tags_complete: The tags to apply when the video is finished

You can also use multiple timecodes, following the example documented above.

#Was this helpful?

Let us know if you liked the post. That』s the only way we can improve.

Yes

No