Sync Users Between Sites

Sync Users Between Sites

#Overview
If you have a sales site separate from your learning or membership site, you』ll need to keep users in sync between the two sites. You may also want to keep user passwords in sync, and enable single-sign-on, so users only have to log in once.
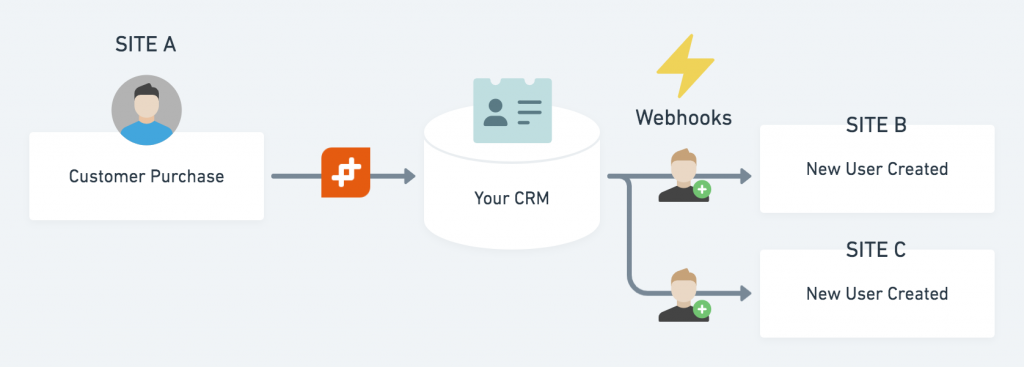
Because WP Fusion uses tags in your CRM or marketing automation platform to grant access to content, a tag applied on Site A can unlock content on Site B (or C, D, and E).
For example, a WooCommerce purchase applies a tag to the new customer on Site A, which then triggers an automatic enrollment into a LearnDash course on Site B.
#Setup and strategy
While WP Fusion can be used to sync user accounts between sites, we don』t recommend it because to keep passwords in sync they need to be stored in plain text in your CRM, which is a major security concern.
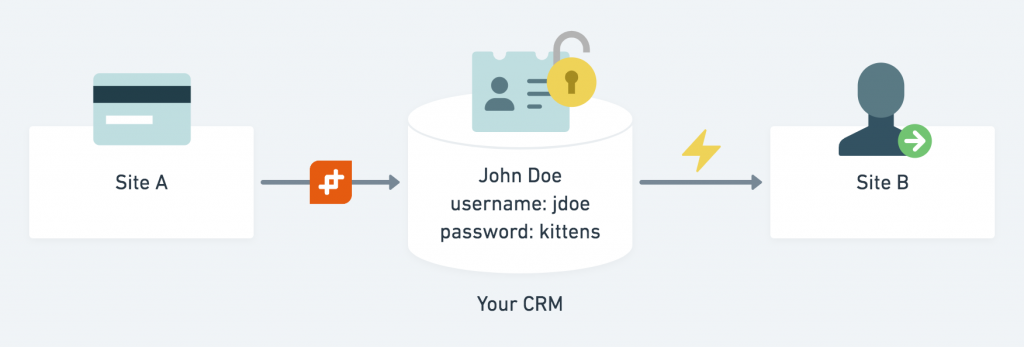
When you use your WP Fusion to sync users between sites, your user passwords end up stored in your CRM in plain text
For that reason we recommend using a plugin that allows you to sync user data directly between the sites, such as WP Remote Users Sync or Uncanny Automator.
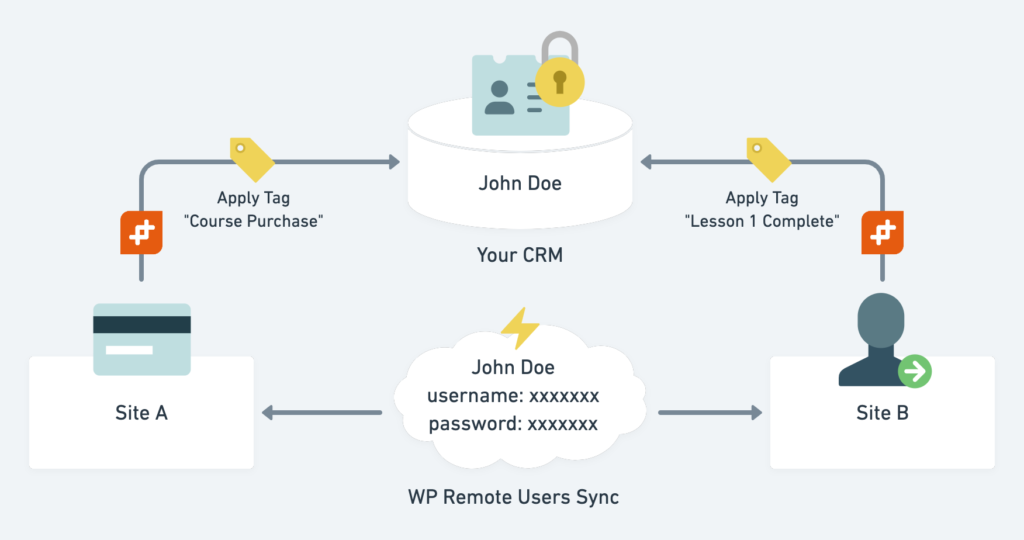
It』s preferable to sync user passwords directly between your sites, and then WP Fusion can sync non-sensitive data such as tags with your CRM
In that scenario, WP Fusion can still connect both sites to your CRM, but it will just be responsible for applying tags and syncing other non-sensitive information.
#Using WP Remote Users Sync
Our recommended solution syncing users between sites is with the WP Remote Users Sync plugin.
It lets you connect your sites directly to each other, so new user accounts are immediately created on your membership site when a customer registers on your sales site.

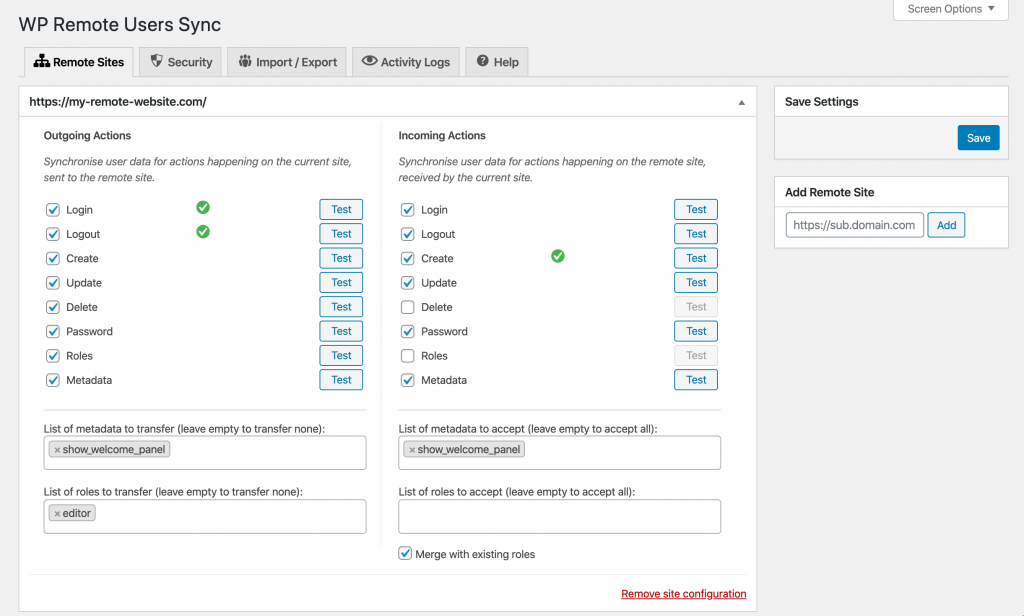
It also enables single sign on, so customers don』t need to log in a second time on your membership site.
#Example
For example if you wanted to sell a product with WooCommerce on Site A, and deliver access to a course on Site B, you would first set up your WooCommerce product to apply an access tag via WP Fusion, and then in your course use that same tag for auto-enrollment (for example with LearnDash or LifterLMS).
You would then connect Site A to Site B using WP Remote Users Sync, and make sure that guest checkout is disabled in the WooCommerce settings.
Make sure that guest checkout is disabled in the WooCommerce settings on Site A.
Now, when the customer checks out, they will automatically be logged in to their new user account.
WP Remote Users Sync will sync the new user to Site B, along with their tags and logged-in status. This means the customer doesn』t have to log in again to access their course on Site B.

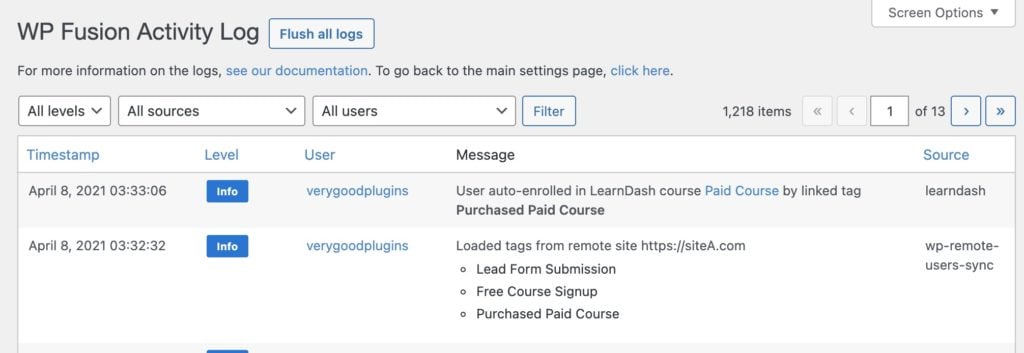
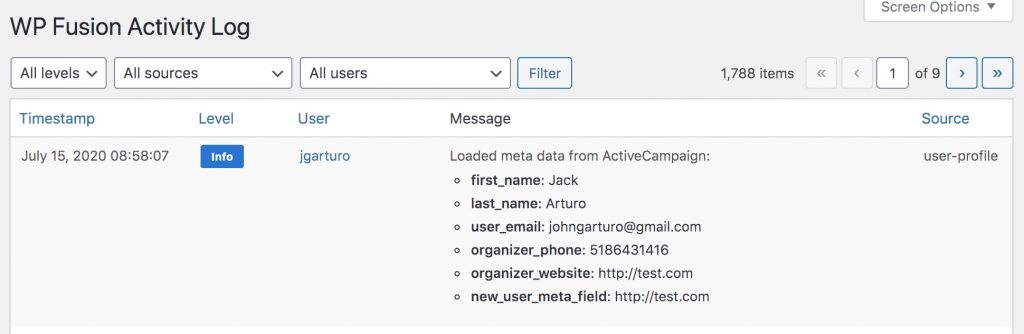
When the tags are loaded on Site B, WP Fusion will automatically enroll the new user into any courses linked to those tags, and record a message in the logs.
For more information on setting up WP Remote Users Sync, see our documentation.
#Using Uncanny Automator
Uncanny Automator allows you to set up a webhook between two sites which automatically creates a new WordPress user. You can use this to have your checkout on one site which automatically creates a user and enrolls them into a course on a second site.
For more info on using Uncanny Automator to sync users between sites, see this tutorial.
#Using WP Fusion
It』s also possible to sync user accounts between multiple websites with WP Fusion, using your CRM to store the data and push it onwards to multiple sites. This method is more advanced and requires additional setup, but doesn』t require installing another plugin.
#No user account
The simplest way to use WP Fusion to sync user data is to require guest checkout on your sales site. In this case WP Fusion syncs your customer data to your CRM, but no user account is generated on the sales site (so there』s no password that needs to be synced).
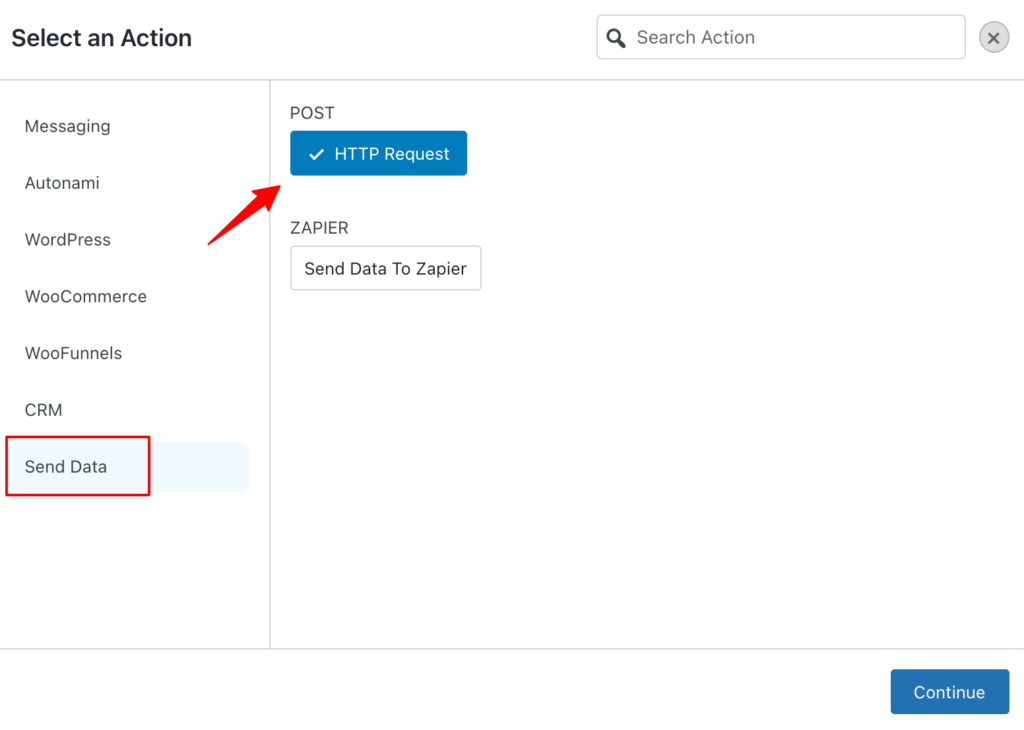
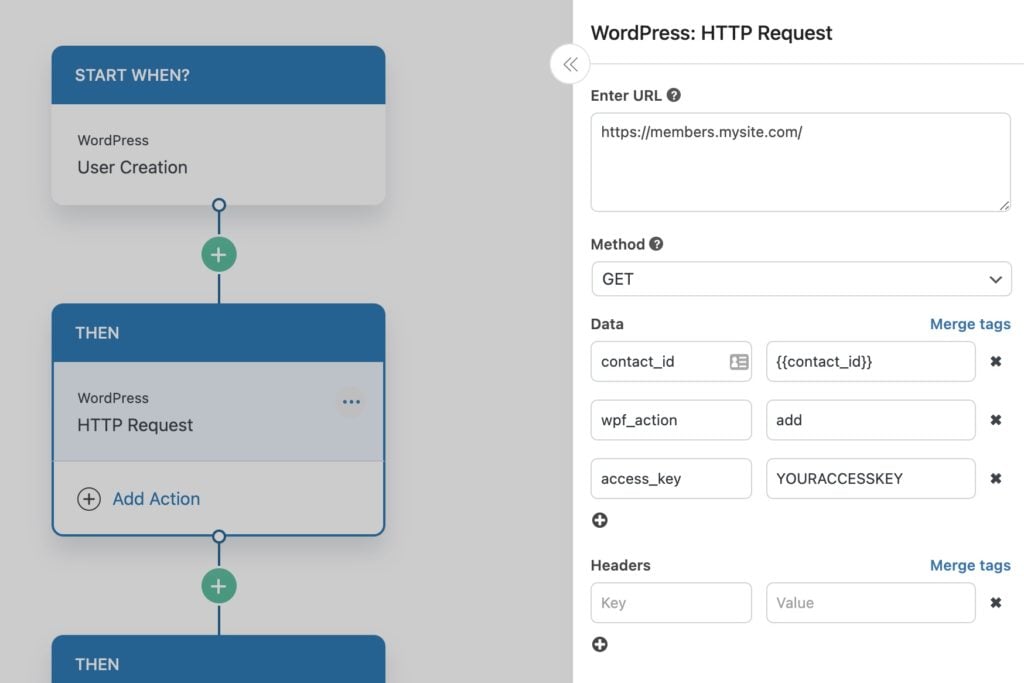
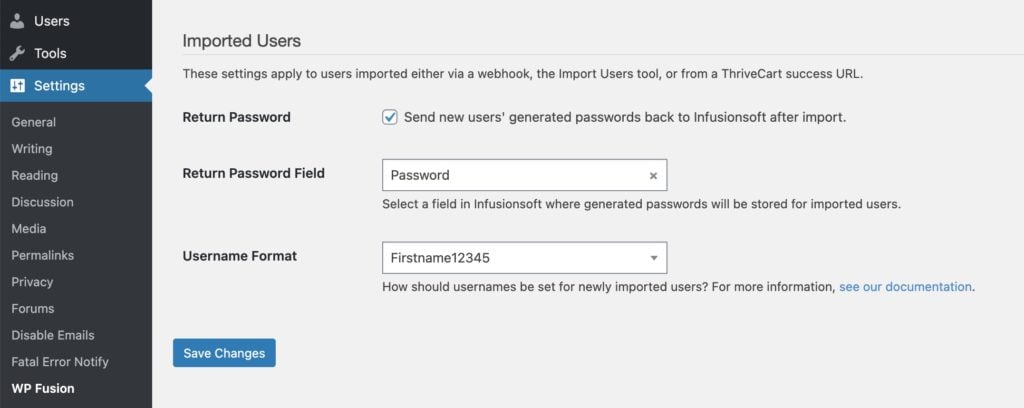
Then you can create an automation in your CRM that sends a webhook to Site B, with wpf_action=add in the webhook URL. This will create a new user account, generate a random password, and enroll the new user in any purchased courses or memberships.
This is quite secure because the password is randomly generated, and relatively easy to manage because once the user account has been created, the user only exists on that one site (you』re not trying to keep passwords and other details in sync on an ongoing basis).
#Syncing user accounts
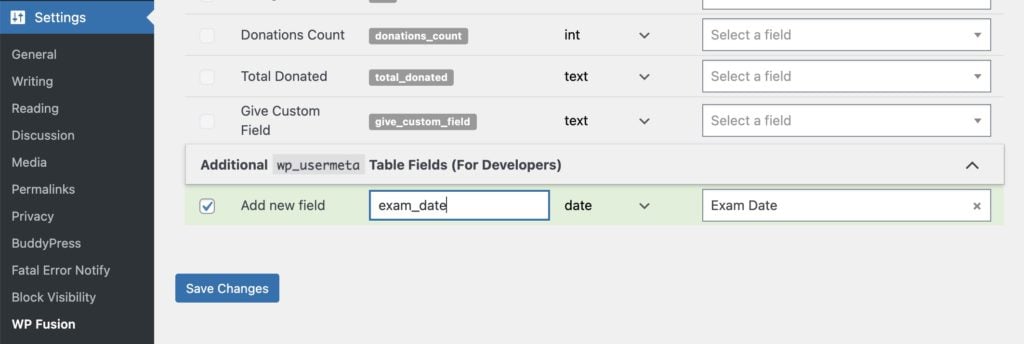
Using WP Fusion it』s possible to sync a user』s user name and password to custom fields on their contact record in your CRM.
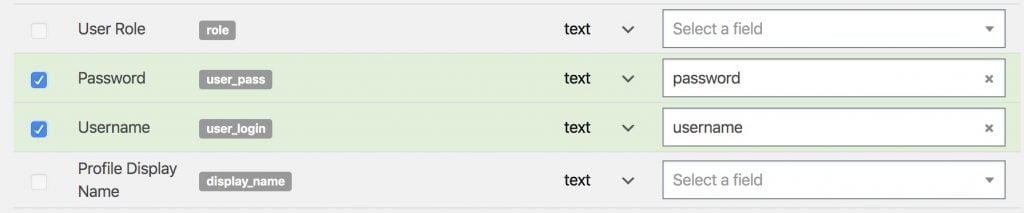
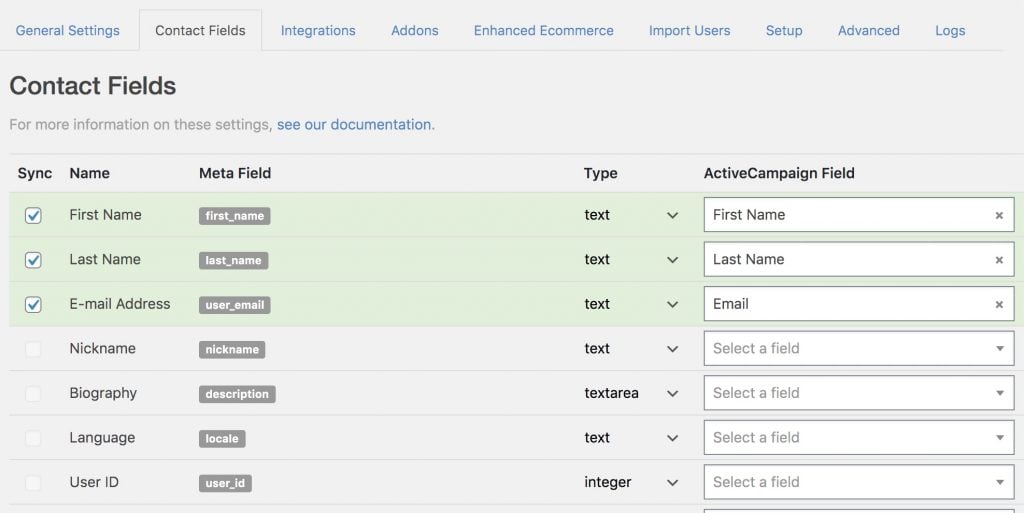
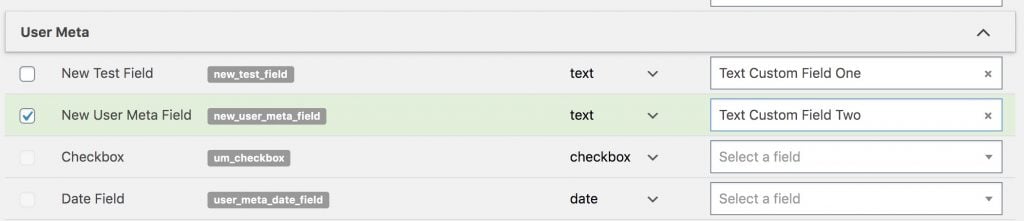
To do this enable the fields user_login and user_pass for sync from the Contact Fields tab in the WP Fusion settings, and select corresponding custom fields in your CRM in which to store the data.
You can then set up WP Fusion on a different WordPress site, and use WP Fusion to pull the latest user name and password from your CRM, effectively keeping your customer logins in sync across two or more WordPress sites.

#Setup
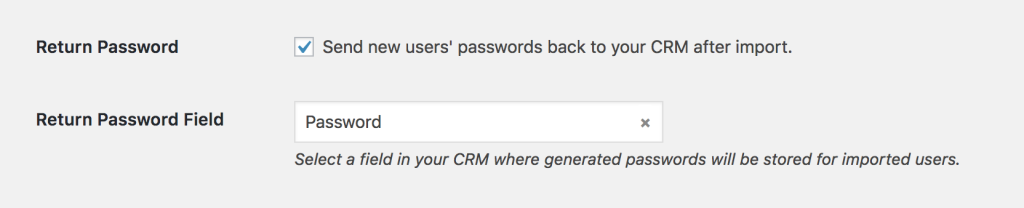
To set up the integration, first navigate to the Contact Fields tab and click the check boxes next to Password and Username to enable them for sync.

Then go to the General Settings tab and make sure the checkbox next to the Push option is checked.
Note: All data is synchronized with SSL encryption but passwords are stored in your CRM application as plain text. Make sure that everyone who has access to your application is trusted before you choose to synchronize passwords.
Now, when a user creates an account or updates their information, their username and password will be synced to to your CRM. You』ll then want to configure a webhook to push the information to the other site(s).

#Was this helpful?

Let us know if you liked the post. That』s the only way we can improve.

Yes

No

Displaying CRM Data in WordPress

Displaying CRM Data in WordPress

#Overview
With WP Fusion it』s possible to display data from your CRM in WordPress, allowing you to personalize your site for logged-in users using data from their CRM contact record.
For example:
Welcome back, your next exam date is 9/9/2020.
Or
Your assigned advisor is Jim Jones, your learning style is Auditory.
#Shortcodes
Using WP Fusion』s user_meta shortcode, you can display any data in your site』s database for the current user.
You can see all the available meta field keys on the Contact Fields list in the WP Fusion settings.

The keys in the Meta Field column can be used to display a user』s data without any extra steps. For example to display the current user』s first name, the shortcode would be
[user_meta field="first_name"]
However, you may have data that only exists in your CRM, not in WordPress. To display that data, you』ll first have to create a place to store the data in WordPress, and then use WP Fusion to load the data from your CRM.
Note: While it might sound more convenient to load the data from your CRM every time the page is displayed, this actually can introduce performance problems if you have a lot of users on your site, since an API call needs to be made on every page load. For that reason it』s better to use WP Fusion to load the data into WordPress first, where it can be displayed without requiring an external API call.
#Managing custom fields
Before WP Fusion can load a custom field from your CRM, it needs a place to store the data on your site. For an overview on how data is synced between WordPress and your CRM, see the Syncing Contact Fields documentation.
An easy way to create a new field is to use a plugin that lets you manage custom fields for users, such as User Meta Pro, or Advanced Custom Fields. Or if you』re using a membership plugin like BuddyPress or MemberPress, these plugins have options for managing profile fields.
Once you』ve created a field to store your custom data, locate it on the Contact Fields list in the WP Fusion settings, and select a corresponding field in your CRM to enable the field for sync.

In this case, we』ve used User Meta Pro to create a field with key new_user_meta_field, and linked it to the Test Custom Field Two field in ActiveCampaign.
#Managing custom fields without a plugin
It』s also possible to register a new field in your database using just WP Fusion. Scroll down to the bottom of the Contact Fields list, and in the Additional Fields section, enter a unique key for the new field.

Select a corresponding custom field in your CRM from the dropdown on the right, and save the settings to enable the new field for sync.
#Loading the data
Now that you have the custom field created and linked with the corresponding CRM field, you need to load the data into WordPress. There are a few ways to do this:

Pull User Meta: From the Advanced tab in the WP Fusion settings you can run a Pull User Meta operation, which will load any enabled fields from your CRM into WordPress for all your users. More info on that here.
Webhooks: If you』re updating the custom field in your CRM over time, you can create an automation that sends a webhook back to WP Fusion when a contact has been modified, using the ?wpf_action=update method. This will load the updated values for that specific contact, and they can be displayed in WordPress. More info on webhooks here.
Shortcode: The [wpf_update_meta] shortcode can also be used to refresh the current user』s stored metadata from their CRM contact record when a page is viewed. To use the shortcode, put it above any [user_meta] shortcodes on the page so the data has been loaded by the time those shortcodes are executed. Note that the [wpf_update_meta] shortcode will slow down the page load by a few seconds, so it』s recommended to use it sparingly.
Login Meta Sync: You also have an option to load a user』s metadata from your CRM each time they log in, by enabling the option for Login Meta Sync.

Finally, if a [user_meta] shortcode is present on a page, and WP Fusion cannot find any data in the database for that field (for the current user), it will connect to your CRM one time to load the data for that field. This is a fallback just in case something got out of sync or a webhook failed to fire.
#Testing
Whichever method you use to load the data, the WP Fusion logs will show the data being loaded from your CRM into the user』s metadata in WordPress.

In this case, the new_user_meta_field we created earlier has loaded a value of http://test.com from ActiveCampaign.
Now if we use the [user_meta] shortcode, that value can be output on a page. For example
Your personalized results can be found at [user_meta field="new_user_meta_field"]
Would be output as
Your personalized results can be found at http://test.com.

#Was this helpful?

Let us know if you liked the post. That』s the only way we can improve.

Yes

No

Autonami Webhooks

Autonami Webhooks

#Overview
With Autonami Pro, you can use webhooks in automations to connect to WP Fusion installed on another site.
Using webhooks you can import new users on your WordPress site based on rules in Autonami, or update existing users』 meta data and tags.
For example, you could sell access to a course using WooCommerce and Autonami on Site A, and using a webhook, WP Fusion on Site B can automatically import the new customer and enroll them in the course they purchased.
Having trouble receiving webhooks? Check out our troubleshooting guide.
#Setup
Navigate to Autonami » Automations and create a new automation to handle the webhook. Select a trigger (such as a tag being applied), and click the Add Direct Action button to add a new action.

In the popup that appears, select Send Data, and then HTTP Request.
In the webhook settings, configure the webhook like in the screenshot below.

The settings should be:

Enter URL: This is the URL to the website where WP Fusion is installed.
Method: Either GET or POST, but sometimes POST requests get blocked by security plugins, so we recommend GET.
Data: At minimum you must have:

contact_id: {{ contact_id }} (this tells WP Fusion which contact to import)
access_key: (the access key from the bottom of the General tab in the WP Fusion settings)
wpf_action: (see below for options)

#Webhook parameters
You can format your webhook parameters in a few different ways to customize the behavior. For each you will need to supply your access key, which can be obtained from the bottom of the main settings panel in your WP Fusion settings.
#To update a user』s tags
To update an existing WordPress user』s tags from the contact record, the data parameters should be
contact_id = {{ contact_id }}
wpf_action = update_tags
access_key = [your access key]
#To update a user』s tags and meta data
To update a user』s tags and pull any new meta data from Autonami for that contact, the data parameters for the webhook should look like the following:
contact_id = {{ contact_id }}
wpf_action = update
access_key = [your access key]
#Create a new user
To create a new user, use the following:
contact_id = {{ contact_id }}
wpf_action = add
access_key = [your access key]
You can also specify additional parameters in user creation. For example, to send the user a welcome email containing a link to log in on your site, use the following:
contact_id = {{ contact_id }}
wpf_action = update_tags
access_key = [your access key]
send_notification = true
You can also specify a specific user role to be assigned to the new user. For example, to set the new user to the 「customer」 role, use the following:
contact_id = {{ contact_id }}
wpf_action = update_tags
access_key = [your access key]
role = customer
Note that you have to have registered a 「customer」 role on your site for this to work. By default users will be assigned the role of 「subscriber」.
The add method will update a user if an existing user already exists. It will not create a duplicate user.
Note: By default, user accounts will be created with their email address as the username and a randomly generated password. However, if you have created a custom username field and password field in Autonami, and enabled these fields in WP Fusion for sync with user_login and user_pass on your website, the new users will be given the usernames and passwords stored in their Autonami contact record.
#User passwords
New user accounts will be created with an automatically generated password. If you』d like to use this password in your email marketing, you can send the password back to Autonami after it has been generated.
In the Webhooks section of the General settings tab, check the box for Return Password, and select a field in Autonami where the password should be stored.

After a new user is created, their automatically generated password will now be saved back to their contact record, and you can use a merge field to include it in an email. The username will be the contact』s email address.

#Was this helpful?

Let us know if you liked the post. That』s the only way we can improve.

Yes

No

ThriveCart

ThriveCart

#Overview
Using WP Fusion with ThriveCart you can create a success URL pointed at your site that will create a new WordPress user and log them in so they can access their purchased content.

Heads up! This is an advanced feature. It is one of the more difficult things to set up with WP Fusion. It often requires extra configuration time and doesn』t work reliably on all hosts. If you』re not comfortable debugging webhooks and running multiple tests, then consider selling your products with WooCommerce.

#Setup
First enable the setting for ThriveCart Auto Login from the Advanced settings tab in WP Fusion.

Then in ThriveCart on the Fulfillment tab for your product, choose Send them to a URL for the What should happen after purchase?  setting.

An example URL will look like https://mysite.com/?wpf_action=thrivecart&access_key=KEY&apply_tags=Membership%20Tag.
There are a few parts to this

https://mysite.com: This is the URL to your website. It can be the home page or any other page on your site.
?wpf_action=thrivecart: This tells WP Fusion to receive the data from ThriveCart, create a new user, and log them in.
&access_key=: This is the access key from the bottom of the General settings tab in WP Fusion.
&apply_tags=: Here you can optionally specify tags to be applied for the new user, for example to unlock content or trigger an automated enrollment.
You can use either tag IDs or tag names, separated by commas. The tags must be URL encoded. You can use urlencoder.org to encode your tags. For example &apply_tags=Tag%20One%2CTag%20Two

For more information on how to use success URLs in ThriveCart, see this article.
#How it works
When a customer checks out they』ll click the access link to be taken to your site. When WP Fusion detects the ThriveCart link it will create a new user based on the details provided at checkout.
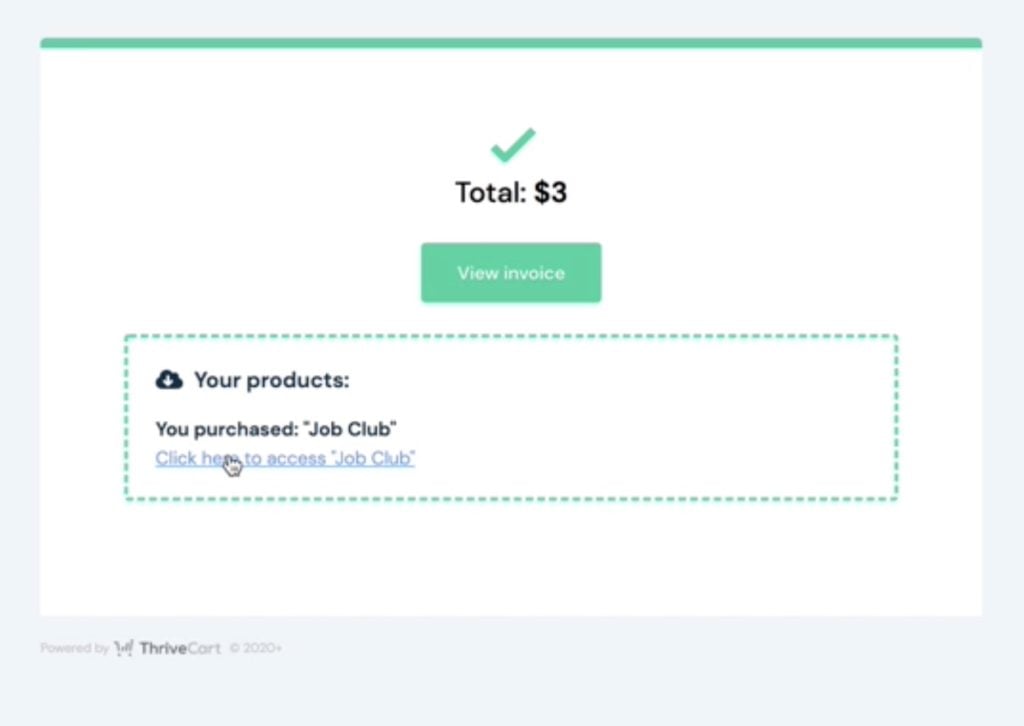
The customer must click the Click Here to Access link after checkout, or else no data will be synced.
The new user will be added to your active CRM, and any tags you』ve specified will be applied.
The new user will automatically be logged in and able to access their purchased content.
If a user already exists with the same email then the new tags will be applied and the existing user will be logged in.

Note: No data is sent to your site until the customer clicks the access link on the order confirmed page. If the customer doesn』t click the link, they won』t receive a new user account. For that reason it』s recommended to also connect ThriveCart to your CRM via a behavior rule, and use a webhook to ensure a user account is always created.

#Passwords
A random password will be generated for the new user.

If you』ve enabled the setting for Return Password from the WP Fusion settings then this password will be sent back to the specified custom field in your CRM.
You can then send the user a welcome email containing their password.
#Welcome email
For the best deliverability it』s recommended to send the welcome email containing the new user』s password from your CRM. However if you would prefer WordPress to send the welcome email, you can append &send_notification=true to your success URL.
WordPress will then send out the default welcome email inviting the new user to set their password.
#Troubleshooting
The first step in troubleshooting the ThriveCart user creation is to enable the WP Fusion activity logs. When a customer lands on the success URL, the logs will show the data that』s received from ThriveCart.

You will see a message ThriveCart user creation triggered, followed by the data that was loaded from ThriveCart. The logs will also show the password that was generated, and any tags that were applied.
If you』re having trouble with ThriveCart success URLs, please contact our support.
#Video – ThriveCart

#Was this helpful?

Let us know if you liked the post. That』s the only way we can improve.

Yes

No

Import Users

Import Users

import-users
WP Fusion includes an import tool that allows you to import existing contacts from your CRM as new WordPress users. If the password field is selected for sync on the Contact Fields tab, existing passwords can be imported as well. If the password field isn』t selected, a secure password will be automatically generated.
If you check the box next to Enable Notifications, WordPress will send a simple welcome email to the user with their username, and a link to log in on your website. You can customize this welcome email by using a plugin like SB Welcome Email Editor.
If you』re using a membership plugin like Ultimate Member, the plugin may send out its own welcome emails to new users, in which case you should leave Enable Notifications disabled.
#Passwords

You can also leave email notifications disabled and send the user』s password back to your CRM after import. Check the box next to Return Password on the main WP Fusion settings tab, and select a field in your CRM in which to store the generated passwords.
After each user is imported, their automatically generated password will now be saved back to their contact record, and you can use a merge field to include it in an email. The username will be the contact』s email address.
Note: Before importing a large number of users, first do a test import on your own contact record to ensure that all of the information is imported and the welcome emails are sent correctly.
By default WordPress will send a notification email to the site owner for every user imported. If you』re importing a large number of users you may wish to temporarily disable this using the Disable New User Notification Emails plugin.
#Username format
By default WP Fusion will set the username for all newly imported users to the contact』s email address.
You may not want the username to be the email address if you』re using a plugin (such as BuddyPress) which shows usernames on the frontend of the site. In that case you can change the default behavior.
This setting is found at the bottom of Settings » WP Fusion » General, in the Imported Users section.

The three Username Format options are:

Email Address: Usernames will be set to the contact』s emails address
FirstnameLastname: Usernames will be a combination of the contact』s first name and last name (i.e. JaneDoe)
Firstname12345: Usernames will be the contact』s first name, followed by a 5 digit random number (i.e. Jane36808)

For more control over how the usernames are generated, see the wpf_import_user filter.

#Was this helpful?

Let us know if you liked the post. That』s the only way we can improve.

Yes

No

Download Monitor

Download Monitor

#Overview
WP Fusion integrates with Download Monitor to allow you to protect downloadable files using tags in your connected CRM.
#Download setup
When editing any Download in the admin, you』ll see the WP Fusion access control meta box in the sidebar.

By checking Users must be logged in to download this file, you can select tags in your CRM that are required to download the file.
If the user is not logged in or does not have the correct tags, they will be redirected to the page you select in the Redirect if access is denied dropdown.
If you do not select a redirect, they will be shown the default restricted content message.
#Listing member downloads
Download Monitor includes a [downloads] shortcode which lets you display an HTML list of downloads.
WP Fusion has the ability to personalize the list of downloads based on the current user』s tags in your CRM.
To enable this, head to Settings » WP Fusion » Integrations » Download Monitor and check the box for Filter Members Only.

Then, when using the shortcode, like
[downloads category="Category" members_only]
Any downloads that the user can』t access (based on their tags in your CRM and the settings configured on each download) will be hidden.
This can be used to create personalized lists of downloads unique to each user.

#Was this helpful?

Let us know if you liked the post. That』s the only way we can improve.

Yes

No

Elementor

Elementor

#Overview
WP Fusion includes an integration with Elementor to let you control visibility of page elements based on a user』s tags in your CRM or marketing automation platform.
WP Fusion also supports syncing Elementor Forms entries to your CRM. For more info on that, see this page.
#Access Control
To set up access rules on Elementor elements, open the settings for any widget, and click on the Advanced tab. Under the WP Fusion section, you will see several settings.

The Visibility dropdown sets the default visibility for the widget. The options are:

Everyone: The widget will be visible to everyone regardless of whether they』re logged in or not (this is the default)
Logged In Users: The widget will only be visible to logged in users
Logged Out Users:  The widget will only be visible to guests on your site

Depending on the visibility mode you』ve selected, there will be additional options

Required Tags (any): The element will only be shown if the user is logged in and has at least one of the specified tags
Required Tags (all): The element will only be shown if the user is logged in and has all of the specified tags
Required Tags (not): If the Visibility mode is set to Everyone, the element will be shown to guests, and hidden from logged in users if they have any of the specified tags. If the visibility mode is set to Logged In Users, the element will be hidden from guests, and hidden from logged in users if they have any of the specified tags

#Elementor Popups
With Elementor Pro, WP Fusion also adds the ability to control the display of popups based on a user』s tags. To set this up, first create your popup, and then open the Advanced Rules window.

Click the toggle switch to turn on the WP Fusion condition. There are two options:

Show: The popup will only be shown to logged in users who have at least one of the specified tags.
Hide: The popup will be hidden from logged in users who have at least one of the specified tags.

#Filter Queries
WP Fusion adds an option to the Posts and Portfolio widgets in Elementor Pro which allows you to filter the displayed results using WP Fusion』s access rules.
To turn this on enable the setting for Filter Queries in the Query tab of the widget settings.

With this setting on, any posts the user doesn』t have access to will be removed from the results.
You can use this to create personalized post listings, for example of courses or media items.
#Tracking clicks
WP Fusion can track clicks on Elementor buttons and elements by applying tags in your CRM. For more info see the bottom of Link Click Tracking.

#Was this helpful?

Let us know if you liked the post. That』s the only way we can improve.

Yes

No

Toolset Types

Toolset Types

#Overview
WP Fusion includes an integration with Toolset Types to allow controlling access to custom post types based on a user』s tags in your CRM.
#Setup
When editing any custom post type with Toolset Types, a WP Fusion meta box will appear in the sidebar.

Any access rules specified here will take priority over individual posts of this type.
For an overview of the options available in the meta box, see here.

#Was this helpful?

Let us know if you liked the post. That』s the only way we can improve.

Yes

No

WP E Signature

WP E Signature

#Overview
WP Fusion integrates with WP E-Signature to allow you to apply tags in your CRM of choice when a document is signed.
#Setup
When editing any document, scroll down to the WP Fusion meta box. Here you can specify one or more CRM tags.

When the document is signed these tags will be applied to the registered user who signed the document.
 

#Was this helpful?

Let us know if you liked the post. That』s the only way we can improve.

Yes

No

Gutenberg

Gutenberg

#Overview
WP Fusion integrates with the Gutenberg editor in WordPress 5.0+ to let you control access to content based on a user』s logged-in status and CRM tags.
#Block Visibility
The recommended solution for block visibility control with WP Fusion is to use the Block Visibility plugin.
After installing Block Visibility, click on your block, and in the right panel, scroll down to the Visibility section.
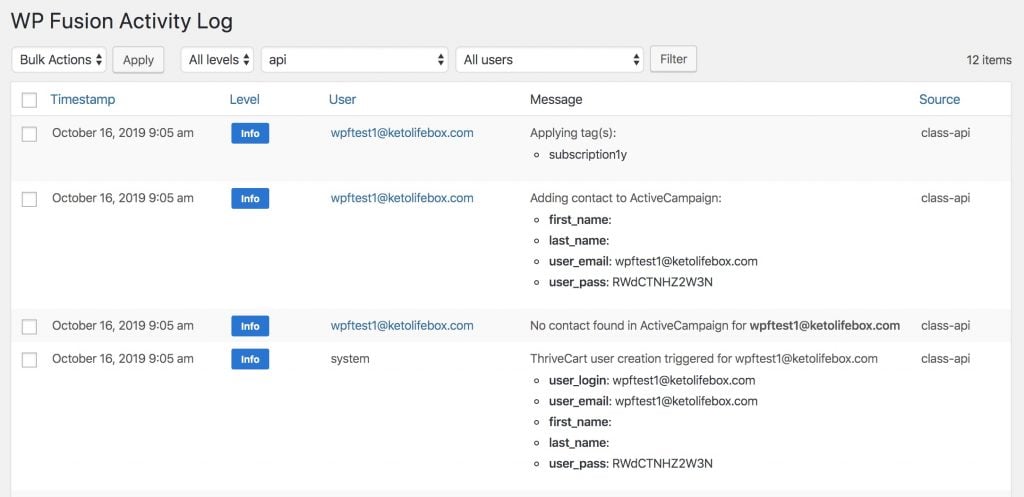
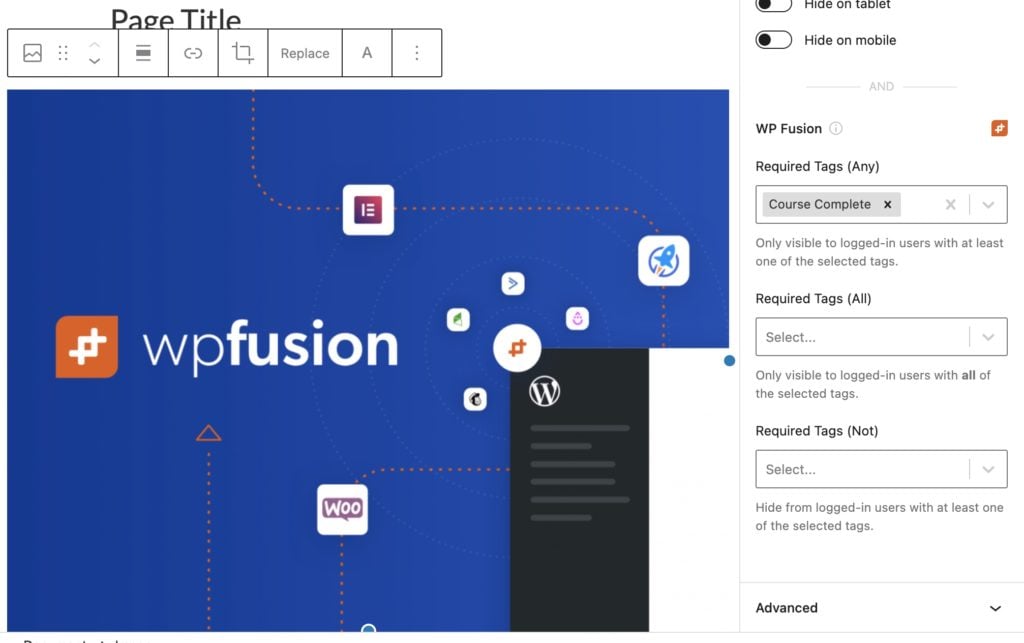
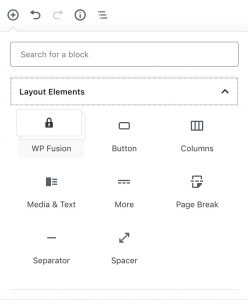
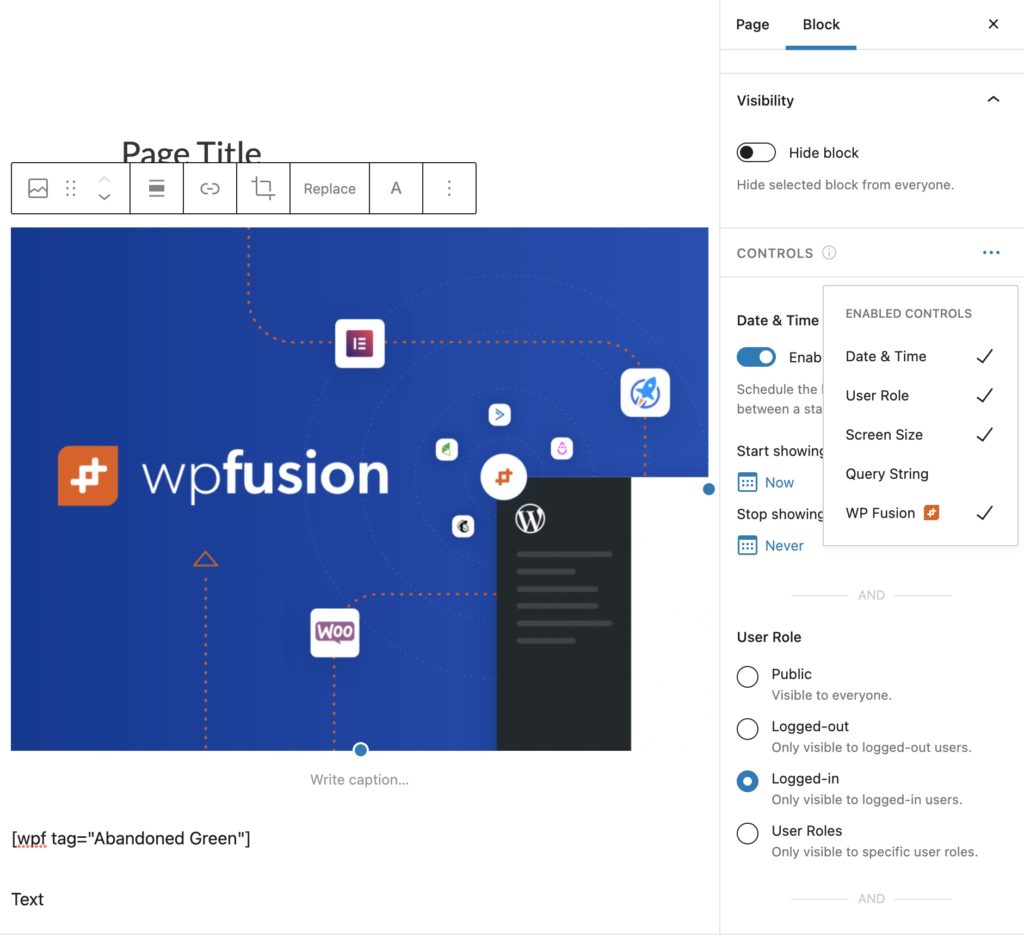
Using Block Visibility you can control access to Gutenberg blocks using CRM tags.
If the WP Fusion section doesn』t appear, click on the Controls banner, and enable the WP Fusion controls.

In the WP Fusion settings, there are three block visibility options:

Required Tags (Any): The block will only be shown if the user is logged in and has at least one of the specified tags (requires User Role to be set to Logged-in).
Required Tags (All): The block will only be shown if the user is logged in and has all of the specified tags
(requires User Role to be set to Logged-in).
Required Tags (Not): If a user is logged in and has any of the specified tags, the block will be hidden.

#Layout Block
WP Fusion also includes a built-in layout block, which allows you to drop other blocks into a container that is protected using tags in your CRM.
#Basic usage
To get started, click on the + icon to add a new block, and select the WP Fusion block from the Layout Elements section.

The WP Fusion block will then be added to the content editor. Once the block appears, click on it and the block settings will appear in the sidebar.

The top section of the block is what will be shown if the user is logged in. You can also specify any tags that are required in the sidebar. If the user is not logged in, and does not have any of the specified tags, they will be shown the content in the bottom section.
You can type text directly into the block, or add any other block to the inner section by clicking the + icon.
#Advanced usage
You can nest multiple WP Fusion blocks within eachother to create more complex access rules.

In the screenshot above, the message 「Welcome back, membership customer!」 will be shown to logged in users who have both of the tags 「Customer」 and 「Purchased Membership」.
「Welcome back, one-time purchase customer!」 will be shown if they just have the 「Customer」 tag.

#Was this helpful?

Let us know if you liked the post. That』s the only way we can improve.

Yes

No