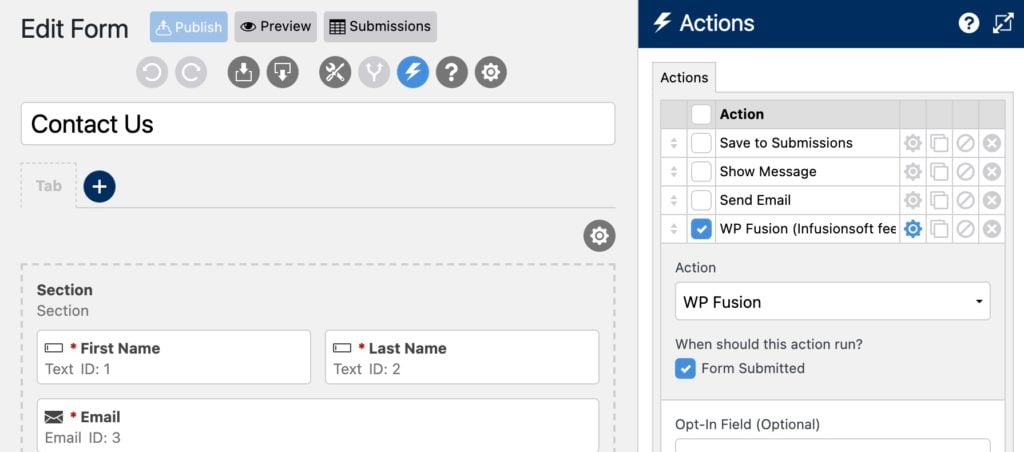
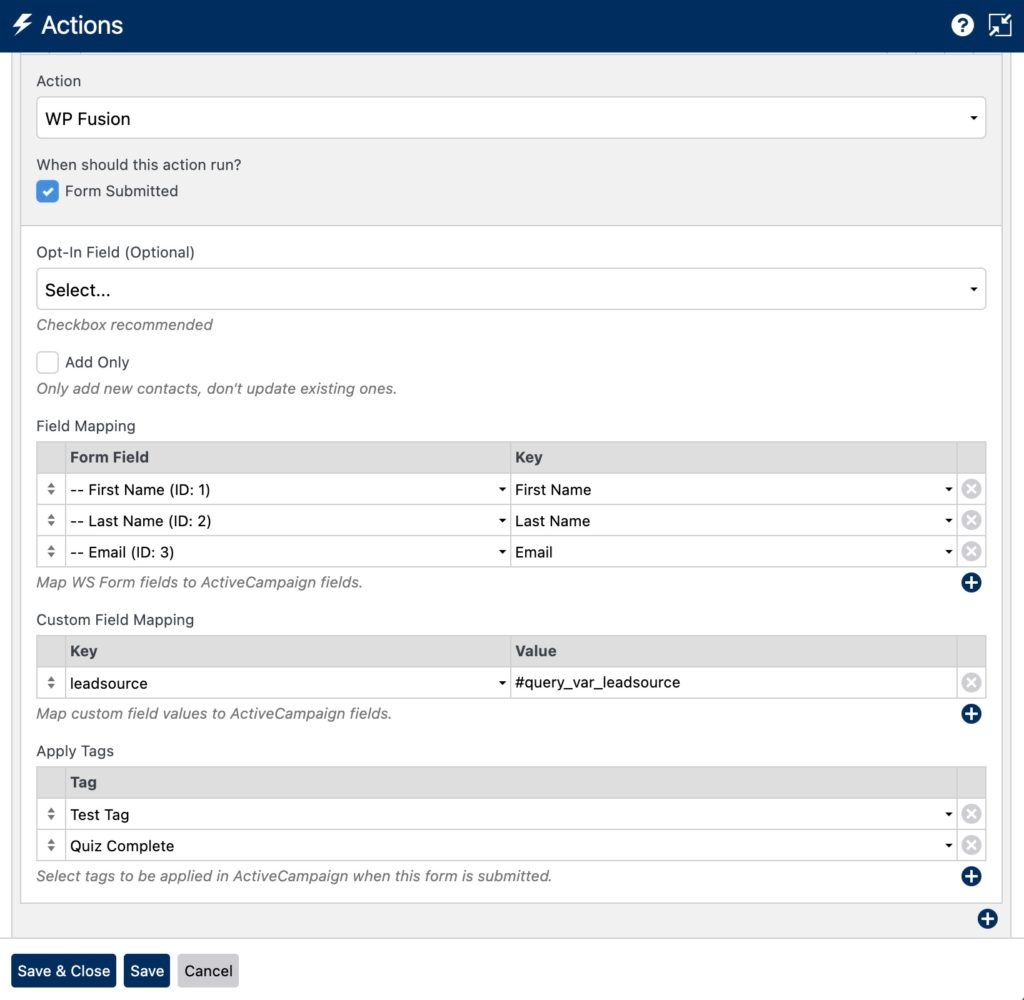
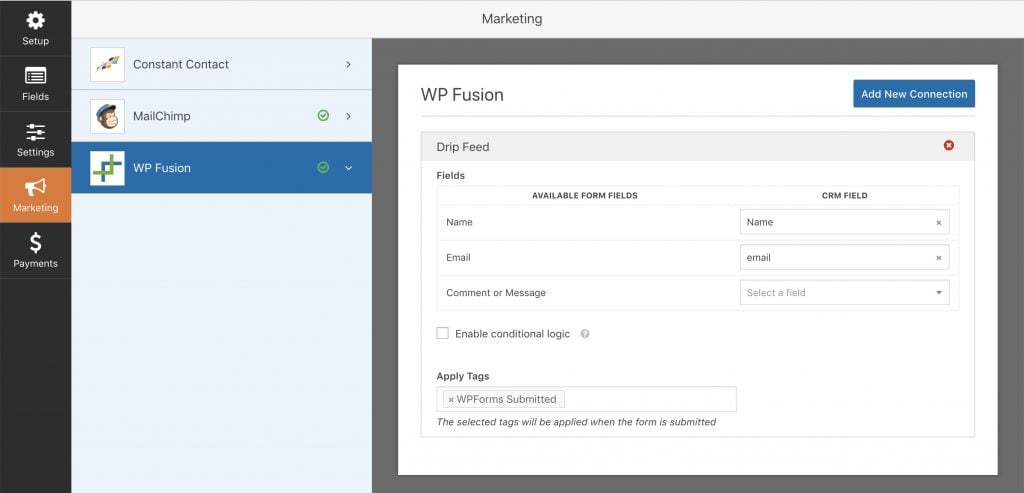
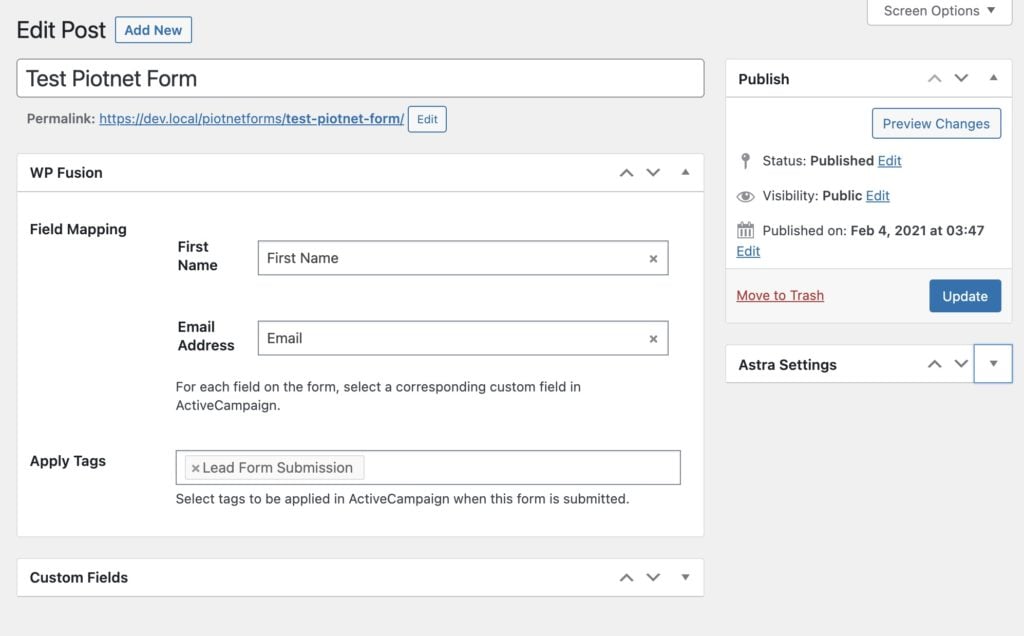
LifterLMS

LifterLMS

#Overview
Using WP Fusion and LifterLMS, you can:

Control access to courses and lessons using tags in your CRM
Automatically save contact details to your CRM when a student purchases or registers for a course or membership
Automatically enroll students into courses and memberships based on tag changes in your CRM
Apply tags in your CRM when a course, membership, or access plan is purchased
Apply tags in your CRM based on course or lesson completion
Track student progress in your CRM using custom fields

#Access control
You can restrict access to LifterLMS Courses and Lessons based on a user』s tags in your CRM, and redirect them to another page (like a sales page) if they don』t have the required tags.
See the screenshot below for an example of the options WP Fusion offers you when configuring a LifterLMS course or lesson:

For more information on the WP Fusion meta box options and protecting content based on CRM tags, see the Restricting Access to Content documentation.
#Activity Tagging
WP Fusion supports several options for applying tags in your CRM based on LifterLMS activity.
#Courses
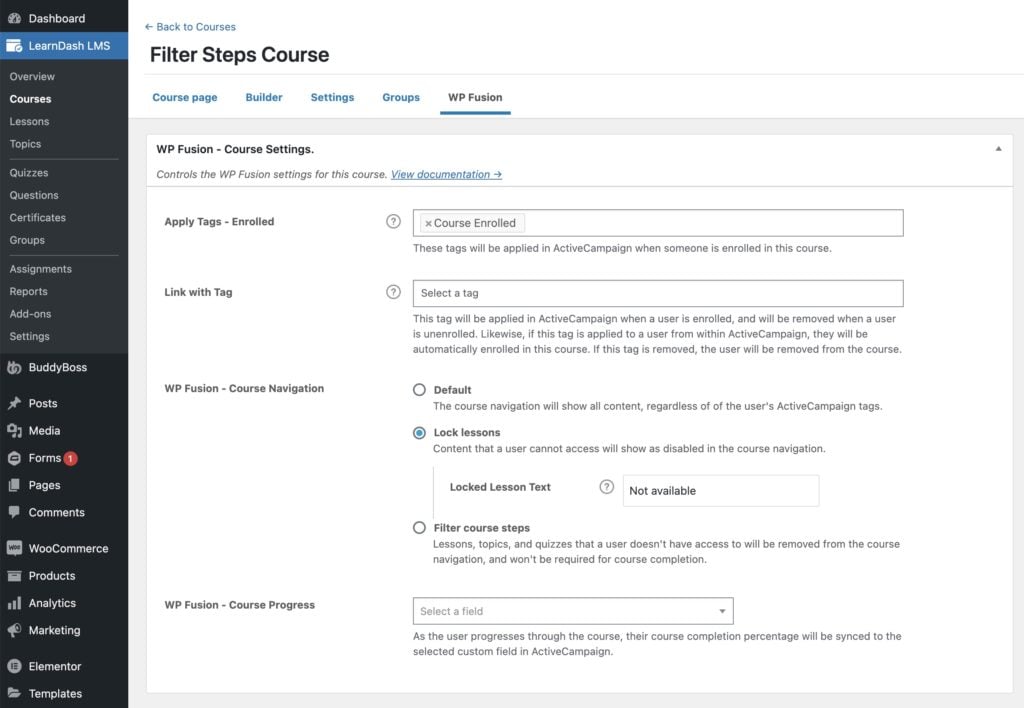
Under the course settings for WP Fusion, there are three options: Apply tags when course begun, Link with Tag, and Apply Tags – Completed.

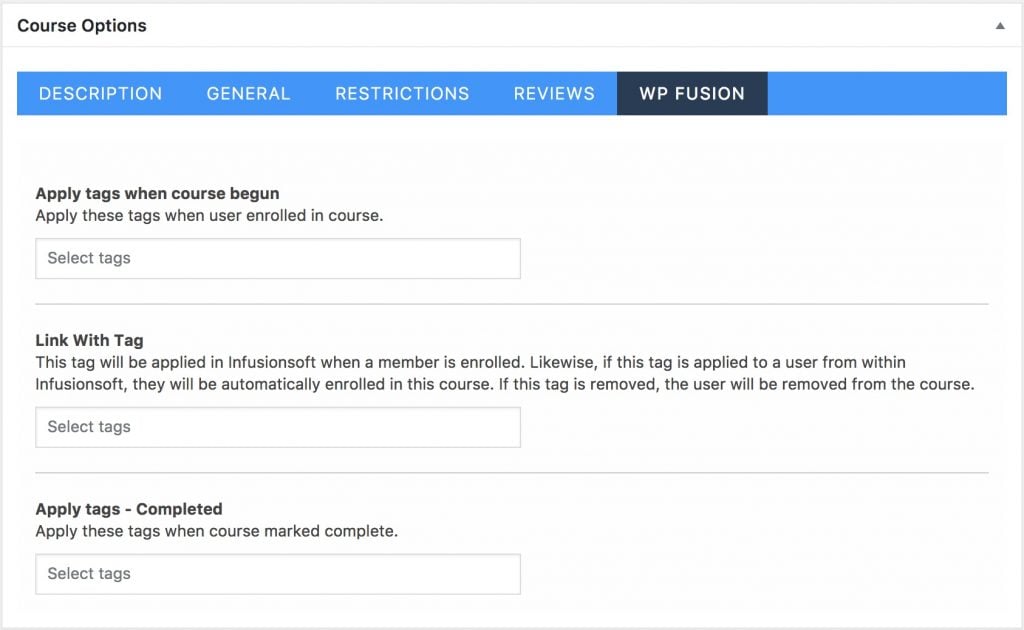
Tags specified in Apply tags when course begun will be applied when a user is enrolled in the course. Note that this does not apply to course access that is granted via a Membership.
Tags specified in Apply – Completed will be applied when a user marks the course complete.
#Course Auto-Enrollment
The Link with Tag setting lets you automatically enroll users in courses based on a tag in your CRM. When the selected tag is applied the user will be enrolled, and when the tag is removed the user will be unenrolled. This is a good way to automate course access based on automations in your CRM or purchases in other plugins.
Note: WP Fusion only allows you to use a single linked tag for auto-enrollment into courses. For more info on this see the FAQ.
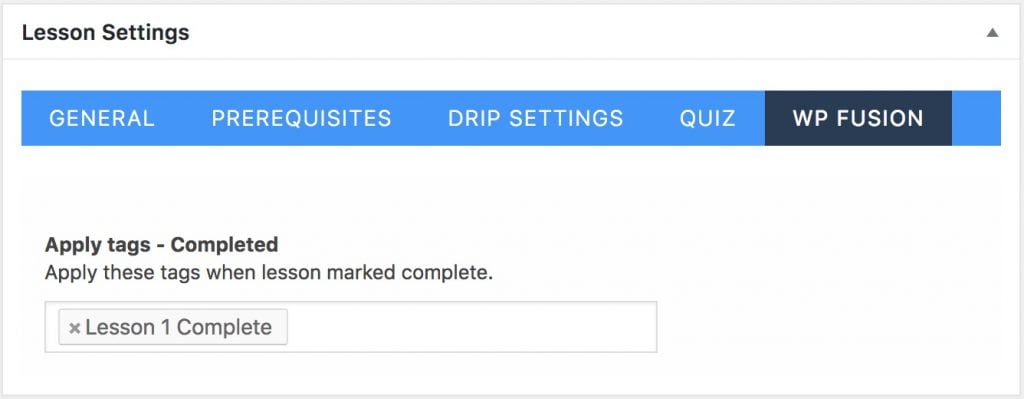
#Lessons
The settings area for lessons in similar, but only provides the option to apply tags when a lesson is marked complete.

#Memberships
WP Fusion also supports applying tags to a user when they are added to a membership level. You can configure this from the new WP Fusion tab added to the LifterLMS membership settings page.

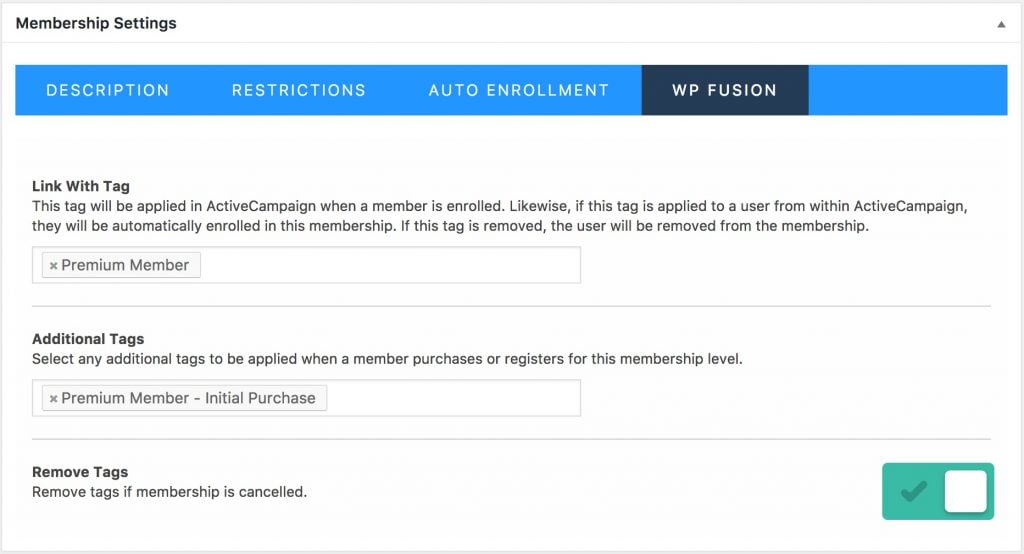
There are three options, Link with Tag, Additional Tags, and Remove Tags.
Link with Tag: Linking a membership with a tag lets you automatically set a membership level via an automation in your CRM. By applying a tag in your CRM (「Premium Member」 in the example above) and sending a Webhook or HTTP Post, the user will automatically be added to the membership level. If this tag is removed, the user will be removed from the membership level.
Note: WP Fusion only allows you to use a single linked tag for auto-enrollment into memberships. For more info on this see the FAQ.
Additional Tags are tags that will be applied one-time when a user first purchases or registers for the membership level. You can use these to track and engage with new customers.
Remove Tags will automatically remove the tags above if the membership is cancelled or a student is removed from the membership.
#Access Plans
WP Fusion also allows you to associate tags with LifterLMS Access Plans, so you can tag students based on how they signed up for your courses.

The settings for WP Fusion appear above the Description field when editing an Access Plan. These tags will be applied to a student when they purchase a plan, or sign up for a free plan.

#Quizzes
WP Fusion supports applying tags when a quiz is attempted in LifterLMS, and when a quiz is passed. To set this up, expand the WP Fusion section while editing any quiz.

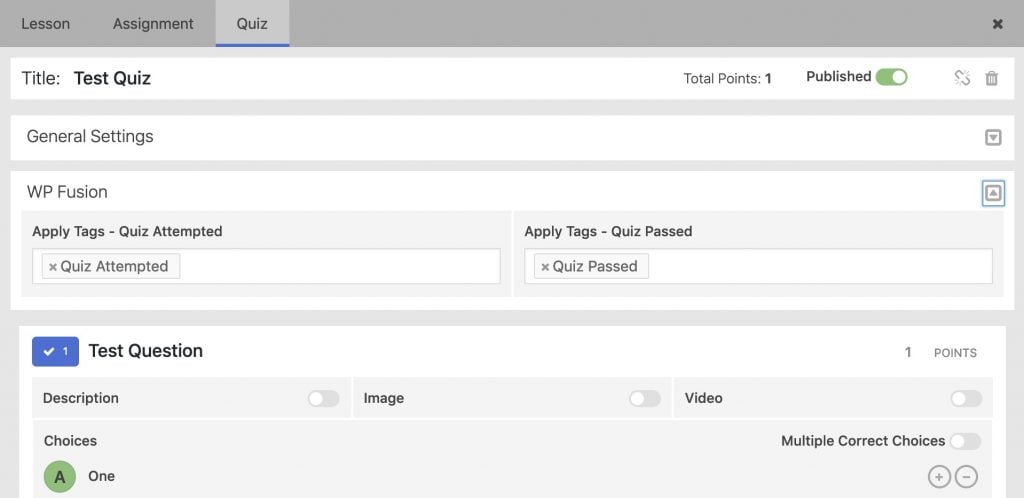
The Quiz Attempted tags will be applied whenever the quiz is attempted. The Quiz Passed tags will only be applied if the student receives a passing grade.
#Engagements
It』s also possible to automatically trigger an Engagement in LifterLMS when a CRM tag is applied to a student. This Engagement can then award an Achievement or a Certificate.

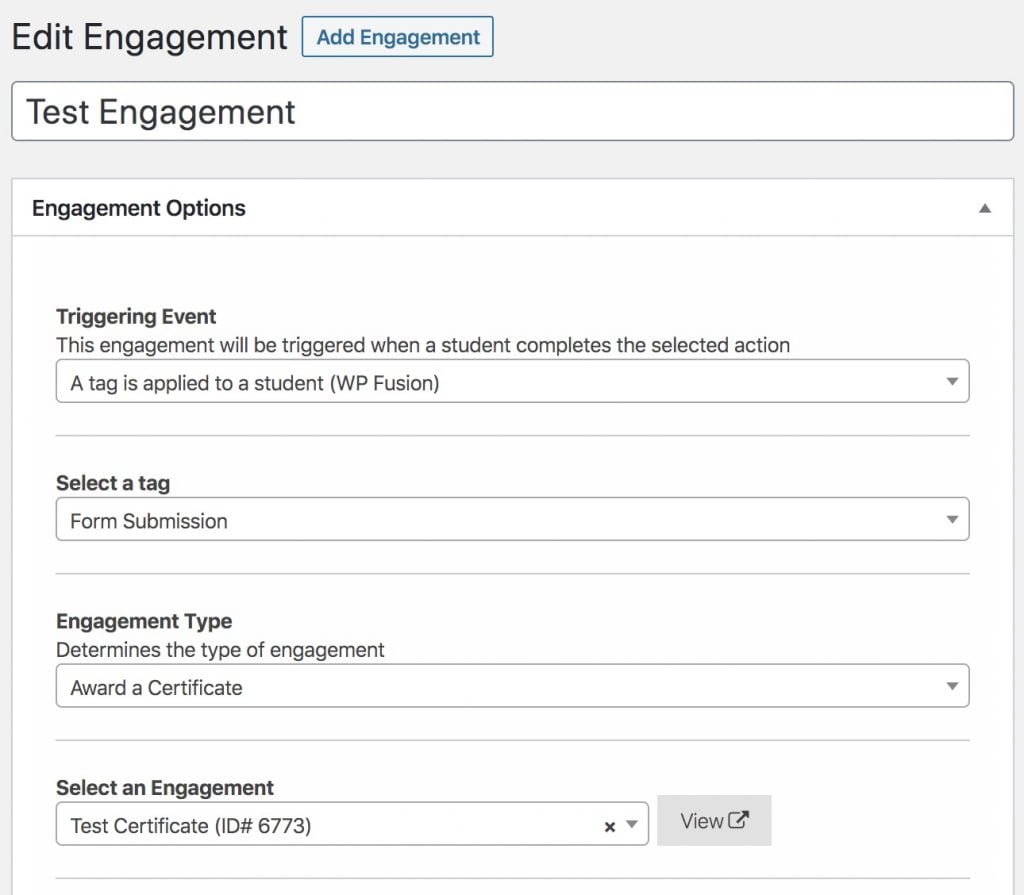
To set this up, create a new Engagement and for the Triggering Event, select 「A tag is applied to a student」. A box will then appear where you can select the tag to be used as the trigger, and you can select the Certificate or Engagement to award.
This is a great way to award Engagements based on events and automations in your CRM. For example you could grant a student a certificate when they』ve been a member of your site for one year.
#Vouchers
WP Fusion supports applying tags in your CRM when a LifterLMS voucher is used during registration on your site.
To set this up, head to Orders » Vouchers » Edit Voucher, and click on the WP Fusion tab.

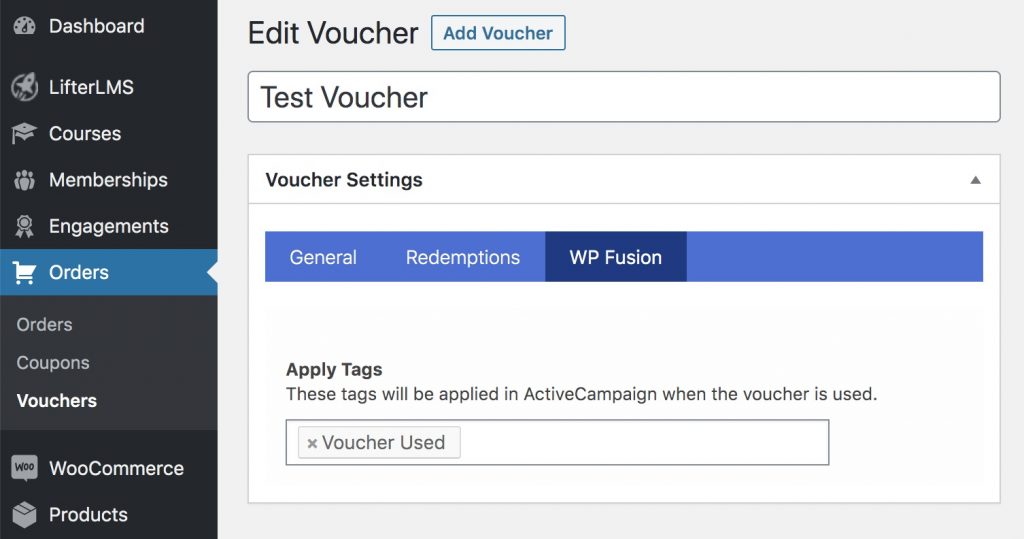
When a user registers with a voucher they will be synced to your connected CRM as a contact record, and any tags specified in the Apply Tags setting will be applied.
#Groups
WP Fusion includes support for the LifterLMS Groups extension, allowing you to apply tags in your CRM when members are added to groups.
To set this up head to Groups » WP Fusion in the WordPress admin.

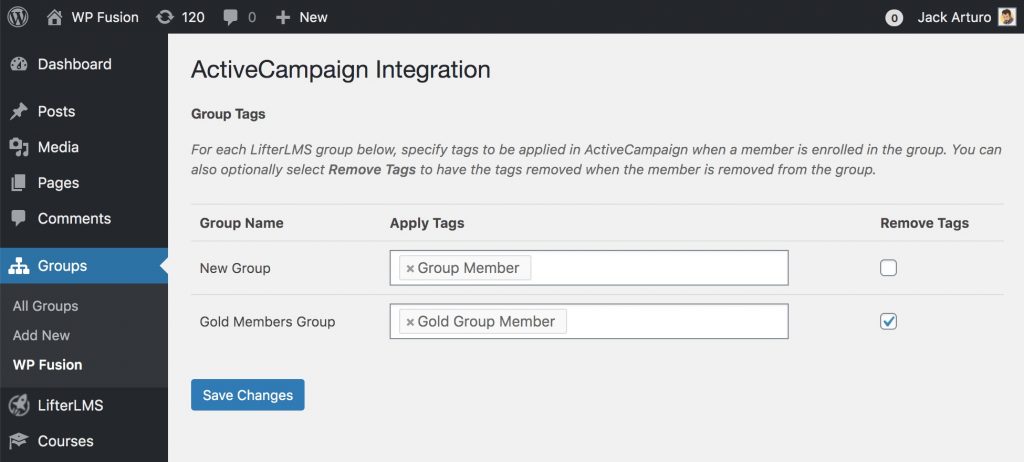
For each LifterLMS group in the table there are two options:

Apply Tags: The tags selected here will be applied in your CRM when a member joins a group.
Remove Tags: If this box is checked, the tags that were applied during enrollment will be removed when a user is removed from a group.

#Tracks
WP Fusion includes support for LifterLMS course tracks.

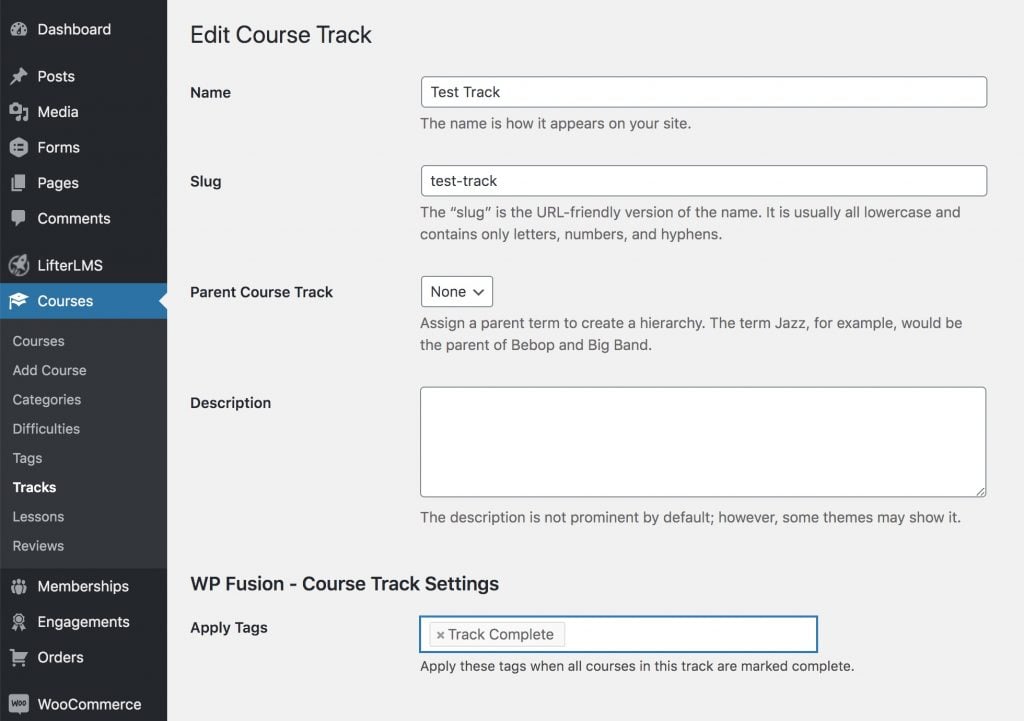
When editing any track, you can specify tags to be applied in your CRM when all courses in that track are completed.
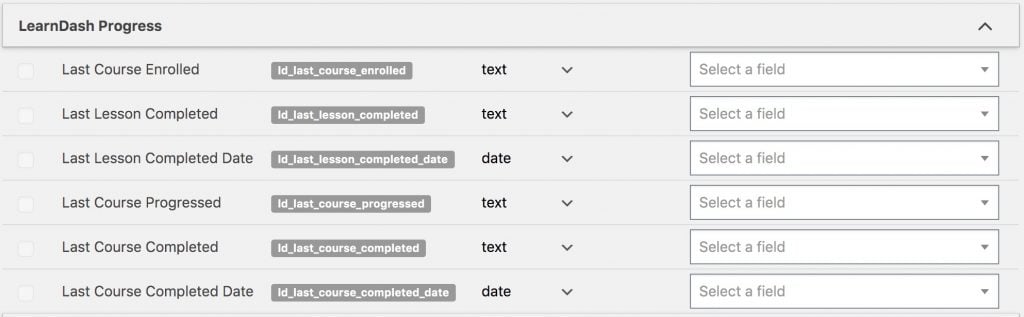
#Syncing Meta Fields
WP Fusion enables several LifterLMS meta fields for sync to your CRM. These can be found under Settings » WP Fusion » Contact Fields.
In addition to the checkout fields WP Fusion adds two 「pseudo」 fields, Last Lesson Completed and Last Course Completed. These are found under the LifterLMS Progress heading.

If these fields are enabled, the title of the last lesson or course completed will be synced to a custom field in your CRM when the content is marked complete.
You can use these fields to track progress in your CRM and potentially reduce the number of tags that need to be applied to a contact.
#Custom Fields
If you』re using the LifterLMS Custom Fields addon to add custom fields to your registration or account forms, these will be detected automatically by WP Fusion and will show up for sync under the LifterLMS header on the contact fields list.
When a user registers or updates their profile, any enabled fields will be synced to the corresponding custom fields in your CRM.
#Event tracking
Using the Event Tracking addon, you can track LifterLMS course progress as events in supported CRMs.
Events can be configured in two places. On an individual course, under the course settings for Event Tracking:
Event tracking can be configured when editing any course under the course settings for Event Tracking.
Or in the Event Tracking global settings:
Event tracking can also be configured globally at Settings » Event Tracking.
The available triggers for event tracking with LifterLMS are:

Course Progress: Triggered whenever a lesson, topic, or quiz is completed within the course, as well as when the course itself is completed.
Quiz Completed: Triggered whenever a quiz in the course is marked complete.
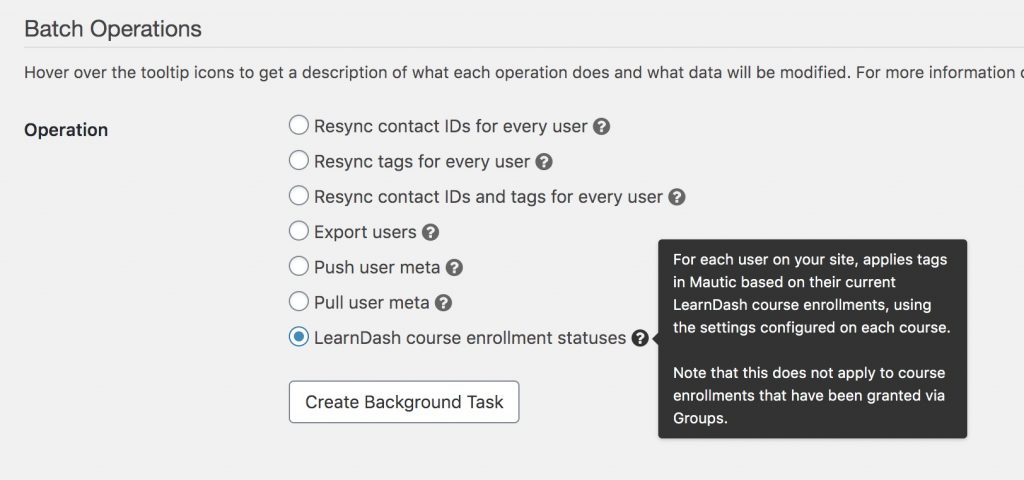
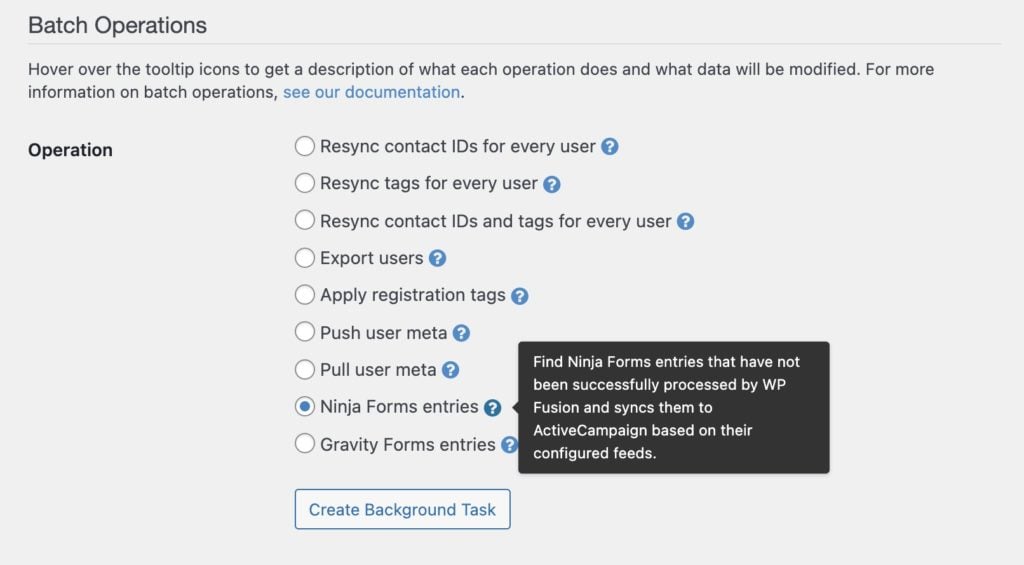
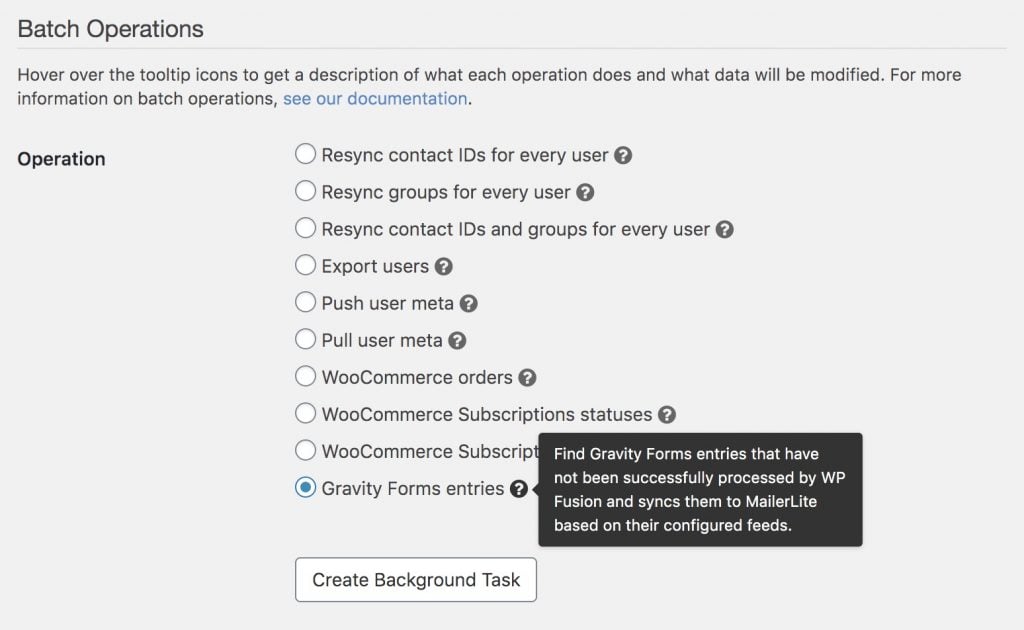
#Batch Operations
WP Fusion includes a batch processing tool to retroactively apply tags in your CRM based on each user』s current course or membership enrollments in LifterLMS.
This is found at Settings » WP Fusion » Advanced » Batch Tools.

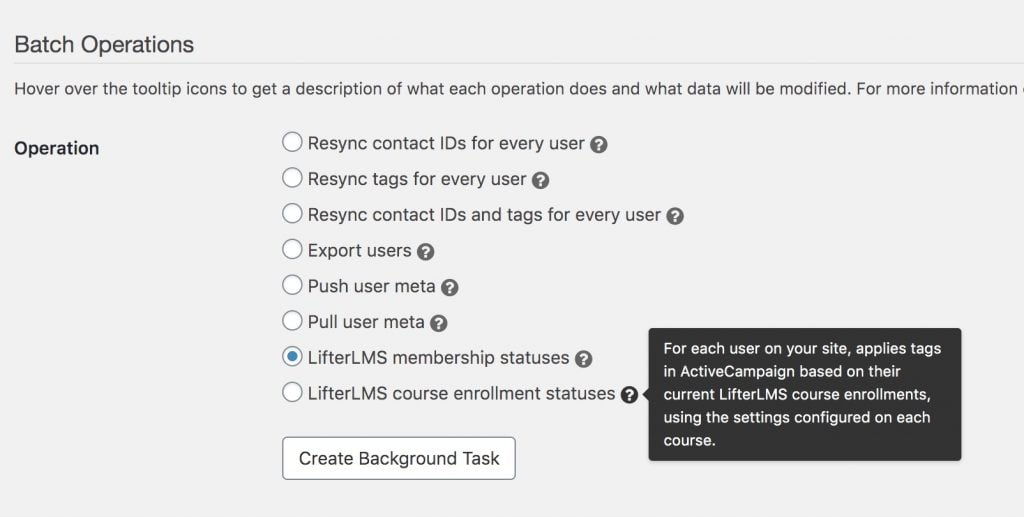
There are two options:

LifterLMS membership statuses: Applies tags for all LifterLMS members based on the tags configured for their membership level. If memberships have been cancelled, and you』ve selected 「Remove tags if membership is cancelled,」 the tags will be removed.
LifterLMS course enrollment statuses: For each user on your site, applies tags in your CRM based on their current LifterLMS course enrollments, using the settings configured on each course.

#Was this helpful?

Let us know if you liked the post. That』s the only way we can improve.

Yes

No

LearnPress

LearnPress

#Overview
Using WP Fusion and LearnPress LMS, you can restrict access to your courses and other content based on a user』s CRM tags. You can also apply tags to a user when they』ve begun a course, and track student progress by applying tags when courses and lessons are marked complete.
#Access Control
For more information on controlling access to LearnPress courses based on CRM tags, see the documentation on WP Fusion』s access control features.
#Tagging
WP Fusion lets you apply tags when students are enrolled into LearnPress courses, as well as when courses and lessons are marked complete.
#Courses
WP Fusion settings when editing a LearnPress course
#Lessons
WP Fusion settings when editing a LearnPress lesson

#Was this helpful?

Let us know if you liked the post. That』s the only way we can improve.

Yes

No

LearnDash

LearnDash

#Overview
Using WP Fusion and LearnDash, you can automatically add students to your CRM of choice when they register on your site.
You also can restrict access to course content using tags in your CRM, apply tags based on progress, and use tags as automated triggers for course and group enrollments.
#Courses, Lessons, & Topics
You can restrict access to Courses, Lessons, and Topics based on a user』s CRM tags, and redirect them to another page (like a sales page) if they don』t have the required tags.
You can also apply tags to a user when they』ve begun a course, lesson, or topic, and likewise when it has been marked complete.
See the screenshot below for an example of the options WP Fusion offers you when configuring a LearnDash course or lesson:

For more information on restricting access to content and the main WP Fusion meta box, see the documentation here.
#Lesson, topic, and quiz access rules
By default, if a course is protected by WP Fusion, then every lesson, quiz, and topic in that course will inherit the same access rules.
If needed you can override this by configuring the WP Fusion meta box on any lesson (or quiz or topic) individually. If access rules have been specified on any lesson, quiz, or topic, then those rules will take priority over the course settings.
#Course settings and Auto-enrollment
WP Fusion also adds some options specific to LearnDash courses. You can find these on the WP Fusion settings panel when editing any course.
WP Fusion's LearnDash course settings
There are four settings here:

Apply tags – Enrolled:  These tags will be applied to a user when they are enrolled in the course, either manually, via a free signup, or another plugin integration. They will not be removed if the student is removed from the course, and they do not affect automated enrollments.
Link with tag: Using this setting you can 「link」 a tag in your CRM with a LearnDash course. When this tag is applied, the user will automatically be enrolled in the course. If the tag is removed, the user will be un-enrolled.Likewise if the user is enrolled in the course (either manually or via a purchase) the linked tag will be applied, and if a user is removed from the course the linked tag will be removed.
Course Navigation: This setting controls how WP Fusion handles the display of restricted lessons and other content in the course navigation. The options are:

Default: The course navigation will show all content, regardless of the user』s CRM tags.
Lock lessons: Lessons the user cannot access will show as disabled. You can optionally specify a message to be displayed as a badge on any locked lessons. See below for more info.
Filter Course Steps: Lessons the user cannot access will be completely removed from the course navigation and progression. This can be used to create personalized courses based on a user』s tags in your CRM (aka 「Adaptive Learning」). See below for more info.

Course Progress: You can optionally select a custom field in your CRM to be used for course progress tracking. When a user』s course progress is updated, their course completion percentage will be synced to the selected custom field.

Note: If you use an auto-enrollment tag, you should set the course price type to 「Closed」 to prevent users from getting automatically enrolled when they register. It』s also not necessary to use 「Restrict access to this course」 if the course type is Closed.
Note: Auto-enrollments are triggered when a user』s tags are modified or loaded from your CRM. Just setting a linked tag on a course will not automatically enroll everyone who has that tag. To trigger a refresh of your users』 tags (and any automated enrollments) you can run a Resync Tags operation from Settings » WP Fusion » Advanced » Batch Operations.
Note: WP Fusion only allows you to use a single linked tag for auto-enrollment into courses. For more info on this see the FAQ
#Lock lessons
If you』ve protected lessons and topics using CRM tags, you can optionally enable the Lock Lessons setting on the course (see Course Settings, below) to display those lessons as locked in the course navigation.
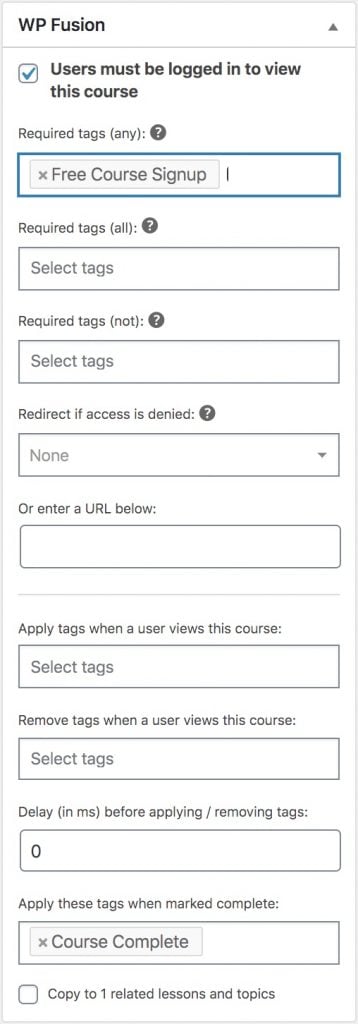
Lessons can be shown as disabled in the course navigation using the Lock Lessons setting.
#Filter Course Steps
This feature (available in LearnDash v3.4.0+) applies WP Fusion』s access rules to each step in the course, (such as lessons, topics, or quizzes). This is the same as enabling Filter Queries, but it can be enabled for individual courses.
When a user doesn』t have access to the step, based on their CRM tags, the step will be hidden from the course navigation, and won』t be required for course completion.
You can use this to create personalized course experiences and objectives for different users based on their CRM tags. For more info see this blog post.

Note: For best compatibility, it』s recommended to enable Shared Course Steps in the LearnDash course settings.
With Shared Course Steps disabled, restricted lessons will be hidden, but the course progress tracker and step count may be inaccurate.

#Strategies for managing course access
There are two common ways to manage LearnDash course access with WP Fusion:
1. (Recommended) Use LearnDash to manage access to the course content, and WP Fusion to trigger enrollments into the course based on tags in your CRM.
This is our recommended setup since it has the best compatibility with LearnDash. With this setup you would:

Leave Users must be logged in to view this course un-checked in the WP Fusion meta box
Set the course access type to Closed
Set an auto-enrollment tag on the course

With this method, LearnDash handles the display of the course overview page based on whether or not a user is enrolled in the course.
This also works properly with Sample Lessons in LearnDash, and drip-feeding course content.
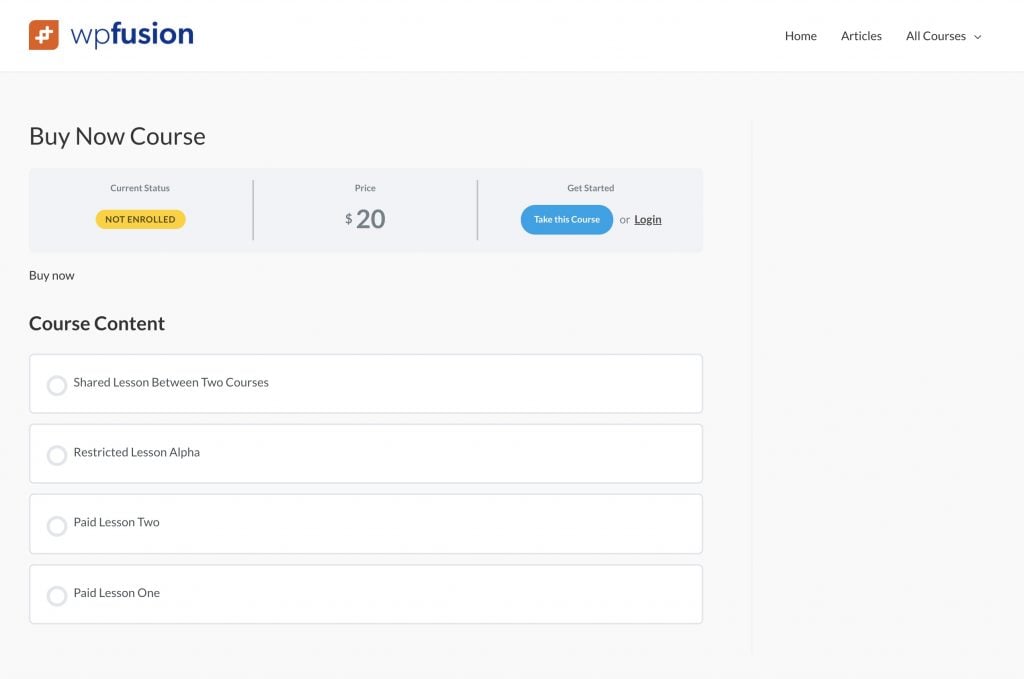
In this screenshot you can see a simple course that the user isn』t currently enrolled in. LearnDash shows a course overview, the price, and links to either purchase the course or log in.
By applying a tag in your CRM, a user can automatically be enrolled in the course (see Auto-enrollment above), and the course overview page will update accordingly.
When a user is enrolled in the course it will also properly update the LearnDash Course Grid, the BuddyBoss enrolled courses list, and any other plugins that work with LearnDash.
For handling course bundles or 「all access passes」, you can also use auto-enrollment tags with LearnDash groups. This lets you create different collections of courses that are managed by a single auto-enrollment tag.
2. (Not recommended) Use WP Fusion to manage access to the course content, bypassing LearnDash』s access rules.
WP Fusion adds a meta box to every post and page on your site that allows you to protect your content using tags in your CRM, and redirect the user to another page if they don』t have the required tags.
Using this meta box you can also protect your LearnDash courses and course content based on CRM tags. With this setup you would:

Select Users must be logged in to view this course in the WP Fusion meta box, and choose some required tags to view the course
Either select a redirect in the meta box, or leave the redirect blank to display the restricted content message
Set the course access type to Open
Do not set an auto-enrollment tag on the course

With this method, every user on the site is automatically enrolled in the course, but they can only view the course content if they have the right tags.
In this screenshot you can see a course page that is protected by WP Fusion, using a CRM tag.
The problem with protecting the visibility of the course with a tag is that you lose all of the LearnDash options for customizing the page appearance when people aren』t enrolled. As well, the user will see themselves as enrolled in all courses, even if they don』t have access— which could be confusing for your students.
For that reason it』s recommended to let LearnDash handle protecting your course content by setting the course access type to Closed, and then using an auto-enrollment tag so that WP Fusion can update student enrollments.
#Quizzes
WP Fusion includes a few settings specific to LearnDash quizzes. These will appear at the bottom of the WP Fusion metabox when editing any quiz in the admin.

In addition to the standard access control options, the available quiz options are:

Apply these tags when quiz passed: These tags will be applied in your CRM when a quiz is submitted and the user has a passing score.
Apply these tags when essay submitted: These tags will be applied in your CRM when a student has submitted an essay. They can be used to trigger an email to the student, or (for example) to create a task for the instructor to grade the essay.
Apply these tags when quiz failed: These tags will be applied in your CRM when a quiz is submitted and the user has a failing score.
Sync final score for this quiz to a custom field: This option allows you to sync a student』s final quiz score to a custom field in your CRM. It will be updated each time the quiz is submitted.
Sync final points for this quiz to a custom field: This is the same as the Sync final score setting except instead of the quiz score, the total points earned by the user will be synced to the selected custom field.

#Quiz Questions

Using WP Fusion you can sync the answers to individual quiz questions to custom fields in your CRM. This can be configured within the WP Fusion meta box when editing any single quiz question.
#Groups
WP Fusion』s settings for LearnDash groups can be found under Settings » Group Access Settings when editing any group.

Similar to Courses, the are two settings here:

Apply tags – Enrolled:  These tags will be applied to a user when they are enrolled in the group, either manually, via a free signup, or another plugin integration. They will not be removed if the student is removed from the group, and they do not affect automated enrollments.
Link with Tag: Using this setting you can 「link」 a tag in your CRM with a LearnDash group. When this tag is applied, the user will automatically be enrolled in the group. If the tag is removed, the user will be un-enrolled. Likewise if the user is enrolled in the group (either manually or via a purchase) the linked tag will be applied, and if a user is removed from the group the linked tag will be removed.
Link with Tag – Group Leader: This setting works similarly to Link with Tag, except for group leaders instead of group members. When this tag is applied, the user will automatically be set as the leader of the group. If the tag is removed, the user will be un-enrolled from the group leader position.

#Assignments
WP Fusion allows you to automatically tag students in your CRM when they upload an assignment to a LearnDash lesson.

This setting appears when editing any lesson where assignment uploads are enabled.
 
#Meta Fields
WP Fusion adds several 「pseudo」 fields that enable syncing a student』s LearnDash progress to custom fields in your CRM. This can be configured under Settings » WP Fusion » Contact Fields.

The fields are:

Last Course Enrolled: When a student is enrolled in a course, the name of the course will be synced.
Last Lesson Completed: When a lesson is marked complete, the name of the lesson will be synced.
Last Lesson Completed Date: When a lesson is marked complete, the date and time will be synced.
Last Course Progressed: Whenever a student completes any content in a course (lesson, topic, quiz, etc.) the name of the course will be synced.
Last Course Completed: When a course is marked complete, the name of the course will be synced.
Last Course Completed Date: When a course is marked complete, the date and time will be synced.

You can use these fields to track progress in your CRM and potentially reduce the number of tags that need to be applied to a contact.
Note: These values will be synced to your CRM in real time as students progress through course content. Because this data is tracked by WP Fusion (and not LearnDash), it』s not possible to export the progress data from before you installed WP Fusion.
#ThriveCart
Using the LearnDash + ThriveCart extension you can automatically enroll new students into LearnDash courses after a successful ThriveCart purchase.
With LearnDash 3.4.0 and higher, WP Fusion can automatically detect new users imported from ThriveCart, and sync their randomly generated password back to your CRM for sending in a welcome email. To enable this, simply turn on the Return Password setting from the Webhooks section in the WP Fusion settings.
#Event tracking
Using the Event Tracking addon, you can track LearnDash course progress as events in supported CRMs.
Events can be configured in two places. On an individual course, in the Settings panel, on the WP Fusion metabox:
Event tracking can be configured in the Settings panel when editing any course on the WP Fusion metabox.
Or in the Event Tracking global settings:
Event tracking can also be configured globally at Settings » Event Tracking.
The available triggers for event tracking with LearnDash are:

Course Progress: Triggered whenever a lesson, topic, or quiz is completed within the course, as well as when the course itself is completed.
Quiz Completed: Triggered whenever a quiz in this course is marked complete.

#Batch Operations
WP Fusion includes two batch processing tools to retroactively apply tags in your CRM based on each user』s current course and/or group enrollments in LearnDash.
These are found at Settings » WP Fusion » Advanced » Batch Tools.

#Course enrollment statuses
When you run the LearnDash course enrollment statuses operation, WP Fusion will check the current course enrollments for each user on your site, and apply any tags configured for that course.
This will not apply any tags if the user is enrolled in a course as part of a LearnDash Group.
This will not update any course or group enrollments (via linked tags), it only applies tags in your CRM.
#Course progress
The LearnDash course progress batch operation will check the course progress for each user on your site, and retroactively apply any tags configured in the Apply tags when marked complete setting for every course, lesson, topic, and quiz the user has already completed.
#Group enrollment statuses
When you run the LearnDash group enrollment statuses operation, WP Fusion will check the current group enrollments for each user on your site, and apply any tags configured for that group (the Apply Tags – Enrolled and Link With Tag settings).
This will not update any course or group enrollments (via linked tags), it only applies tags in your CRM.

#Was this helpful?

Let us know if you liked the post. That』s the only way we can improve.

Yes

No

CoursePress

CoursePress

#Overview
Using WP Fusion and CoursePress by WPMU Dev, you can automatically add students to your CRM of choice when they register on your site.
You can also restrict access to course content, and apply tags based on progress through courses and units.
#Settings
To set up tagging based on progress through a course, open the course editor in the admin and scroll to the bottom of the page.

Here you will see an option to apply tags in your CRM when a course has been marked completed.
You can also set tags to be applied when any unit is completed. If this section isn』t shown, first create some units and then return to the main course edit page to configure tagging.

#Was this helpful?

Let us know if you liked the post. That』s the only way we can improve.

Yes

No

WS Form

WS Form

#Overview
Using WP Fusion, you can send entries from WS Form to any one of 42+ supported CRMs and marketing automation tools.
#Setup
After creating your form and adding some fields, go to the Actions panel and add a new action. From the dropdown select WP Fusion.

In the panel that appears, you can then configure how the form data should be synced to your CRM.

The options are:

Opt-In Field: Here you can (optionally) select a custom field on your form that must be checked for data to be synced to your CRM, for example a GDPR consent field. This works best with a checkbox field.
Add Only: If checked, only new contacts will be synced to your CRM, existing contacts will not be updated.
Field Mapping: For each field on your form you can select a corresponding custom field in your CRM. To add a new field mapping, click the + icon. If your CRM supports it, you can also select Create Tag(s) from Value to automatically convert the submitted value(s) into tags.
Custom Field Mapping: Custom field mapping allows you to push custom values (including WS Form variables) to fields in your CRM. Select a field in your CRM from Key dropdown and then enter your custom field value under the Value header.
Apply Tags: Here you can select any number of tags to be applied in your CRM when the form is submitted. Press the + icon to add a new tag.

When the form is submitted a new contact record will be created in your CRM containing all of the fields you』ve enabled for sync. If an existing contact is found (by email address), then the existing contact will be updated (no duplicate contact will be created).

#Was this helpful?

Let us know if you liked the post. That』s the only way we can improve.

Yes

No

WPForms

WPForms

#Overview
WP Fusion integrates with WPForms to save form submissions to your CRM or marketing automation system. Using WP Fusion you can add and update contacts when forms are submitted, and also apply tags.
#Setup
After creating a form, navigate to the Marketing settings section and select WP Fusion from the list. Click 「Add New Connection」 to create a new feed.

For each field on your form you can select the corresponding CRM field where the data should be stored. You can also specify any tags that should be applied to contacts when the form is submitted.
You can also create multiple connections and use the conditional logic options to apply different tags depending on the values of form fields.

#Was this helpful?

Let us know if you liked the post. That』s the only way we can improve.

Yes

No

Piotnet Forms

Piotnet Forms

#Overview
Using WP Fusion, you can send entries from Piotnet Forms to any one of 42+ supported CRMs and marketing automation tools.
#Setup
After creating your form and adding some fields, go to the admin Edit Form screen, and you』ll see a meta box where you can configure the field mapping between your form fields and fields in your CRM.

You can also apply tags to contacts when the form is submitted.
When the form is submitted a new contact record will be created in your CRM containing all of the fields you』ve enabled for sync. If an existing contact is found (by email address), then the existing contact will be updated (no duplicate contact will be created).

#Was this helpful?

Let us know if you liked the post. That』s the only way we can improve.

Yes

No

Ninja Forms

Ninja Forms

#Overview
WP Fusion integrates with Ninja Forms to save form submissions to your CRM or marketing automation system. Using WP Fusion you can add and update contacts when forms are submitted, and also apply tags.
#Setup
After creating a form, navigate to the Emails & Actions section and click the blue plus icon to add a new action.

Select WP Fusion from the list, and click on the gear icon to open the WP Fusion configuration panel.

At the top you will see a setting for Apply Tags. Here you can enter a comma-separated list of tags to apply in your CRM when the form is submitted. You can use either tag labels or tag IDs.
Below you will see a field mapping interface. Click Add New to add a new field mapping. In the left column you』ll be able to select a field from your Ninja Form, and in the right column you』ll be able to select a corresponding field in your connected CRM.
Note: For guest (not logged-in) form entries to sync, you must have at least an email address field on the form and configured for sync.
#Syncing historical entries
If you already have existing Ninja Forms entries from before you installed WP Fusion, you can use a batch processing tool to export all of those entries to your CRM.
First configure your form feeds. Then navigate to Settings » WP Fusion » Advanced and scroll down to the Batch Operations section.

Select 「Ninja Forms entries」 from the list of options, and click Create Background Task.
WP Fusion will go through all of your historical entries, processing each according to the WP Fusion actions set up on the corresponding form. A status bar will appear at the top of the page indicating the progress.
After each entry is processed it will be locked by WP Fusion so it can』t be exported again, to prevent duplicate data from going to your CRM.

#Was this helpful?

Let us know if you liked the post. That』s the only way we can improve.

Yes

No

Gravity Forms

Gravity Forms

#Overview
WP Fusion integrates with Gravity Forms to send new form submissions to any one of 40+ CRMs and marketing automation tools, allowing you to track and engage with leads.
It also supports the Gravity Forms User Registration Add-on for user registrations.
#Setup
First create a form in Gravity Forms and save it. Then you』ll be able to access the WP Fusion feeds list via the Form Settings menu.
Screen-Shot-2016-01-28-at-06.20.59-(2)
Here you will be asked to create a new WP Fusion Feed.
Screen Shot 2016-01-28 at 06.23.12
#Feed Settings
On the feed settings panel, WP Fusion will list all of your form fields. In the right column you can use the dropdown to select a corresponding custom field in your CRM.

Underneath the Form Fields you』ll find additional meta fields related to the form, such as IP address, entry URL, and form ID.
#Tagging leads
Underneath the field mapping list, you can configure any tags you』d like to be applied when the form is submitted.

Depending on your connected CRM you may see an option to select lists in addition to tags.
#Conditional logic
Finally you have the ability to create conditional logic to decide if the feed runs on form submission.
Screen Shot 2016-01-28 at 06.29.30
If any of the conditions are not met the form will be submitted but the feed will not run. You can have multiple feeds per form.
#Video
Here is a video showing the process.

#Auto-login
If you have form auto login enabled in the WP Fusion settings, tracking cookies will be set when a guest user submits a form. This allows you to apply tags via a form submission and then use those tags on subsequent pages to grant access to content and track activity.
#Pre-fill form fields
You can pre-fill Gravity Forms form fields with user data, and this also works with auto-login sessions. For example {user:first_name}.
For a reference, see the Gravity Forms documentation.
Note that the field names must be usermeta field names, not CRM field names (you can see your usermeta field names when looking at the Contact Fields list in the WP Fusion settings).
When the auto-login link is visited, any enabled fields are loaded from your CRM and cached in the corresponding user meta field keys in WordPress. It』s these fields that are then displayed by the {user:field_name} merge tag.
Note that as of v3.38.5 of WP Fusion, this feature no longer requires Set Current User to be enabled in WP Fusion』s auto-login settings, it will work automatically when an auto-login session is detected.
#Return after login
It』s possible to require an email optin via a Gravity Forms form in order to access protected content on your site.
To set this up, first go into the post you』d like to protect, and in the WP Fusion meta box, enable Users must be logged in to view this content. You can optionally specify some required tags. For the Redirect if access is denied, select the page with your form from the dropdown.
Then in the main WP Fusion settings, enable the option for Form Auto Login. This will start a tracking session whenever your form is submitted.
Finally, enable the setting for Return After Login.
Now, when a visitor tries to access the protected content, they will be redirected to the page with your Gravity Forms optin form on it. When the form is submitted, a contact record will be created in your connected CRM, and any specified tags will be applied.
This will start an auto-login session, which unlocks any content protected by WP Fusion. Finally, the Return After Login feature will redirect the lead back to the post or page they』d previously tried to access.
#Merge fields
WP Fusion makes a {contact_id} merge field available for use in Gravity Forms notifications.

You can use this to include a link to the contact record in notification emails.
#Managing entries
When WP Fusion processes a Gravity Forms entry it will add a note to the entry indicating the contact ID that was created/updated in your CRM. If there are any API errors these will also be saved as a note on the entry.

WP Fusion also adds a metabox to the side of every entry where you can view the status of that entry, with a link to view the corresponding contact record in your CRM.
If an entry didn』t sync correctly for some reason, you can click the Process WP Fusion actions again button to re-send the form entry to your CRM.
#Event Tracking
Using the Event Tracking addon, you can track Gravity Forms entries as events in supported CRMs.
Events can be configured when editing individual forms, by creating an Event Tracking Feed:
Event tracking can be configured on the Event Tracking Feed when editing any Gravity Forms
#Syncing historical entries
If you already have existing Gravity Forms entries from before you installed WP Fusion, you can use a batch processing tool to export all of those entries to your CRM.
First configure your form feeds. Then navigate to Settings » WP Fusion » Advanced and scroll down to the Batch Operations section.

Select 「Gravity Forms entries」 from the list of options, and click Create Background Task.
WP Fusion will go through all of your historical entries, processing each according to the feeds set up on the corresponding form. A status bar will appear at the top of the page indicating the progress.
After each entry is processed it will be locked by WP Fusion so it can』t be exported again, to prevent duplicate data from going to your CRM.

#Was this helpful?

Let us know if you liked the post. That』s the only way we can improve.

Yes

No

Formidable Forms

Formidable Forms

#Overview
WP Fusion integrates with Formidable Forms to add contacts to your CRM when they submit a form on your site. You can also tag contacts based on the form that was submitted.
#Setup
After creating your form, go to the form settings and open the Form Actions tab. From the actions row, click the up arrow icon to create a new WP Fusion action.

For each field on your form, you can select a corresponding contact field in your CRM to save the data. You can also specify tags to be applied to the contact when they fill out the form.
If you are using Formidable Forms Pro and conditional logic, you can create multiple WP Fusion form actions to apply different tags based on your conditional logic rules.
#User Registration
If you』re using the User Registration addon for Formidable Forms, WP Fusion can also sync user registrations and profile updates to your connected CRM.
In this case it』s not necessary to set up a WP Fusion form action.
#Action Setup
After creating your registration or profile form, add a User Register action under the Actions and Notifications panel in the Formidable Forms settings.

For each form entry you』d like to save to the user record, create a meta name, and select the corresponding form field.
For more information on the User Registration action setup, see the Formidable Forms documentation.
#Syncing the fields to your CRM
Once you』ve configured the User Registration action, head to the Contact Fields tab in the WP Fusion settings and scroll down to the Formidable Forms Registration section.

For each registration field you』ll be able to select a corresponding field in your CRM to store the data.
When a user registers or updates their profile, the selected fields will be synced to your CRM.

#Was this helpful?

Let us know if you liked the post. That』s the only way we can improve.

Yes

No