How To Connect Mautic To WordPress

How To Connect Mautic To WordPress

In this video, you will learn how to install WP Fusion and set up a direct connection to your Mautic account.
To get started install and activate the plugin, then navigate to settings -> WP Fusion.
Next, go to settings -> WP Fusion
And from the 『Select Your CRM List』 choose 『Mautic』
To enable the connection to Mautic we first need to enable API access in your Mautic account.
To do this, log in to Mautic and click on the gear icon in the top right, then choose 『Configuration』.

Click on 『API Settings』
And select 『Yes』 for API Enabled and 『Enable basic auth』
Then, click on 『Apply』.

Finally, return to WordPress and enter your Mautic URL, Username and Password.

Then click on 『Connect』
WP Fusion will now establish a direct connection to your Mautic account and import your tags and custom fields.
To finalize the process click on 『Save Changes』.
 

#Was this helpful?

Let us know if you liked the post. That』s the only way we can improve.

Yes

No

Salon Booking

Salon Booking

#Overview
WP Fusion integrates with Salon Booking to add customers to your CRM of choice when they make a reservation, and apply tags based on the services booked.
#Customer Data
With WP Fusion active all new customers will have their name and email address synced to your CRM when they make a new booking.

You can also optionally sync their address and phone number to custom fields by enabling these fields for sync under the Salon Booking header in the WP Fusion settings.
#Applying Tags
When editing any Salon Booking service you』ll see a meta box where you can specify tags to be applied in your CRM when a booking is made for that service.

#Was this helpful?

Let us know if you liked the post. That』s the only way we can improve.

Yes

No

How to Connect Salesforce to WordPress

How to Connect Salesforce to WordPress

In this video, you will learn how to install WP Fusion and set up a direct connection to your Salesforce account.
To get started install and activate the plugin, then navigate to settings -> WP Fusion.
From the 『Select Your CRM』 dropdown choose 『Salesforce 』.
To enable the connection we need to authorize with Salesforce and generate access keys for your website.
1. Click 『Authorize with Salesforce』:

2. Login to your WP Fusion account:

3. Allow WP Fusion (OAuth):

WP Fusion will now establish a direct connection to your Salesforce account and import your tags and custom fields.

To finalize the process click on 『Save Changes』.

4. Important: Complete the app installation in Salesforce.
WP Fusion is now connected to Salesforce, but the access will expire when your refresh token expires.
To prevent the refresh token from expiring, go to Salesforce and navigate to Setup » Connected Apps OAuth Usage and click Install next to WP Fusion.

#Refresh Token Policy
By default WP Fusion is installed with an indefinite refresh token.
However, we have seen some Salesforce apps with different security policies that cause the WP Fusion app to get installed with a temporary refresh token.
That means that when the refresh token expires, you』ll need to click the Reauthorize With Salesforce link again.
To fix this, head to Settings » Connected Apps » WP Fusion and make sure the Refresh Token Policy is set to Refresh token is valid until revoked.

#Was this helpful?

Let us know if you liked the post. That』s the only way we can improve.

Yes

No

How to Connect NationBuilder to WordPress

How to Connect NationBuilder to WordPress

In this video, you will learn how to install WP Fusion and set up a direct connection to your NationBuilder account.
To get started install and activate the plugin, then navigate to settings -> WP Fusion.
From the 『Select Your CRM』 list choose 『NationBuilder』
To enable the connection to NationBuilder we need to locate your Nation Slug.
To find the 『Nation Slug』 login to your NationBuilder account and look at the URL in your browser』s address bar.
The first part, immediately after https and prior to 『NationBuilder』 is your subdomain. Or in your NationBuilder navigate 『Settings -> Nation Defaults』 and look on your 『Primary website』

Copy the Nation slug and paste it into the appropriate field in WP Fusion.

Then, click on 『Authorize with NationBuilder』.
WP Fusion will now establish a direct connection to your NatinBuilder account and import your tags and custom fields.
To finalize the process click on 『Save Changes』.

#Was this helpful?

Let us know if you liked the post. That』s the only way we can improve.

Yes

No

The Events Calendar / Event Tickets

The Events Calendar / Event Tickets

#Overview
WP Fusion integrates with The Events Calendar and Event Tickets by Modern Tribe, letting you add contacts to your CRM of choice and apply tags when attendees register for events or purchase tickets.
You can also track event attendance by syncing check-in data for attendees to a custom field on their contact record in your CRM.
#Event Tickets

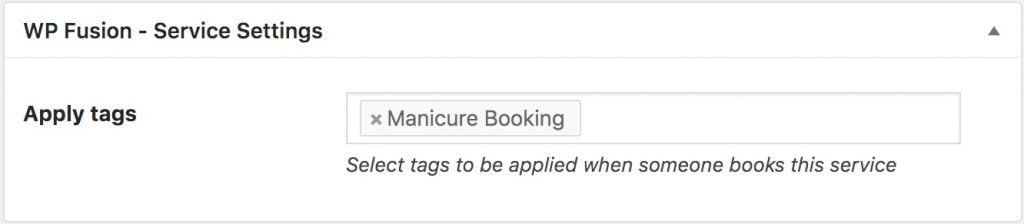
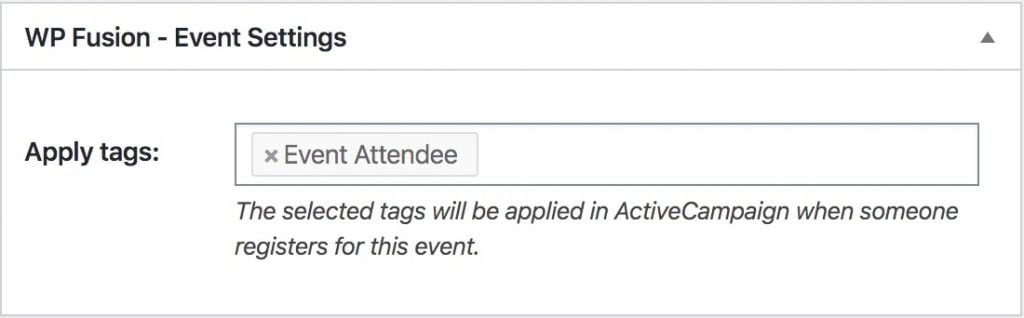
When adding a new ticket to an event, you』ll see a new option to select tags to apply. When the guest makes an RSVP to your event, their contact information be sent to your CRM, and any tags specified here will be applied.
Note: WP Fusion』s ticket settings do not appear on tickets added as blocks in the Gutenberg editor. To manage WP Fusion』s settings for tickets you can add tickets to an event via Events » Add New, or install the Classic Editor plugin.
#Moving Tickets
With Event Tickets, attendees can be moved from one event to another. If this happens, the tags from the original event will be removed, and the tags for the new event will be applied. Any enabled event or venue fields will also be synced to the CRM with the values for the new ticket.
#Syncing event details
WP Fusion also lets you sync the event date, time, and location to the contact record, so this data can be merged into emails. See below for an example.

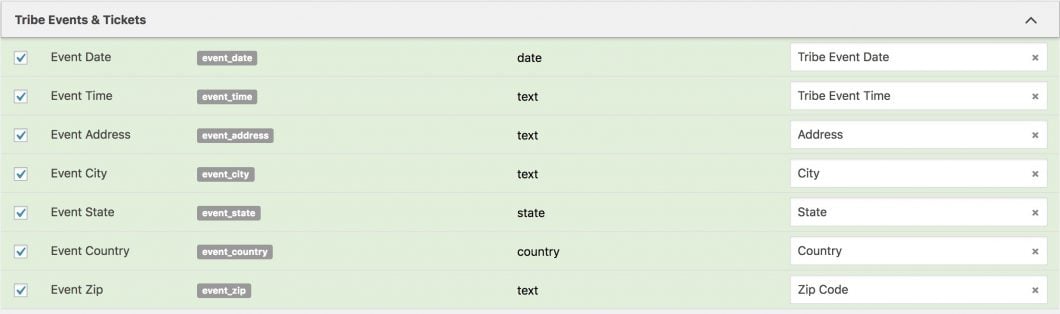
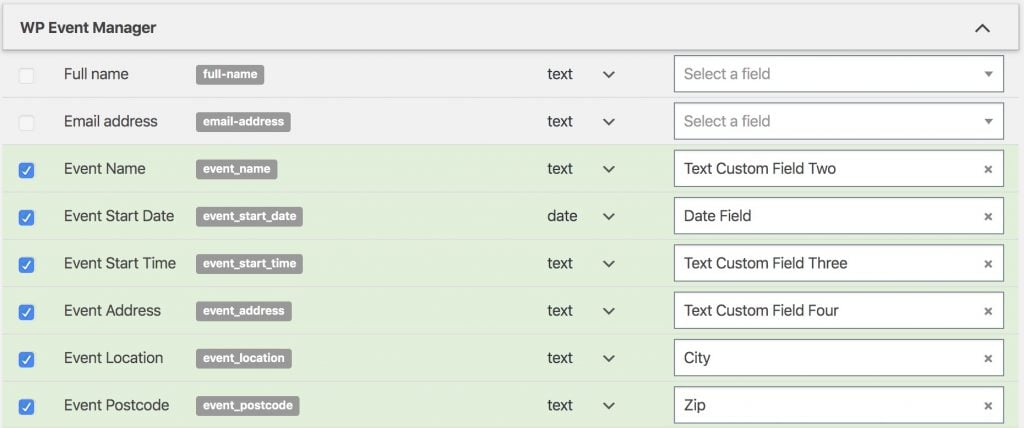
If you』re using The Events Calendar Pro, you have the option to create custom fields for your events. Any custom fields you』ve created for events will also show up on the Contact Fields list in the WP Fusion settings, and they will be synced when an attendee RSVPs for an event or purchases a ticket.
#Event Tickets Plus
Event Tickets Plus allows for even more flexibility with creating events. You can sell tickets to events using Easy Digital Downloads or WooCommerce, and collect additional information about attendees during the registration process by adding custom fields to the ticket settings.

Any custom fields added to an event will show up under the Contact Fields section in the WP Fusion settings page. You can then map these to fields in your CRM and record relevant attendee information.

#Multiple Attendees
If you』ve added a custom email field to your Event Tickets Plus ticket form, WP Fusion can sync each event attendee to a separate contact record in your CRM, and the tags specified in the Apply tags setting will be applied to each contact.

To enable this feature check the box for Add attendees when editing any RSVP or WooCommerce ticket.
As long as there is a valid email address entered for each attendee they will be synced to your CRM as separate contact records, and the tags specified in the Apply tags setting on the ticket will be applied to each attendee.
#Event Check-ins
Event Tickets Plus allows you to check-in attendees to an event, either via the WordPress admin or using the Event Tickets Plus QR scanning app. To track event attendance you can enable the event_checkin field for sync.

When this is enabled the selected custom field in your CRM will be updated when an attendee is checked in to an event.
#Video
Watch this video from WPLaunchify about connecting Ontraport to Event Tickets / WooCommerce with WP Fusion.

#Exporting Attendees
WP Fusion includes a batch export tool for Event Tickets that can retroactively sync event attendees to your CRM from before you installed WP Fusion.
This can be found at Settings » WP Fusion » Advanced » Batch Operations.
Select the Event Ticket attendees option and click the Create Background Task button to start the export.
Any event attendees that have not yet been processed by WP Fusion will be synced to your CRM, including any enabled fields. Any tags configured on the corresponding events will also be applied.

#Was this helpful?

Let us know if you liked the post. That』s the only way we can improve.

Yes

No

How to Connect Sendinblue to WordPress

How to Connect Sendinblue to WordPress

In this video, you will learn how to install WP Fusion and set up a direct connection to your Sendinblue account.
To get started install and activate the plugin, then navigate to settings -> WP Fusion.
From the 『Select Your CRM』 dropdown choose 『Sendinblue』.
To enable the connection to Sendinblue we need to locate your API Key.
This can be found by logging into your Sendinblue account and clicking on the Profile icon in the top right-hand corner and choose 『SMTP & API』.

Make sure it』s API v3 key.

Copy the API Key and paste it into the appropriate field in WP Fusion.

Then, click on 『Connect』.
WP Fusion will now establish a direct connection to your Sendinblue account and import your tags and custom fields.
To finalize the process click on 『Save Changes』.

#Was this helpful?

Let us know if you liked the post. That』s the only way we can improve.

Yes

No

How To Connect Ontraport to WordPress

How To Connect Ontraport to WordPress

In this video, you will learn how to install WP Fusion and set up a direct connection to your Ontraport account.
To get started install and activate the plugin, then navigate to settings -> WP Fusion.
And from the 『Select Your CRM List』 dropdown choose 『Ontraport』.
We will need to locate two pieces of information

Your APP ID
Your API Key

To generate these credentials login to your Ontraport account and hover over the 『Your Account』 icon in the top right. Then select 『Administration』:

Click on the 『Integrations』 tab and choose 『Ontraport API Instructions and Key Manager』:

Click on the 『New API Key』 button

Give it a name
Select the Owner
The click on 『Save』 in the top right.

 
Click on the Name
Then copy the APP ID, and paste into WP Fusion
and do the same with the API key
Finally, click on 『Test Connection』.


WP Fusion will now establish a connection to Ontraport and import your tags and custom fields.
To finalize the process click on 『Save Changes』

#Was this helpful?

Let us know if you liked the post. That』s the only way we can improve.

Yes

No

WP Event Manager

WP Event Manager

#Overview
WP Fusion integrates with WP Event Manager to allow you to add event attendees as contacts to your CRM of choice when they register for an event. You can also optionally apply CRM tags based on the event the person registered for.
WP Fusion』s integration is designed to work with the Registrations Addon for WP Event Manager.
#Adding contacts
By default WP Fusion will sync any event registrations to your CRM as contacts, with the name and email address provided at registration. If a contact already exists with the same email address they will be updated.
#Custom registration fields
If you』ve created custom registration fields, these will appear under the WP Event Manager section in the Contact Fields tab of the WP Fusion settings.

For each custom field you can specify a corresponding custom field in your CRM where the data should be synced.
#Syncing event fields
WP Fusion also makes available some fields related to the event for syncing to your CRM. These can also be found in the Contact Fields list in the WP Fusion settings.

If any of these fields are enabled then WP Fusion will load the values from the event in WordPress and sync it along with the registration data to your CRM. You can then merge the values into emails, or use them in automations (for example to send a reminder a day before an event).
#Tagging contacts
WP Fusion adds a meta box to the bottom of any Event post type. Here you can specify tags to be applied in your CRM when someone registers for that event.

#Was this helpful?

Let us know if you liked the post. That』s the only way we can improve.

Yes

No

How to Connect Klaviyo to WordPress

How to Connect Klaviyo to WordPress

In this video, you will learn how to install WP Fusion and set up a direct connection to your Klaviyo account.
To get started install and activate the plugin, then navigate to settings -> WP Fusion.
From the 『Select Your CRM』 dropdown choose 『Klaviyo』.
To enable the connection to Klaviyo we need to locate your API Key.
This can be found by logging into your Klaviyo account and clicking on the Profile icon in the top right-hand corner and choose 『Account』.

Then click 『Settings』  and choose 『API Keys』

Copy the API Key and paste it into the appropriate field in WP Fusion.

Then, click on 『Connect』.
WP Fusion will now establish a direct connection to your Klaviyo account and import your tags and custom fields.
To finalize the process click on 『Save Changes』.

#Was this helpful?

Let us know if you liked the post. That』s the only way we can improve.

Yes

No

How to Connect User.com to WordPress

How to Connect User.com to WordPress

In this video, you will learn how to install WP Fusion and set up a direct connection to your User.com account.
To get started install and activate the plugin, then navigate to settings -> WP Fusion.
From the 『Select Your CRM』 dropdown choose 『User.com』
To enable the connection we need to locate the App Subdomain and the API key
This can be found by logging into your User.com account and navigating to your App.
To find the App Subdomain, you can look at the URL in your browser』s address bar. The first part, immediately after https and prior to 『user.com』 is your App subdomain.

For the API Key, you can find it under Settings -> App Settings -> Advanced -> Public REST API keys.

Copy the 『App Subdomain』 and 『API Key』 and paste it into the appropriate field in WP Fusion.
Then click on 『Connect』

WP Fusion will now establish a direct connection to your User.com account and import your tags and custom fields.
To finalize the process click on 『Save Changes』.

#Was this helpful?

Let us know if you liked the post. That』s the only way we can improve.

Yes

No