HubSpot Webhooks

HubSpot Webhooks

#Overview
You can use webhooks in HubSpot to send data back to your WordPress site using WP Fusion. Using these webhooks, you can create new users on your WordPress site, or update existing users』 meta data and lists.
Webhooks are available in the following HubSpot editions:

Marketing Hub Professional
Marketing Hub Enterprise
Sales Hub Enterprise

Having trouble receiving webhooks? Check out our troubleshooting guide.
#Getting started
Webhooks are managed in HubSpot by going to Automation >> Workflows from the top navigation menu.
For this tutorial, we』ll be showing you how to create a new WordPress user when a contact is added to a specific HubSpot list. See below for additional options when configuring the workflow action.
First create a new workflow, and then add an enrollment trigger. Here we』ve set workflow to run whenever someone is added to the static list 「Membership Trial.」
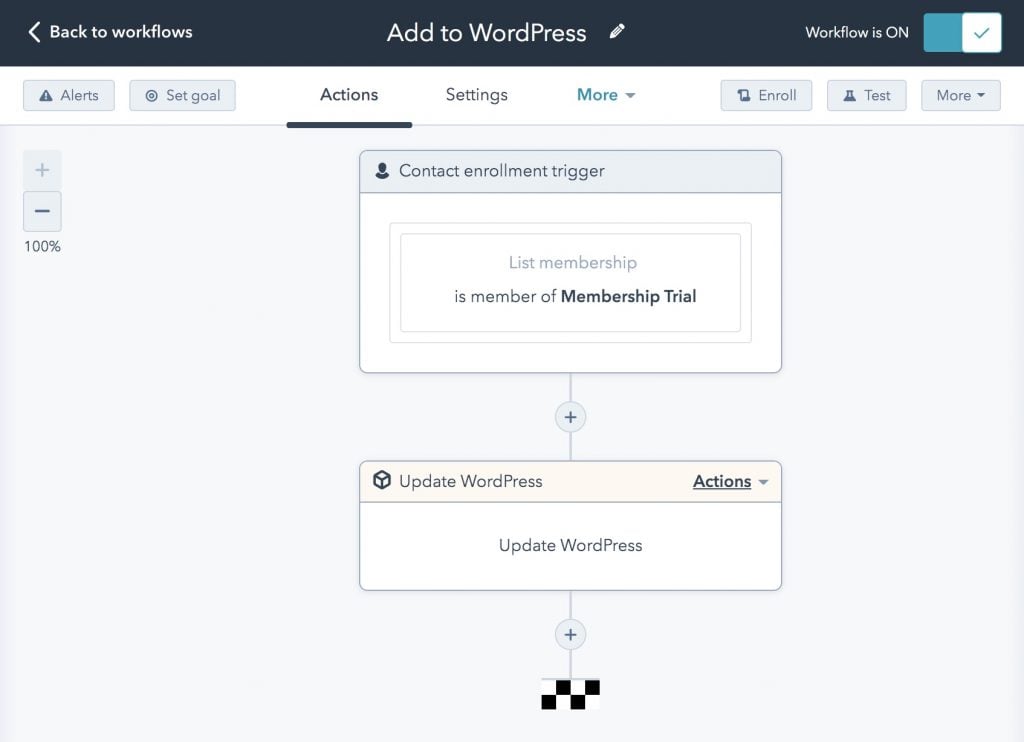
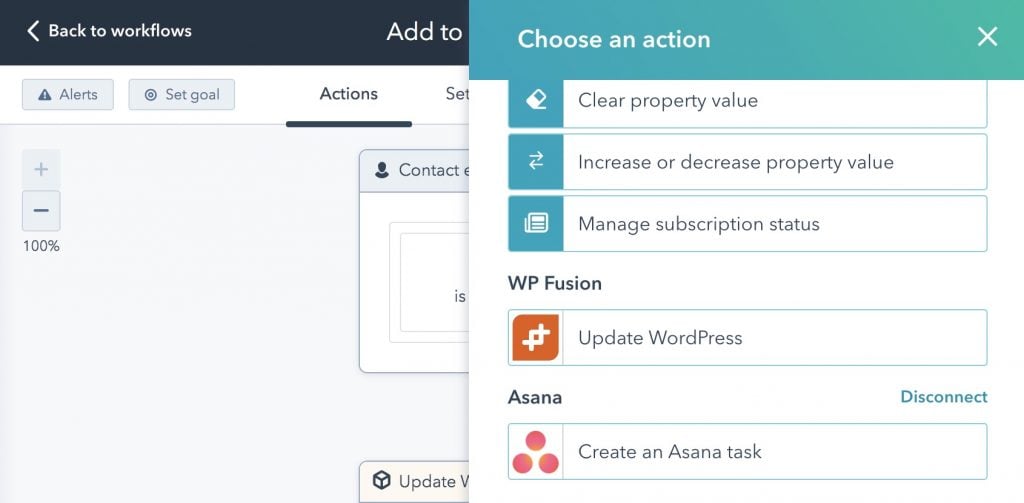
Click the + symbol to add a new action to the workflow, and from the Actions panel, select Update WordPress.
A panel will appear where you can configure the webhook to your WordPress site.
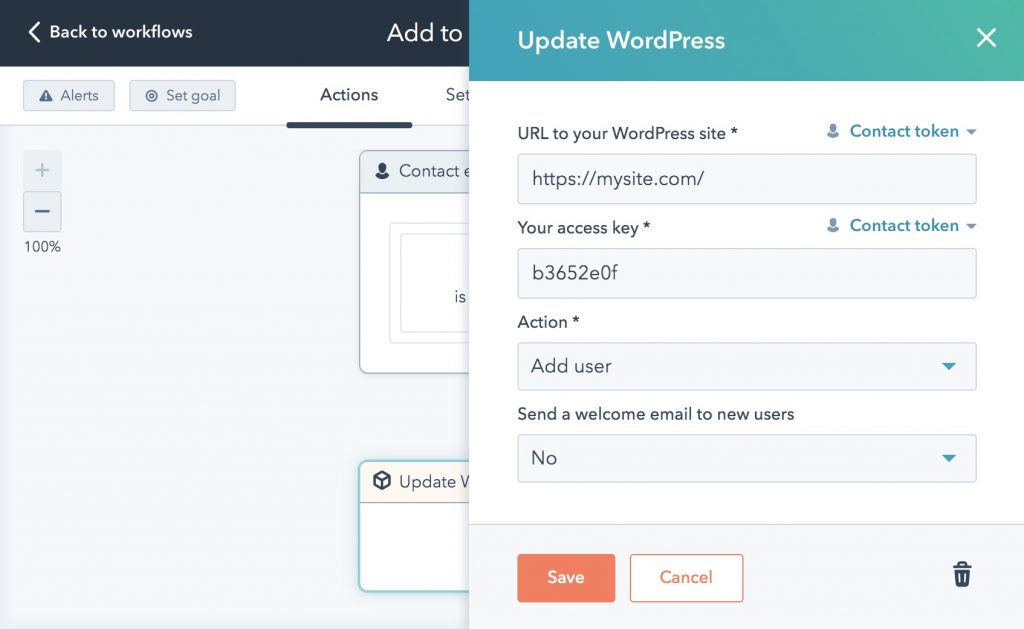
In this example, we』ve set the action to Add user, and disabled the welcome email that is sent to new users.
Now, every time a contact is added to this list, a new WordPress user will be created based on their contact data in HubSpot. If the user already exists on the site, they will be updated (no duplicate users will be created).
The available options in the workflow action are:
URL to your WordPress site: This is the URL to the site where you have WP Fusion installed.
Your access key: This is the access key from the bottom of the General tab in the WP Fusion settings. This helps to secure your webhook URL.
Action: There are three options:

Update user』s lists: If a user already exists on your site for this contact, their lists will be loaded from their HubSpot contact record.
Update user』s metadata lists: If a user already exists on your site for this contact, their lists and custom field values will be loaded from their HubSpot contact record.
Add user: This will import the contact as a new WordPress user. If a user already exists with that contact ID, their lists and custom field values will be loaded from HubSpot.

Send a welcome email to new users: If your webhook action is set to Add, you can choose whether or not to send a welcome email to new users. If you select Yes, the default WordPress welcome email will be sent to any newly imported users, containing a link to reset their password.
Note: By default, user accounts will be created with their email address as the username and a randomly generated password. However, if you have created a custom username field and password field in HubSpot, and enabled these fields in WP Fusion for sync with user_login and user_pass on your website, the new users will be given the usernames and passwords stored in their HubSpot contact record.
#User passwords
New user accounts will be created with an automatically generated password. If you』d like to use this password in your email marketing, you can send the password back to HubSpot after it has been generated.
In the Webhooks section of the General settings tab, check the box for Return Password, and select a field in HubSpot where the password should be stored.

After a new user is created, their automatically generated password will now be saved back to their contact record, and you can use a merge field to include it in an email. The username will be the contact』s email address.

#Was this helpful?

Let us know if you liked the post. That』s the only way we can improve.

Yes

No

Emercury Webhooks

Emercury Webhooks

#Overview
You can use outgoing webhooks in Emercury to send data back to your WordPress site, using WP Fusion. Using webhooks you can create new users on your WordPress site based on updates in Emercury, or update existing users』 meta data and tags.
Having trouble receiving webhooks? Check out our troubleshooting guide.
#Getting started
Webhooks are managed in Emercury under Settings » Developer. If you』re already logged into your Emercury account, you should be able to access this page by following this link. For an overview of webhooks with Emercury, see this doc.
For this tutorial, we』ll be showing you how to create a new WordPress user when a contact is added to your Emercury list. See below for additional options when constructing the URL parameters.
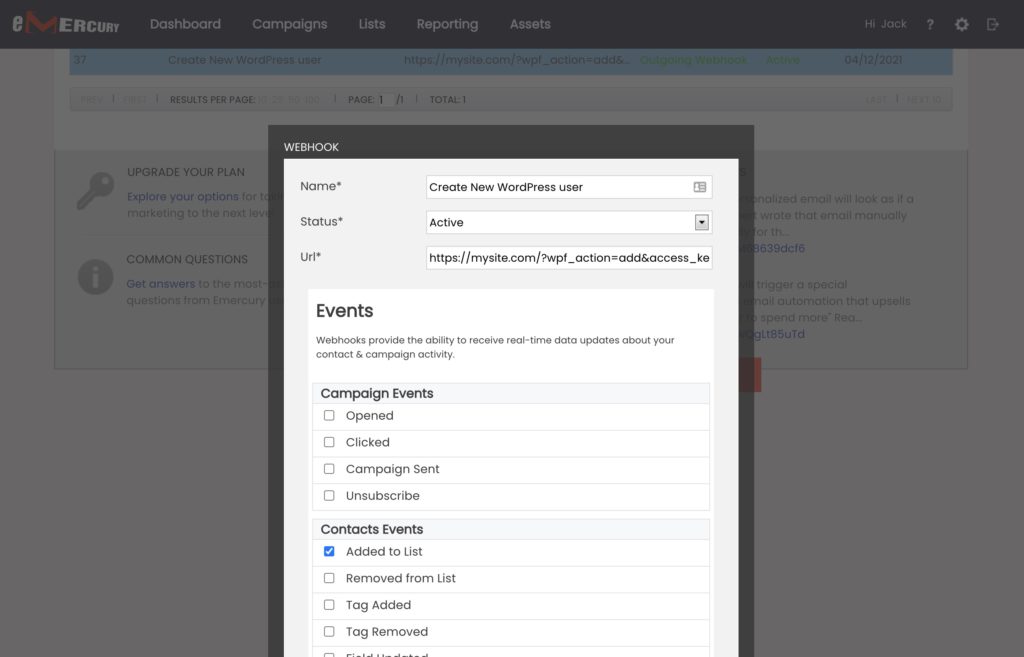
From the webhooks screen, first click Add to create a new webhook. In the popup that appears, give the webhook a name, set the status to Active, and enter the URL to your site, following the examples below.

For the Events, select which events should trigger the webhook. In this case, Added to List.
Finally, click Save to activate the webhook. Now when a contact is added to your Emercury list, they will automatically be imported as a new WordPress user.
There are several ways to format the webhook URL depending on the desired action:
#To update a user』s tags
To update an existing WordPress user』s tags from the contact record, the URL for the webhook should look like the following:
http://mydomain.com/?wpf_action=update_tags&access_key=YOURACCESSKEY
#To update a user』s tags and meta data
To update a user』s tags and pull any new meta data from Emercury for that contact, the URL for the webhook should look like the following:
http://mydomain.com/?wpf_action=update&access_key=YOURACCESSKEY
#Create a new user
To create a new user, use the following URL:
http://mydomain.com/?wpf_action=add&access_key=YOURACCESSKEY
You can also specify additional parameters in user creation. For example, to send the user a welcome email containing a link to log in on your site, use the following:
http://mydomain.com/?wpf_action=add&access_key=YOURACCESSKEY&send_notification=true
You can also specify a specific user role to be assigned to the new user. For example, to set the new user to the 「customer」 role, use the following:
http://mydomain.com/?wpf_action=add&access_key=YOURACCESSKEY&role=customer
Note that you have to have registered a 「customer」 role on your site for this to work. By default users will be assigned the role of 「subscriber」.
The add method will update a user if an existing user already exists. It will not create a duplicate user.
Note: By default, user accounts will be created with their email address as the username and a randomly generated password. However, if you have created a custom username field and password field in your Emercury application, and enabled these fields in WP Fusion for sync with user_login and user_pass on your website, the new users will be given the usernames and passwords stored in their Emercury contact record.
#User passwords
New user accounts will be created with an automatically generated password. If you』d like to use this password in your email marketing, you can send the password back to Emercury after it has been generated.
In the Webhooks section of the General settings tab, check the box for Return Password, and select a field in Emercury where the password should be stored.

After a new user is created, their automatically generated password will now be saved back to their contact record, and you can use a merge field to include it in an email. The username will be the contact』s email address.

#Was this helpful?

Let us know if you liked the post. That』s the only way we can improve.

Yes

No

Maropost Webhooks

Maropost Webhooks

#Overview
You can use webhooks in Maropost to send data back to your WordPress site using WP Fusion. Using webhooks you can create new users on your WordPress site based on rules in Maropost, or update existing users』 meta data and tags.
Having trouble receiving webhooks? Check out our troubleshooting guide.
#Getting started
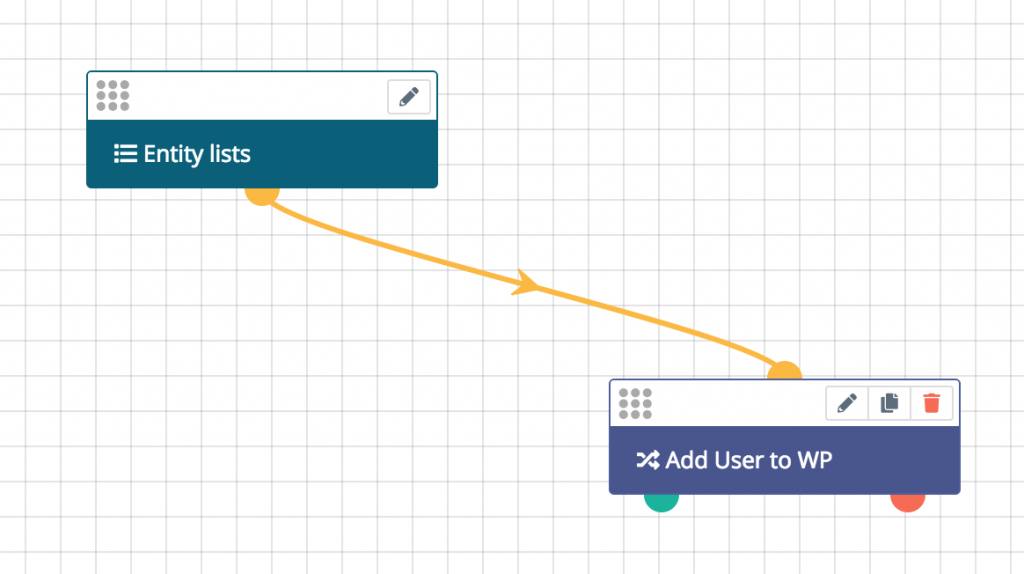
Go to the Manage Automations page by hovering over the Maropost Cloud icon in the upper left hand corner of your screen and  then select Automation from the menu. Click the blue New Journey button to create a new rule. Select a trigger for the rule, such as when a page is visited, a field is modified, or a user is added to a list.
In the screenshots below we』ve configured the rule to be triggered whenever a user is added to the 「Add User to WP」 list.
You can also specify any conditions you』d like to be met, or leave this section blank.


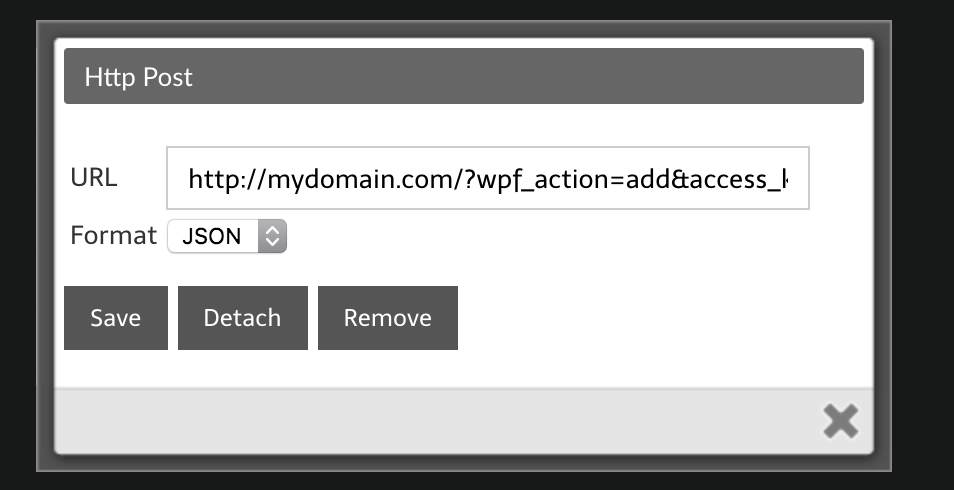
Under 「Actions」, choose 「HTTP Post」 from the menu. Enter the URL to your site following the examples in the next sections. You can get your site』s unique access key from the bottom of the main WP Fusion settings page.

 
#To update a user』s tags
To update an existing WordPress user』s tags from the contact record, the URL for the webhook should look like the following:
http://mydomain.com/?wpf_action=update_tags&access_key=YOURACCESSKEY
#To update a user』s tags and meta data
To update a user』s tags and pull any new meta data from Maropost for that contact, the URL for the webhook should look like the following:
http://mydomain.com/?wpf_action=update&access_key=YOURACCESSKEY
#Create a new user
To create a new user, use the following URL:
http://mydomain.com/?wpf_action=add&access_key=YOURACCESSKEY
You can also specify additional parameters in user creation. For example, to send the user a welcome email containing a link to log in on your site, use the following:
http://mydomain.com/?wpf_action=add&access_key=YOURACCESSKEY&send_notification=true
You can also specify a specific user role to be assigned to the new user. For example, to set the new user to the 「customer」 role, use the following:
http://mydomain.com/?wpf_action=add&access_key=YOURACCESSKEY&role=customer
Note that you have to have registered a 「customer」 role on your site for this to work. By default users will be assigned the role of 「subscriber」.
The add method will update a user if an existing user already exists. It will not create a duplicate user.
Note: By default, user accounts will be created with their email address as the username and a randomly generated password. However, if you have created a custom username field and password field in your Maropost application, and enabled these fields in WP Fusion for sync with user_login and user_pass on your website, the new users will be given the usernames and passwords stored in their Maropost contact record.

#Was this helpful?

Let us know if you liked the post. That』s the only way we can improve.

Yes

No
Infusionsoft / Keap HTTP Posts

Infusionsoft / Keap HTTP Posts

#Overview
You can use HTTP Posts in Infusionsoft to send data back to your WordPress site using WP Fusion. Using HTTP Posts you can create new users on your WordPress site based on automations in Infusionsoft, or update existing users』 meta data and tags.
Having trouble receiving webhooks? Check out our troubleshooting guide.
#Getting Started
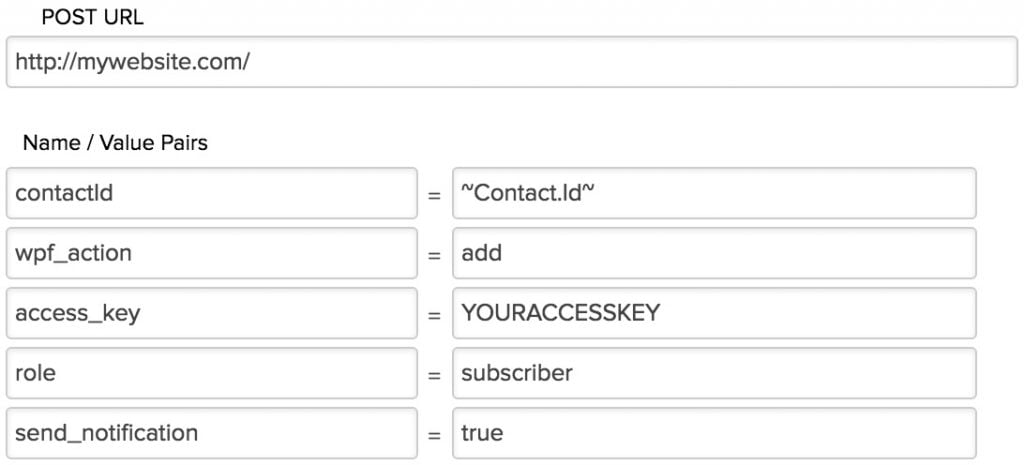
Open a campaign in the Campaign Manager (or create a new one) and create a trigger goal. For example, to trigger WP Fusion to sync a contact when a tag is applied, create an Applies A Tag goal. Then connect the goal to a campaign sequence. In the campaign sequence, add a Send HTTP Post action from the Process menu. In the Post URL field, put the URL to your website, like so:
new-http-post
There are three methods, update, update_tags and add. For each you will need to supply your access key, which can be obtained from the bottom of the General tab in the WP Fusion settings:

#To update a user』s tags
To update an existing WordPress user』s tags from the contact record, under Name / Value pairs, you should have:
contactId = ~Contact.Id~
wpf_action = update_tags
access_key = [your access key]
#To update a user』s tags and meta data
To update a user』s tags and pull any new meta data from Infusionsoft for that contact, under Name / Value pairs, you should have:
contactId = ~Contact.Id~
wpf_action = update
access_key = [your access key]
#Create a new user
Using this method, you can register a new user on your website when a contact is created in Infusionsoft. Under Name / Value pairs, you should have:
contactId = ~Contact.Id~
wpf_action = add
access_key = [your access key]
There are two additional options, which you can leave out if you don』t need them.
send_notification = true
role = subscriber
If you set send_notification to true, the user will be sent a welcome email with their username, password, and a link to log in on your site.
You can also set the role parameter to assign users a specific role on your site. By default users will be imported with the role set in the WordPress』 Settings >> General 「New User Default Role」 field, but sometimes you may want to create users with a different role depending on conditions in your campaign sequence.
The add method will update a user if an existing user already exists. It will not create a duplicate user.
Note: By default, user accounts will be created with their email address as the username and a randomly generated password. However, if you have created a custom username field and password field in Infusionsoft, and enabled these fields in WP Fusion for sync with user_login and user_pass on your website, the new users will be given the usernames and passwords stored in their Infusionsoft contact record.
#User passwords
New user accounts will be created with an automatically generated password. If you』d like to use this password in your email marketing, you can send the password back to Infusionsoft after it has been generated.
In the Webhooks section of the General settings tab, check the box for Return Password, and select a field in Infusionsoft where the password should be stored.

After a new user is created, their automatically generated password will now be saved back to their contact record, and you can use a merge field to include it in an email. The username will be the contact』s email address.

#Was this helpful?

Let us know if you liked the post. That』s the only way we can improve.

Yes

No

Flexie Webhooks

Flexie Webhooks

#Overview
You can use webhooks in Flexie to send data back to your WordPress site using WP Fusion. Using webhooks you can create new users on your WordPress site based on rules in Flexie, or update existing users』 meta data and tags.
Having trouble receiving webhooks? Check out our troubleshooting guide.
#Getting started
Go to the Manage Workflows page under the Flexie』s Workflow menu in the sidebar and create a new rule. Select a trigger for the rule, such as when a page is visited, a field is modified, or a user is added to a list.

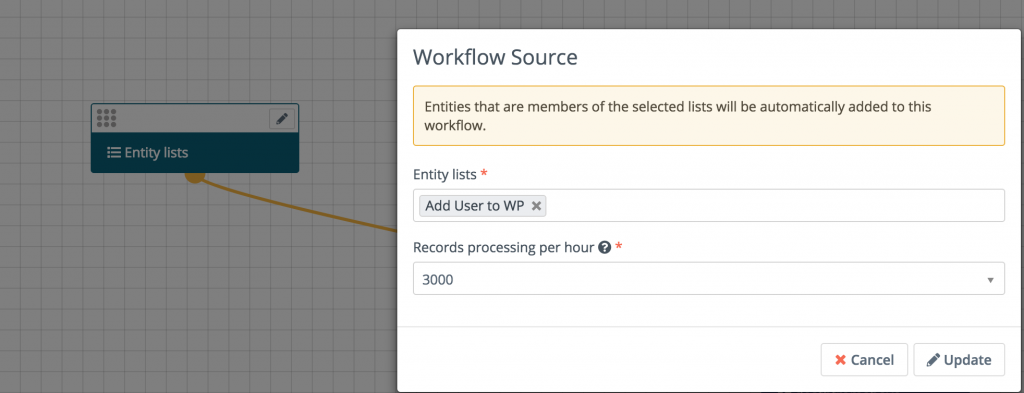
In the screenshot below we』ve configured the rule to be triggered whenever a user is added to the 「Add User to WP」 list.
You can also specify any conditions you』d like to be met, or leave this section blank.

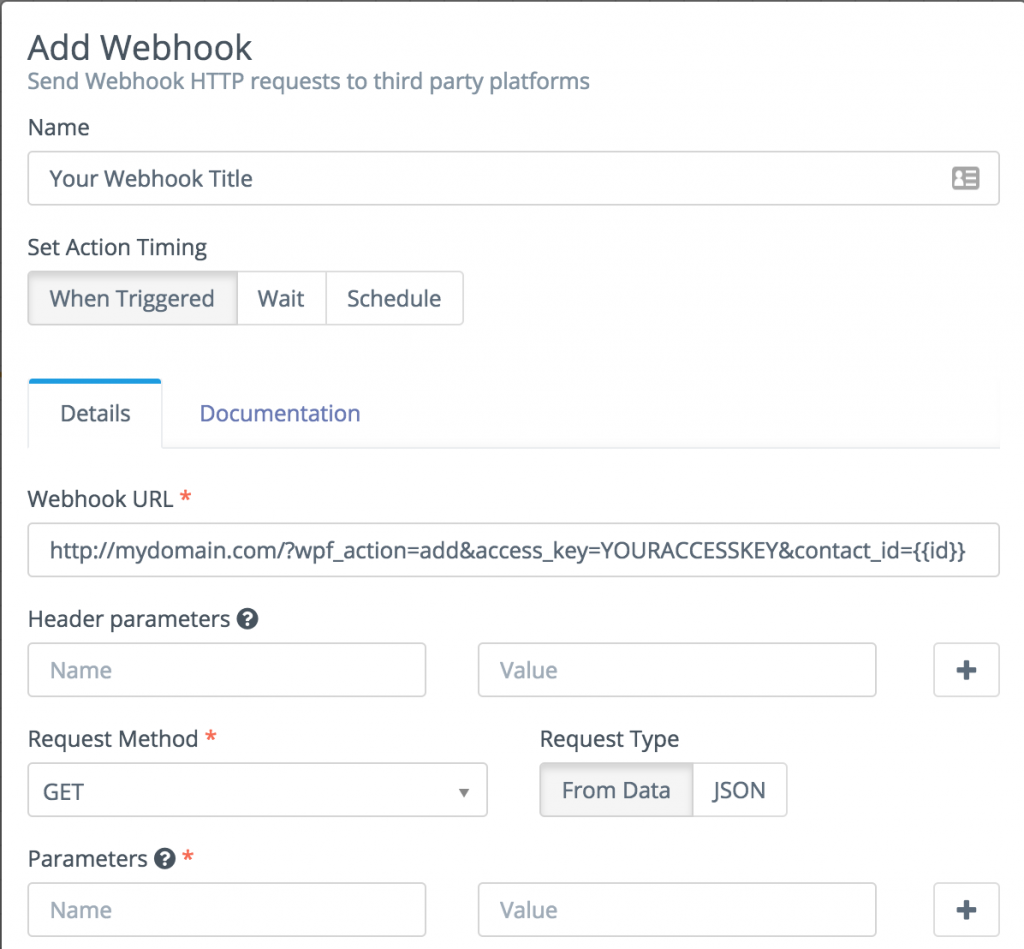
Under 「Actions」, choose 「Add Webhook」 from the menu. Enter the URL to your site following the examples in the next sections. You can get your site』s unique access key from the bottom of the main WP Fusion settings page. Also, make sure the Request Method is set to Get.

 
#To update a user』s tags
To update an existing WordPress user』s tags from the contact record, the URL for the webhook should look like the following:
http://mydomain.com/?wpf_action=update_tags&access_key=YOURACCESSKEY&contact_id={{id}}
#To update a user』s tags and meta data
To update a user』s tags and pull any new meta data from Flexie for that contact, the URL for the webhook should look like the following:
http://mydomain.com/?wpf_action=update&access_key=YOURACCESSKEY&contact_id={{id}}
#Create a new user
To create a new user, use the following URL:
http://mydomain.com/?wpf_action=add&access_key=YOURACCESSKEY&contact_id={{id}}
You can also specify additional parameters in user creation. For example, to send the user a welcome email containing a link to log in on your site, use the following:
http://mydomain.com/?wpf_action=add&access_key=YOURACCESSKEY&contact_id={{id}}&send_notification=true
You can also specify a specific user role to be assigned to the new user. For example, to set the new user to the 「customer」 role, use the following:
http://mydomain.com/?wpf_action=add&access_key=YOURACCESSKEY&contact_id={{id}}&role=customer
Note that you have to have registered a 「customer」 role on your site for this to work. By default users will be assigned the role of 「subscriber」.
The add method will update a user if an existing user already exists. It will not create a duplicate user.
Note: By default, user accounts will be created with their email address as the username and a randomly generated password. However, if you have created a custom username field and password field in your Flexie application, and enabled these fields in WP Fusion for sync with user_login and user_pass on your website, the new users will be given the usernames and passwords stored in their Flexie contact record.

#Was this helpful?

Let us know if you liked the post. That』s the only way we can improve.

Yes

No

Mautic Webhooks

Mautic Webhooks

#Overview
You can use Webhooks in Mautic to automatically send updates back to your WordPress site when a contact』s profile has been updated. You can also automatically generate new WordPress user accounts for Mautic contacts.
Having trouble receiving webhooks? Check out our troubleshooting guide.
There are two ways to set up webhooks with Mautic. Either globally, or part of a campaign:
#Global webhooks
Global webhooks apply to all contacts in Mautic. For example you can send data back to WordPress whenever any contact is updated.
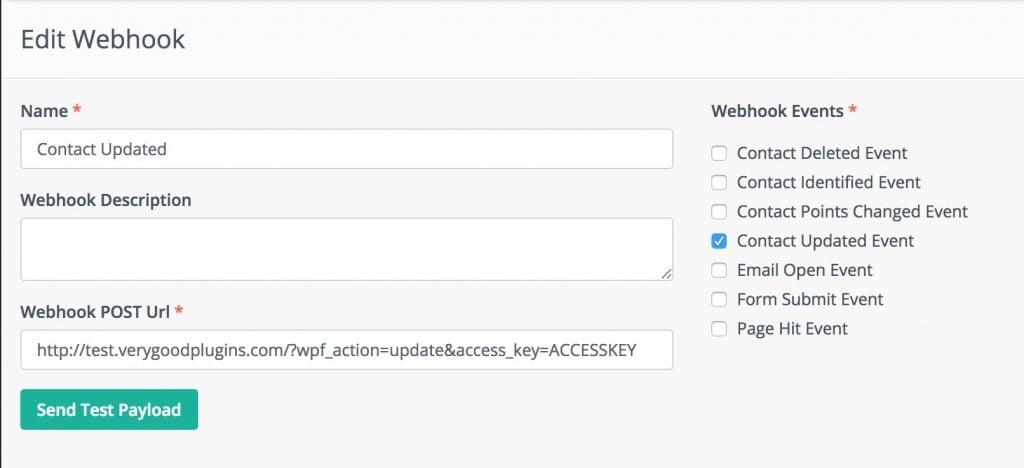
Navigate to the webhook settings (accessible via the gear the the top right of your app) and create a new webhook.

 
Depending on the action you』re trying to perform, there are multiple ways to format the webhook URL. Those are explained further down this page.
#Webhooks in a campaign
You can also add a webhook node to a campaign, so that it only runs on contacts in that campaign. For example this could be used to create new WordPress users only when a contact is tagged when a specific tag.

In the URL field, enter the URL to your site, following the examples below.
For the method, select GET
Add a new row under data, the name should be contact_id, and the value is {contactfield=id}

When the contact gets to this point in the campaign, Mautic will ping your webhook URL and merge in the ID of the current contact, so that WP Fusion knows which contact to load the data for.
#Webhook methods
#To update a user』s tags
To update an existing WordPress user』s tags from the contact record, the URL for the webhook should look like the following:
http://mydomain.com/?wpf_action=update_tags&access_key=YOURACCESSKEY
#To update a user』s tags and meta data
To update a user』s tags and pull any new meta data from Mautic for that contact, the URL for the webhook should look like the following:
http://mydomain.com/?wpf_action=update&access_key=YOURACCESSKEY
#To create a new user
To create a new user, use the following URL:
http://mydomain.com/?wpf_action=add&access_key=YOURACCESSKEY
You can also specify additional parameters in user creation. For example, to send the user a welcome email containing a link to log in on your site, use the following:
http://mydomain.com/?wpf_action=add&access_key=YOURACCESSKEY&send_notification=true
You can also specify a specific user role to be assigned to the new user. For example, to set the new user to the 「customer」 role, use the following:
http://mydomain.com/?wpf_action=add&access_key=YOURACCESSKEY&role=customer
Note that you have to have registered a 「customer」 role on your site for this to work. By default users will be assigned the role of 「subscriber」.
The add method will update a user if an existing user already exists. It will not create a duplicate user.
Note: By default, user accounts will be created with their email address as the username and a randomly generated password. However, if you have created a custom username field and password field in Mautic, and enabled these fields in WP Fusion for sync with user_login and user_pass on your website, the new users will be given the usernames and passwords stored in their Mautic contact record.
#User passwords
New user accounts will be created with an automatically generated password. If you』d like to use this password in your email marketing, you can send the password back to Mautic after it has been generated.
In the Webhooks section of the General settings tab, check the box for Return Password, and select a field in Mautic where the password should be stored.

After a new user is created, their automatically generated password will now be saved back to their contact record, and you can use a merge field to include it in an email. The username will be the contact』s email address.

#Was this helpful?

Let us know if you liked the post. That』s the only way we can improve.

Yes

No
Bento Webhooks

Bento Webhooks

#Overview
You can use webhooks inside Bento automations to automatically send data back to your WP Fusion powered WordPress site.
Using webhooks, you can import new users on your WordPress site based on automations in Bento, or update existing users』 meta data and tags.
Having trouble receiving webhooks? Check out our troubleshooting guide.
#Setup
Navigate to Bento » Automate and create a new workflow to handle the webhook. Select a 『Trigger』 (such as Viewed a Page).

Add an action and Select Send Webhook.

In the webhook settings, configure the webhook like in the screenshot above:

Webhook URL: This is the URL to your site. For more info on the URL options, see the next section.
JSON Payload: The JSON payload identifies the subscriber to WP Fusion. This needs to be {"id":"{{visitor.uuid}}"}

#Webhook URL parameters
You can format your webhook URL in a few different ways to customize the behavior. For each you will need to supply your access key, which can be obtained from the bottom of the main settings panel in your WP Fusion settings.
#To update a user』s tags
To update an existing WordPress user』s tags from the contact record, the URL for the webhook should look like the following:
https://mydomain.com/?wpf_action=update_tags&access_key=YOURACCESSKEY
#To update a user』s tags and meta data
To update a user』s tags and pull any new meta data from Bento for that contact, the URL for the webhook should look like the following:
https://mydomain.com/?wpf_action=update&access_key=YOURACCESSKEY
#Create a new user
To create a new user, use the following URL:
https://mydomain.com/?wpf_action=add&access_key=YOURACCESSKEY
You can also specify additional parameters in user creation. For example, to send the user a welcome email containing a link to log in on your site, use the following:
https://mydomain.com/?wpf_action=add&access_key=YOURACCESSKEY&send_notification=true
You can also specify a specific user role to be assigned to the new user. For example, to set the new user to the 「customer」 role, use the following:
https://mydomain.com/?wpf_action=add&access_key=YOURACCESSKEY&role=customer
Note that you have to have registered a 「customer」 role on your site for this to work. By default users will be assigned the role of 「subscriber」.
The add method will update a user if an existing user already exists. It will not create a duplicate user.
Note: By default, user accounts will be created with their email address as the username and a randomly generated password. However, if you have created a custom username field and password field in Bento , and enabled these fields in WP Fusion for sync with user_login and user_pass on your website, the new users will be given the usernames and passwords stored in their Bento contact record.
#User passwords
New user accounts will be created with an automatically generated password. If you』d like to use this password in your email marketing, you can send the password back to Bento after it has been generated.
In the Webhooks section of the General settings tab, check the box for Return Password, and select a field in Bento where the password should be stored.

After a new user is created, their automatically generated password will now be saved back to their contact record, and you can use a merge field to include it in an email. The username will be the contact』s email address.

#Was this helpful?

Let us know if you liked the post. That』s the only way we can improve.

Yes

No
Changelog

Changelog

1.3.1 - 10/24/2019

Submitted form data will now be included in Register and Update webhooks

1.3 - 8/5/2019

Added "Form Submitted" trigger
Fixed tag setting box not saving when empty

1.2 - 2/7/2019

Added check all and uncheck all option for Post Fields setting
Fix for data in wp_users table not being sent

1.1 - 12/22/2018

Fixed "Send Test" button for unpublished webhooks

1.0 - 12/21/2018

Initial release

#Was this helpful?

Let us know if you liked the post. That』s the only way we can improve.

Yes

No

Lead Source Tracking

Lead Source Tracking

#Overview
WP Fusion includes the ability to detect lead sources in URL parameters, such as those used with Google Analytics.
The system is quite versatile. It can look for a variety of common lead source parameters passed in URLs to your site and store these as a cookie when the user first visits your site.
If a visitor then registers on your site, makes a purchase, or submits a WP Fusion enabled form, the detected lead source parameters can be synced to custom fields in any one of WP Fusion』s 40+ supported CRMs and marketing automation platforms.
The cookie is valid for 90 days. So even if a user leaves your site and comes back later to make a purchase, you can still capture the source that brought them to you in the first place.
Note: This feature does not work properly on WP Engine or other hosts that don』t let you edit your site』s caching settings.
#Google Analytics
If you』re using Google Analytics』 Campaign URL Builder, Google will generate tracking links to your site that look like https://mysite.com/?utm_source=facebook&utm_campaign=summer_ad.

You can enable each of the various Google Analytics tracking variable for sync from the Contact Fields tab in the WP Fusion settings.
Note: By default WP Rocket caches URLs with Analytics leadsource variables in them. This will prevent WP Fusion』s lead source tracking from working. You can follow this tutorial to exclude the Google query string parameters from WP Rocket』s cache.
#Custom Lead Source Tracking
To enable custom lead source tracking, locate the leadsource field in the Contact Fields list and map it to a field in your CRM. Make sure to check the Sync box to enable the connection.
Structure the URL to your site like https://mysite.com/?leadsource=custom_leadsource. Anything after the leadsource parameter in the URL will be synced. Using this method you can set up your own lead source tracking strategy however you see fit.
#Referrer and Landing Page
The fields Original Referrer and Landing Page are a bit different in that they don』t use a URL parameter for tracking.

Original Referrer: This tracks the URL a user followed to get to your site. If this is enabled, the referrer URL will be recorded on their first visit.
Landing Page: This tracks the page the visitor landed on when they came to your site for the first time.

#How it works
When a visitor lands on your site with one of the tracked parameters, WP Fusion will set a cookie, either wpf_leadsource (for the UTM and URL parameters) or wpf_ref for the Original Referrer and Landing Page.
You can see the cookies set by WP Fusion using your browser』s developer tools. If the cookies aren』t being set, your page is probably cached.
This cookie is valid for 90 days. If any any time during that period, a contact record is created for that visitor by WP Fusion, the tracked values will be extracted from the cookie and merged into the API data sent to create the new contact record.
This works any time WP Fusion creates a contact record— a form submission, abandoned cart, product purchase, or regular registration. It does not work when a contact record is added to your CRM by another plugin, since other plugins wouldn』t know to look for cookies set by WP Fusion.
Also note that WP Fusion only sync the lead source data when a new contact record is created. It won』t send the data to an existing contact record, to avoid overwriting lead source data you may have already collected for a contact. This can be considered First Referrer tracking.
#Caching
Note that the lead source tracking relies on cookies, which often aren』t compatible with caching. For example this functionality does not work on WP Engine.
Generally speaking, if the cookies aren』t being set, make sure your landing page is excluded from cache, or the query variables you』re tracking are set to bypass the cache. It may also be helpful to bypass the cache when the wpf_leadsource or wpf_ref cookies are set (though this could degrade performance).
Note that with WP Rocket, any URL with UTM parameters is cached by default, which means the lead source tracking won』t work. To override that you』ll need to download and customize the helper plugin WP Rocket | Ignore Query Strings.
#Developers
#Register additional leadsource variables
You may want to register additional URL parameters that should be tracked as leadsource variables. You can do this using the wpf_leadsource_vars filter.
For example to register the URL parameter lang:
function my_wpf_custom_leadsource_vars( $vars ) {
$vars[] = 'lang';
return $vars;
}

add_filter( 'wpf_leadsource_vars', 'my_wpf_custom_leadsource_vars' );
Once the variable is registered it will be detected in the URL when someone visits your site (for example &lang=en) and saved to the wpf_contact cookie.
Any custom leadsource fields added via the wpf_leadsource_vars filter will automatically show up on the Contact Fields list for syncing with custom fields in your CRM:

Then, when WP Fusion adds a contact record to your CRM (via a registration, purchase, form submission, or any other source), the custom leadsource values will be synced to the corresponding custom fields in your CRM.
#Change the cookie name
If needed you can change the name of the cookies that are used for WP Fusion』s lead source tracking. The two filters are wpf_leadsource_cookie_name and wpf_ref_cookie_name.
For example to prefix the two cookie names with an underscore:
add_filter( 'wpf_leadsource_cookie_name', function() {
return '_wpf_leadsource';
} );

add_filter( 'wpf_referral_cookie_name', function() {
return '_wpf_ref';
} );

#Was this helpful?

Let us know if you liked the post. That』s the only way we can improve.

Yes

No
ConvertKit Webhooks

ConvertKit Webhooks

#Overview
Using webhooks with ConvertKit you can create new users on your WordPress site when tags are applied in ConvertKit, or update existing users』 meta data and tags.
WP Fusion supports two types of webhooks: update and add. The update webhook will trigger WP Fusion to load the user』s latest meta data and tags from ConvertKit.
Using the add webhook will create a new WordPress user on your site based on a contact in ConvertKit. If you attempt to add a user that already exists, they will just be updated (no duplicate users will be created).
Having trouble receiving webhooks? Check out our troubleshooting guide.
#Getting Started
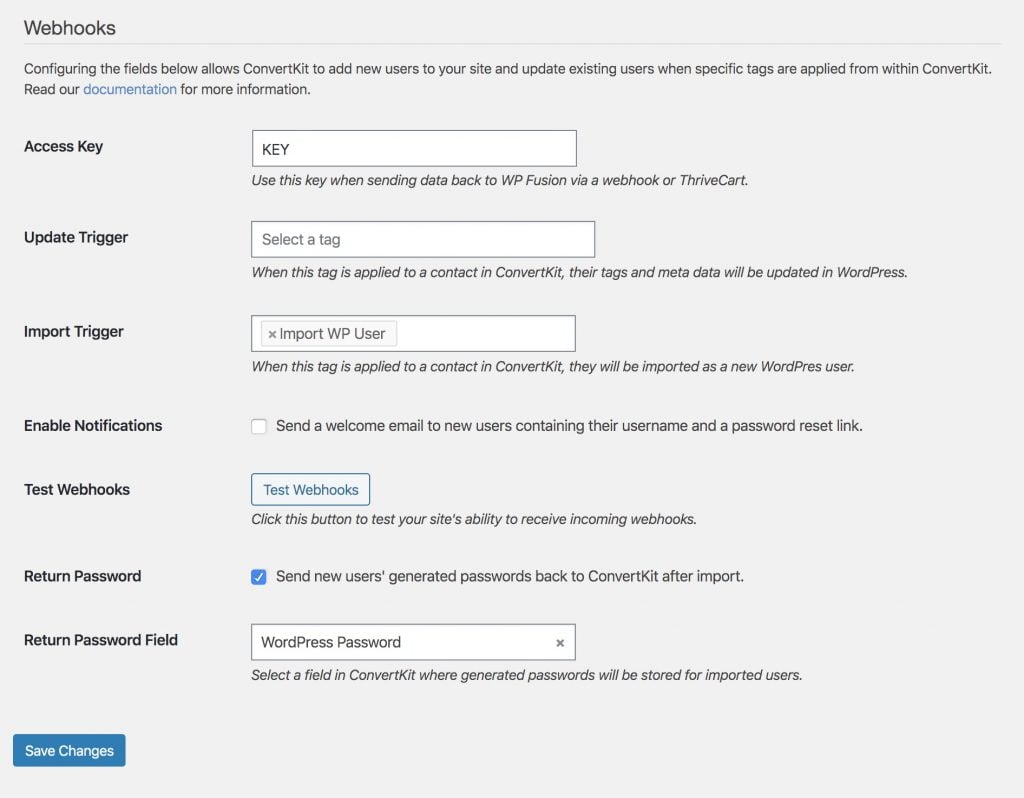
Create two tags in ConvertKit, one for triggering user updates, and one for triggering the import of new users. Then go to the General tab of the WP Fusion settings and add these tags to the tag select boxes in the Webhooks section, then save the settings.

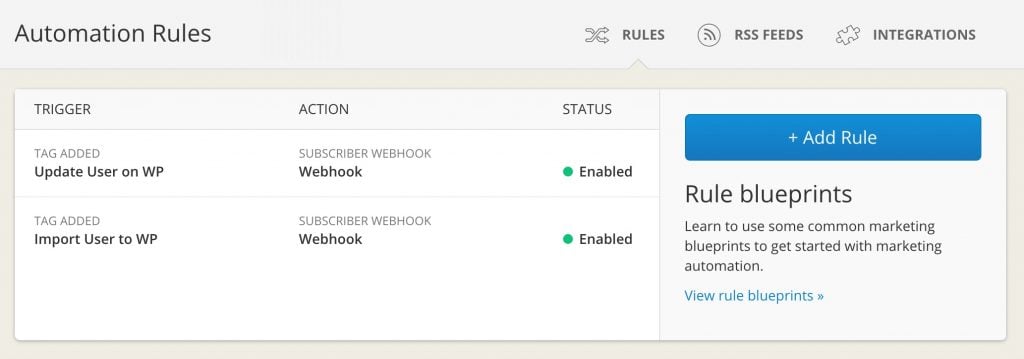
If you navigate back to your Automation Rules tool in ConvertKit, you should see the two new automation rules listed.

You can now apply these tags as part of other automations to keep subscriber information in sync, and even automatically generate WordPress accounts for ConvertKit subscribers.
The import trigger method will update a user if an existing user already exists. It will not create a duplicate user.
Note: By default, user accounts will be created with their email address as the username and a randomly generated password. However, if you have created a custom username field and password field in ConvertKit, and enabled these fields in WP Fusion for sync with user_login and user_pass on your website, the new users will be given the usernames and passwords stored in their ConvertKit contact record.
#User passwords
New user accounts will be created with an automatically generated password. If you』d like to use this password in your email marketing, you can send the password back to ConvertKit after it has been generated.
In the Webhooks section of the General settings tab, check the box for Return Password, and select a field in ConvertKit where the password should be stored.

After a new user is created, their automatically generated password will now be saved back to their contact record, and you can use a merge field to include it in an email. The username will be the contact』s email address.

#Was this helpful?

Let us know if you liked the post. That』s the only way we can improve.

Yes

No