Auto Login#Overview
WP Fusion』s auto-login system can load the CRM tags and meta data for a contact record into a temporary WordPress user account. The site visitor is then tracked with a cookie.
This allows you to personalize site content, pre-fill forms, and track activity (by applying tags) even if the contact doesn』t have a WordPress account.
The auto-login process can either be triggered via a link, or via a form submission.
Note: This feature does not work properly on WP Engine or other hosts that don』t let you edit your site』s caching settings.
#Auto Login Links
Auto login links can be used in an email to grant access to restricted content on your site without requiring a user to log in. You can even grant access to contacts in your CRM that don』t have user accounts on your site.
Keep in mind that the user will only be logged in for the purposes of WP Fusion』s content restriction and activity tracking features. For security reasons, users will not be able to access or edit their account details, purchase history, or any other sensitive information. For that they will need to log into your site using their username and password. All other plugins will see the visitor as a guest.
#Usage
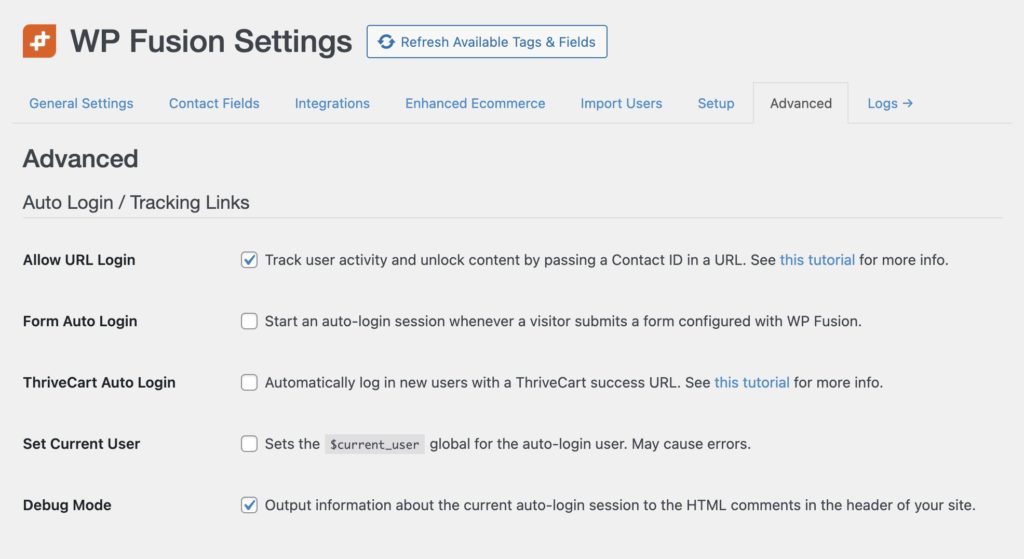
To use this feature, first enable it from the Advanced section of the WP Fusion general settings tab.
You can now log a user into your site by passing a contact ID in any URL pointed at your site, for example:
http://mysite.com/my-special-content/?cid=1234
This sets a cookie and creates a temporary WordPress user with that contact』s tags and other information from your CRM. Any protected content will be accessible if the contact has the correct tags. You can also apply tags and track activity as if the user was logged in.
You can also use WP Fusion』s user meta shortcodes to display contact data from your CRM.
#Personalization tags
Here are some of the personalization tags for our more popular CRM integrations. This list will continue to be updated:
ActiveCampaign: http://mysite.com/?cid=%CONTACTID%
AgileCRM: http://mysite.com/?cid={{id}}
ConvertKit: http://mysite.com/?cid={{ subscriber.id }}
Drip: http://mysite.com/?cid={{ subscriber.id }}
FluentCRM: http://mysite.com/?cid={{contact.id}}
Gist: not supported by Gist
Groundhogg: http://mysite.com/?cid={id}
HubSpot: http://mysite.com/?cid={{ contact.email }}
Infusionsoft / Keap: http://mysite.com/?cid=~Contact.Id~
Mailchimp: http://mysite.com/?cid=*|EMAIL|*
MailerLite: http://mysite.com/?cid={$email}
Mautic: http://mysite.com/?cid={contactfield=id}
NationBuilder: http://mysite.com/?cid={{recipient.id}}
Ontraport: http://mysite.com/?cid=[Contact ID]
Sendinblue: http://mysite.com/?cid={{ contact.EMAIL }}
Zoho: http://mysite.com/?cid=${Contacts.Contact Id}
For other CRMs you can find the merge field for the contact ID from their merge fields documentation.
#Set Current User
By default auto-logged in users will only be able to access content protected by WP Fusion, and contact data can only be displayed using WP Fusion』s shortcodes.
You can enable Set Current User to have WP Fusion set the $current_user global in WordPress, so other plugins will be tricked into treating the user as logged-in as well.
This works well for pre-filling forms (in plugins like Gravity Forms or Advanced Custom Fields) with data from the CRM contact record, allowing you to create profile update forms or subscription preferences forms for your mailing list subscribers.
However this can cause problems with membership plugins (like BuddyBoss) and gamification plugins as they try to trigger notifications or achievements for a non-existent user, and may cause your site to crash when the auto-login link is visited.
If you get a white screen or an error message when visiting an auto-login link, turning off Set Current User will likely fix the error.
#Form Auto Login
You can also start an auto-login session when a form is submitted with any one of our supported form plugins.
This is the same as if the visitor had just followed an auto-login link— a cookie is set and then you can customize the site appearance based on the tags and meta data on their contact record.

To enable this, check the box for Form Auto Login from the Advanced settings tab.
#Ending auto-login sessions
WP Fusion will attempt to end the auto login session in several situations to prevent unexpected behavior on your site:
When a user logs into the site with a username and password
When a visitor reaches a page that contains 「login」 in the URL
When a visitor reaches a page that contains 「register」 in the URL
When a visitor reaches a page that contains 「checkout」 in the URL
However you may also want to force the auto-login session to end at a different time, for example when a form is submitted. You can do this by appending ?wpf-end-auto-login=true to any URL.
You can also achieve this in PHP by calling wp_fusion()->auto_login->end_auto_login();
#Troubleshooting Auto Login
The auto login system is still considered experimental and we can』t guarantee that it will work with all plugins.
If you』re using an auto login link and it doesn』t seem to be working, the first thing to check is if the cookie has been set for the auto login session. You can check your browser』s cookie storage to see if the wpf_contact cookie is being set. In Chrome this is found in the developer console under Application » Cookies:
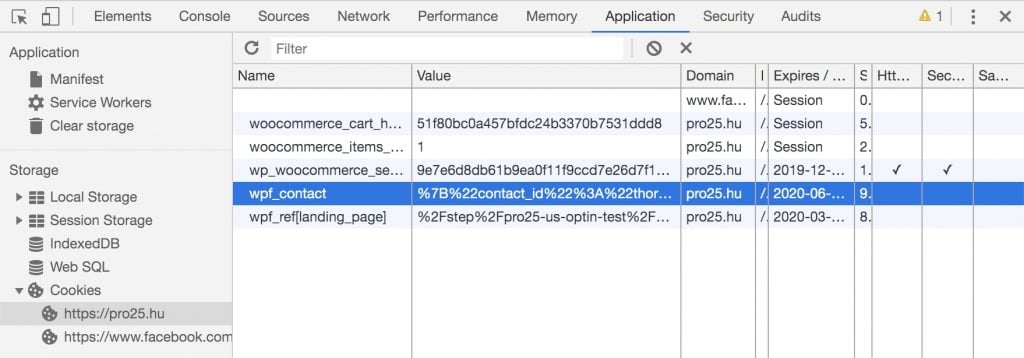
If the wpf_contact cookie isn』t set, then the auto login URL wasn』t recognized. You should make sure that you』re using a real contact ID in your auto login URL, and that Auto Login is turned on in the WP Fusion settings.
#Caching
Because auto-login links are visited by guests (people who aren』t logged in), making auto-login links work with caching requires some extra attention.
For starters, make sure that any URLs with cid= in them are excluded from cache. Also add a cookie based cache exclusion for the wpf_contact cookie.
Note that URLs with UTM parameters (from Google Analytics) force-enable caching on some hosts. In many cases https://mysite.com/?cid=123 will work, but https://mysite.com/?utm_campaign=FallNewsletter&cid=123 will not, because the utm_campaign parameter triggers caching.
Getting around that is different for every host. For example with Cloudways we』ve had to:
In the cache exclusion settings in the Breeze plugin, put in a URL exclusion for the landing page being used with auto-login
In the Varnish settings in Cloudways, put in a cache exclusion for the landing page being used with auto-login
In the Varnish settings in Cloudways, put in a cache exclusion for the wpf_contact cookie.
#Debug Mode
As of WP Fusion v3.37.12, you can enable Auto Login Debug Mode from the Advanced tab in the WP Fusion settings.
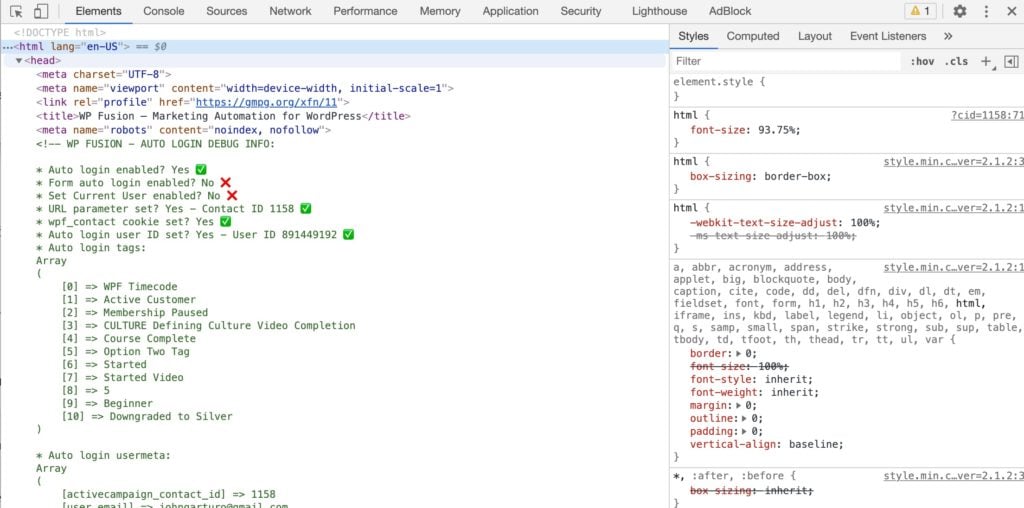
When enabled, details about the current auto-login session will be output to the HTML comments in the header of your site.
You can use this to troubleshoot issues for a particular auto-login user, for example missing or malformed metadata or tags. This will also show if the wpf_contact cookie isn』t being set, for example due to caching.
#Developer resources
There are a few filters that allow you to modify the auto-login process.
#Using an alternate auto-login query variable
Instead of using ?cid= in your URL, you may want to use another variable, for example if you』re already passing the contact』s ID to a different plugin. You can register an additional custom query variable using the wpf_auto_login_query_var filter.
For example to share the contact ID parameter with RightMessage, you』d use:
function alt_auto_login_var( $var ) {
return 'rm_ac';
}
add_filter( 'wpf_auto_login_query_var', 'alt_auto_login_var' );
#Pass auto-login data to other scripts
WP Fusion includes a function, wpf_get_current_user(), which works the same as the wp_get_current_user() function, except that it also supports auto-login sessions. This can be used to pass data from an auto-login session to a 3rd party tracking script.
Below are two examples, one for Oribi』s site tracking, and one for Smartlook』s site tracking.
function custom_wpf_tracking() {
if ( ! function_exists( 'wp_fusion' ) || ! wpf_is_user_logged_in() ) {
return; // WP Fusion needs to be active and the user needs to be identified.
}
$user = wpf_get_current_user(); // Get the details about the current user. This lets you use the email via $user->user_email
$contact_id = wpf_get_contact_id(); // Or, optionally, you can use the contact ID for tracking.
?>
ORIBI.api('setUserEmail', 'user_email; ?>' );
smartlook( 'identify', '' );
user->has_tag( 'Payment Failed' ) ) {
$end = true;
}
return $end;
}
add_filter( 'wpf_end_auto_login', 'my_end_auto_login', 10, 2 );
There is also a helper filter which allows you to end a session based on a partial URL match, wpf_end_auto_login_request_uris:
function my_end_auto_login_uri( $request_uris ) {
$request_uris[] = 'my-page-slug';
return $request_uris;
}
add_filter( 'wpf_end_auto_login_request_uris', 'my_end_auto_login_uri' );
In this example, if the visitor lands on https://mysite.com/my-page-slug/ (or any URL with my-page-slug in it) the session will end.
#Skipping an auto-login session
You can skip an auto-login session on a single page via the wpf_skip_auto_login filter. The session will be resumed once the visitor navigates to another page.
function my_skip_auto_login( $skip, $contact_data ) {
if ( is_page( 'my-custom-form' ) ) {
$skip = true;
}
return $skip;
}
add_filter( 'wpf_skip_auto_login', 'my_skip_auto_login', 10, 2 );
There is also a helper filter which allows you to skip the session based on a partial URL match, wpf_skip_auto_login_request_uris:
function my_skip_auto_login_uri( $request_uris ) {
$request_uris[] = 'my-page-slug';
return $request_uris;
}
add_filter( 'wpf_skip_auto_login_request_uris', 'my_skip_auto_login_uri' );
In this example, if the visitor lands on https://mysite.com/my-page-slug/ (or any URL with my-page-slug in it) the session will skipped on that page.
#Making auto-login more secure
The basic auto-login implementation with just the cid= parameter is the easiest to set up and the most reliable. However this does mean that a visitor could cycle through random contact IDs in the URL, and potentially gain access to another contact』s content or details.
You can further secure the URL by adding a second parameter that has to pass. In this example, the auto-login URL contains an additional email= parameter. If the email doesn』t match the email address on the contact record in the CRM, the auto-login session.
To work, the URL would need to be formatted like https://mysite.com/?cid={contact_id}&email={email_address}
function verify_wpf_auto_login( $end, $contact_data ) {
if ( isset( $_GET['cid'] ) ) {
$contact = wp_fusion()->crm->load_contact( intval( $_GET['cid'] ) );
if ( is_wp_error( $contact ) ) {
return true;
}
// If there's no &email= parameter in the URL, or the email doesn't match
// the email in the database, end the auto login session
if ( ! isset( $_GET['email'] ) ) {
return true;
}
if ( urldecode( $_GET['email'] ) != $contact['user_email'] ) {
return true;
}
}
return $end;
}
add_filter( 'wpf_end_auto_login', 'verify_wpf_auto_login', 10, 2 );
#Was this helpful?
Let us know if you liked the post. That』s the only way we can improve.
Yes
No

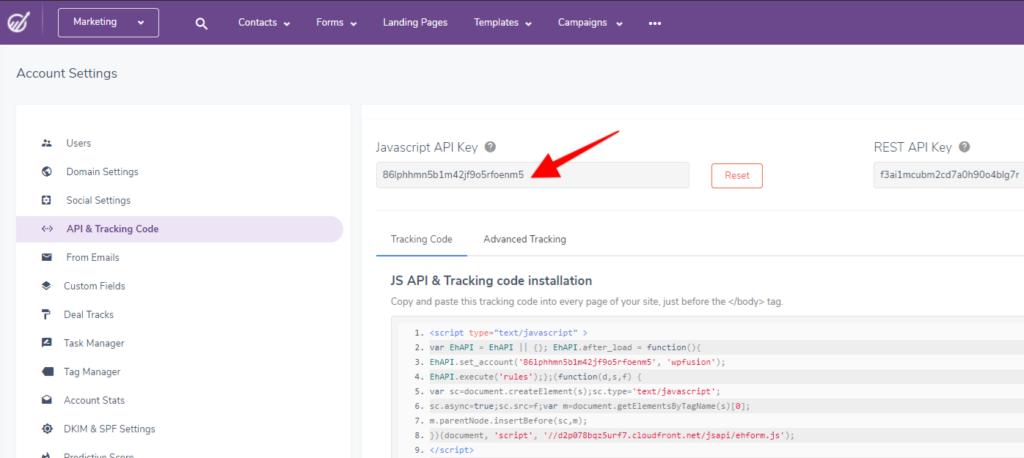 You can find your EngageBay JavaScript API key in your account under Admin Settings » API and Tracking Code


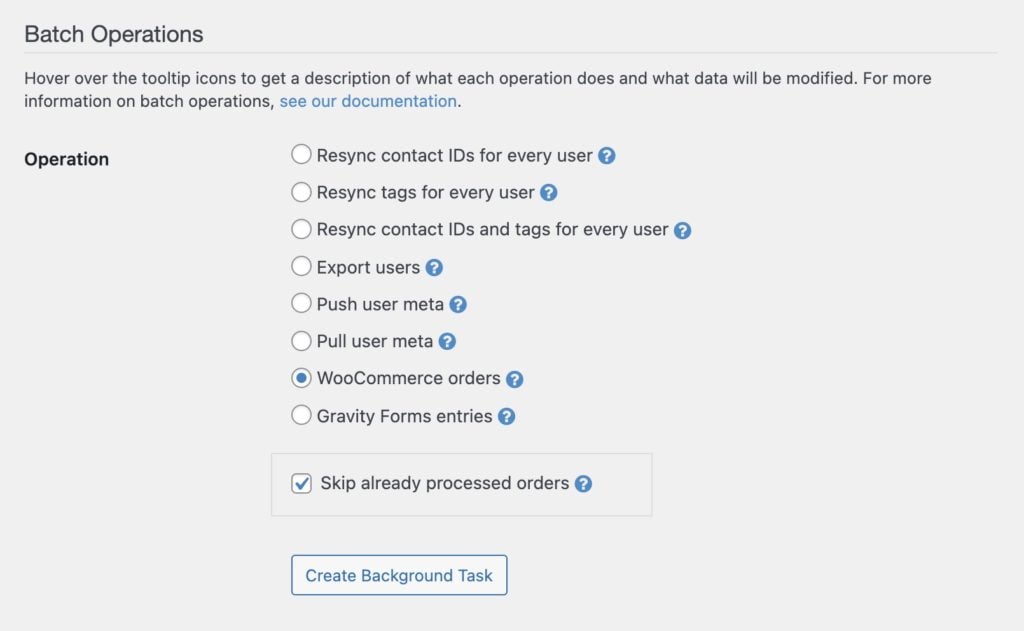 By default the batch exporter will not export the same order to your CRM twice.