The WP Fusion User Class#Overview
As we discussed in the first section, WP Fusion achieves its flexibility and extensibility by standardizing the way WordPress communicates with different CRM systems.
The first section covered how to interface with your selected CRM directly by utilizing the wp_fusion()->crm object. Those methods are 「low level」, they require you to already know the contact ID of the contact you want to edit, and do very little in terms of validation of data or redundancy checking.
So while WP Fusion』s CRM class deals with contacts and contact data, the WPF_User class deals with WordPress users and user data.
This class works like a central dispatch, taking incoming events and data from our various plugin integrations and routing it to the appropriate method in your selected CRM.
#A basic example of how this all works, using LifterLMS
When a student completes a lesson in LifterLMS, LifterLMS triggers the 'lifterlms_lesson_completed' action.
In our LifterLMS integration file, we have a function attached to this hook. This function checks to see if any tags have been configured to be applied when the lesson is marked complete.
If there are tags to apply, the function then calls:
wp_fusion()->user->apply_tags( $tags, $user_id );
In the apply_tags() function, we first check to see if there is a contact ID available for that user. If the user doesn』t have a contact record, then nothing else happens.
Then we check the user』s current tags and see if the tags being applied are actually new. If the user already has the tag, then we don』t need to send an unnecessary API call.
Then apply_tags() sends the new tags to the CRM wrapper class (discussed in the previous article), by calling:
wp_fusion()->crm->apply_tags( $tags, $contact_id );
It checks the response from the API call, and if there were any errors, these are recorded in WP Fusion』s error log for troubleshooting purposes.
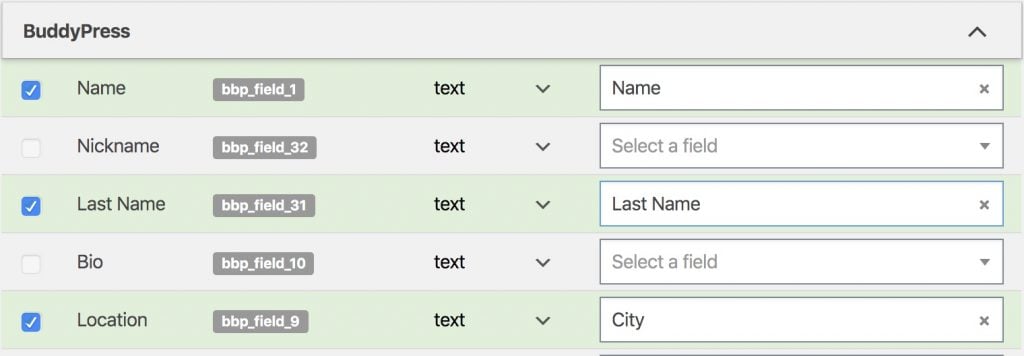
Finally we update the tags stored in in the usermeta table for that user, at '{crm_slug}_tags' so they can be quickly accessed again in the future.
#The available methods in the WPF_User class:
#user_register()
wp_fusion()->user->user_register( $user_id, $post_data = null, $force = false );
This function is triggered whenever a user registers on your site, from any plugin or other source. It can also be manually called to create a new CRM contact from an existing user ID.
Parameters:
$user_id (int) (Required) The ID of the user you』d like to use to create the new contact
$post_data (array) (Optional) You can pass in additional data you』d like to be included with the new contact. If this is left blank, WP Fusion will attempt to get as much data as possible out of the database
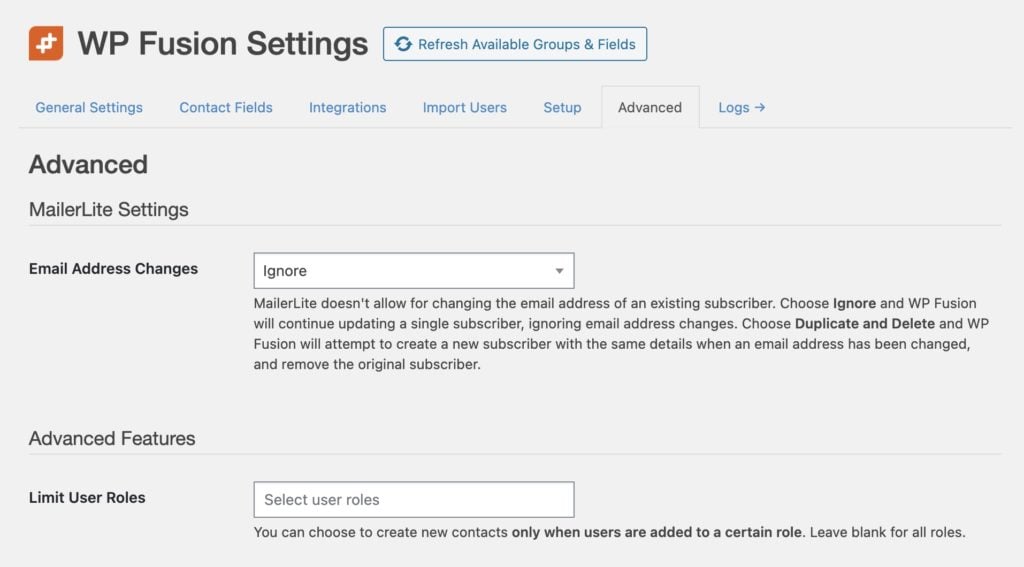
$force (bool) (Optional) If you have the setting for 「Create Contacts」 disabled in the WP Fusion settings, then you can set this argument to true to force creating a new contact.
Return values:
$contact_id (int) The contact ID of the new contact
false (bool) If there wasn』t enough data available to create a new contact, or if there was an API connection failure
#get_contact_id()
wp_fusion()->user->get_contact_id( $user_id, $force_update = false );
Gets the contact ID for a user from their local user meta, or forces an update of the contact ID by looking up their email address in your CRM.
Parameters:
$user_id (int) (Required) The ID of the user you』d like to get the contact ID for
$force_update (bool) (Optional) If set to true, this will force an update of the saved contact ID for the user by looking up their email address in your CRM
Return values:
$contact_id (int) The contact ID of the user
false (bool) If the user has no contact ID saved on the site, or if WP Fusion was unable to locate their email address in your CRM
#get_tags()
wp_fusion()->user->get_tags( $user_id, $force_update = false );
Gets the tags for a user from their local user meta, or forces an update of their tags by performing an API call.
Parameters:
$user_id (int) (Required) The ID of the user you』d like to get the tags ID for
$force_update (bool) (Optional) If set to true, this will force an update of the saved tags for the user by force-checking their contact ID and then re-loading the user』s tags from your CRM
Return values:
$user_tags (array) An array of tag IDs applied to the contact. Will be an empty array if no tags were found
false (bool) If the user has no contact ID saved on the site, or if WP Fusion was unable to locate their email address in your CRM
#pull_user_meta()
wp_fusion()->user->pull_user_meta( $user_id );
Loads the latest meta data from the CRM contact record for the specified user, and updates their saved data on your site.
Parameters:
$user_id (int) (Required) The ID of the user you』d like to load from the CRM
Return values:
$user_meta (array) An array of WordPress meta fields and their values that were loaded for the user
false (bool) If the user has no eligible meta to load, or if there was an error loading their contact record
#push_user_meta()
wp_fusion()->user->push_user_meta( $user_id, $user_meta = false );
Pushes meta data for a user from WordPress to your CRM.
Parameters:
$user_id (int) (Required) The ID of the user you』d like to update
$user_meta (array) (Optional) An associative array of WordPress meta keys and values to update. If left blank, WP Fusion will send all meta data found for that user in the database.
Return values:
true (bool) The contact was successfully updated
false (bool) If the user has no saved contact ID, or there was no eligible meta data to send
#apply_tags()
wp_fusion()->user->apply_tags( $tags, $user_id = false );
Applies an array of tags to a user.
Parameters:
$tags (array) (Required) An array of tag IDs to apply to the user
$user_id (int) (Optional) The user to apply the tags to. Will use the current logged in user if left blank
Return values:
true (bool) The tags were successfully applied
false (bool) If no contact ID was found for the user, or if the user already had the specified tags and no API call was needed
#remove_tags()
wp_fusion()->user->remove_tags( $tags, $user_id = false );
Removes an array of tags from a user.
Parameters:
$tags (array) (Required) An array of tag IDs to remove from the user
$user_id (int) (Optional) The user to remove the tags from. Will use the current logged in user if left blank
Return values:
true (bool) The tags were successfully removed
false (bool) If no contact ID was found for the user, or if the user didn』t have those tags in the first place
#import_user()
wp_fusion()->user->import_user( $contact_id, $send_notification = false, $role = false );
This function imports a contact from your CRM, by contact ID, and creates a new WordPress user. If a user already exists with the same contact ID, that user will just be updated.
New users will be given a randomly generated password. If you have enabled 「Return Password」 in the WP Fusion settings, this password will be stored back to their contact record.
Parameters:
$contact_id (int) (Required) The contact ID to import
$send_notification (bool) (Optional) Whether to send the new user the default WordPress welcome email
$role (bool / string) (Optional) If provided, the new user will be given the specified role. Otherwise they will be created with the site default role.
Return values:
$user_id (int) The ID of the new user (or existing user if updated)
$error (WP Error object) If there was an API error importing the user, or if the loaded contact data didn』t contain an email address
#Utility and helper functions:
#get_user_id()
wp_fusion()->user->get_user_id( $contact_id );
Looks up a user by their contact ID.
Parameters:
$contact_id (int / string) (Required) The contact ID to search by
Return values:
$user_id (int) The ID of the user
false (bool) If no user was found with that contact ID
#has_tag()
wp_fusion()->user->has_tag( $tag, $user_id = false );
Checks a given user to see if they have the specified tag.
Parameters:
$tag (int / string) (Required) The tag ID or tag label to check for
$user_id (int) (Optional) The user ID to check. Will default to the current user ID if left blank
Return values:
true (bool) The user has the tag
false (bool) The user does not have the tag
#get_tag_id()
wp_fusion()->user->get_tag_id( $tag_label );
For CRMs that use internal IDs for their tags (like Infusionsoft), this function will return the tag ID for a given tag label.
Parameters:
$tag_label (string) (Required) The tag label to check for
Return values:
$tag_id (int / string) The internal ID for the supplied tag label
false (bool) If no tag was found with that label
#get_tag_label()
wp_fusion()->user->get_tag_label( $tag_id );
For CRMs that use internal IDs for their tags (like Infusionsoft), this function will return the tag label for a given tag ID.
Parameters:
$tag_id ( int / string) (Required) The tag ID to check for
Return values:
$label (string) The tag label for that ID. If no tag is found, it will return 「Unknown Tag:」 with the tag ID
#Was this helpful?
Let us know if you liked the post. That』s the only way we can improve.
Yes
No
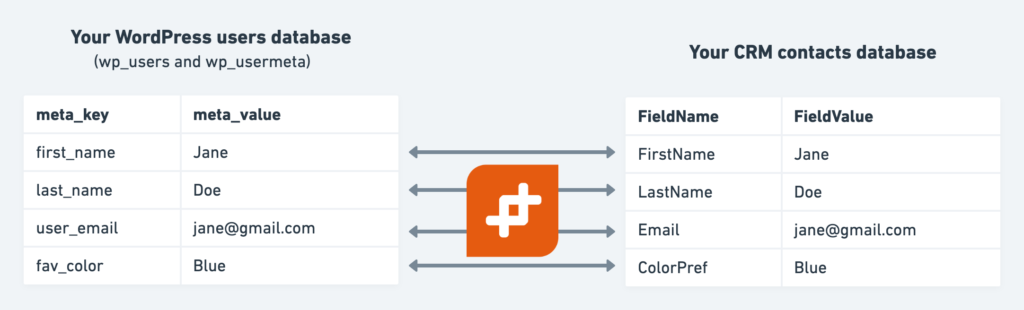 Syncing data between just two tables (your users and your CRM) is automatic and requires no extra setup
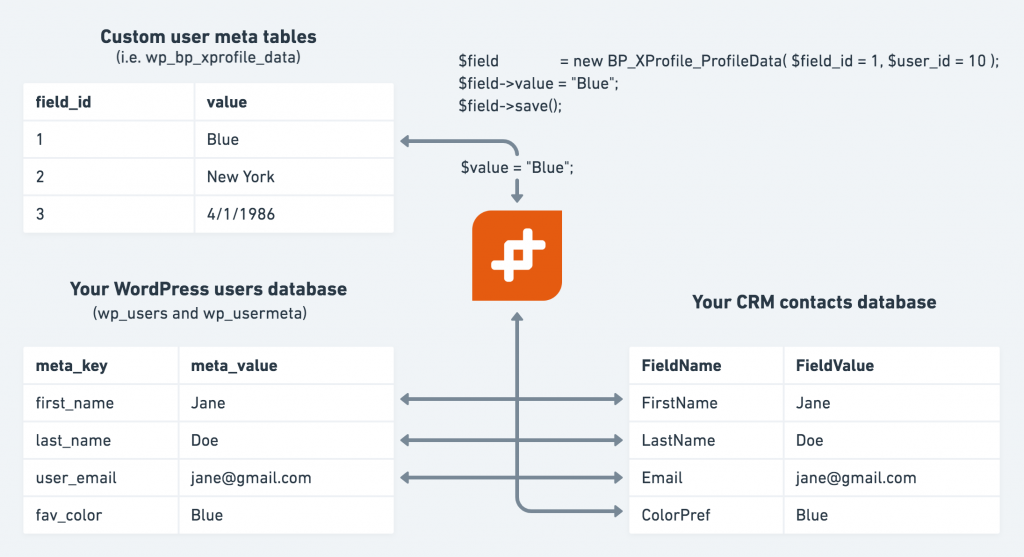 Syncing data between your CRM and multiple WordPress tables can require some extra attention if using a non-supported plugin