Webhooks not being received by WP FusionThere are some situations in which WP Fusion doesn』t receive webhooks properly. Here are some troubleshooting steps if you』re having difficulties receiving incoming webhooks:
#Use the built-in testing tool
WP Fusion now includes a built-in utility for testing your site』s ability to receive incoming webhooks.
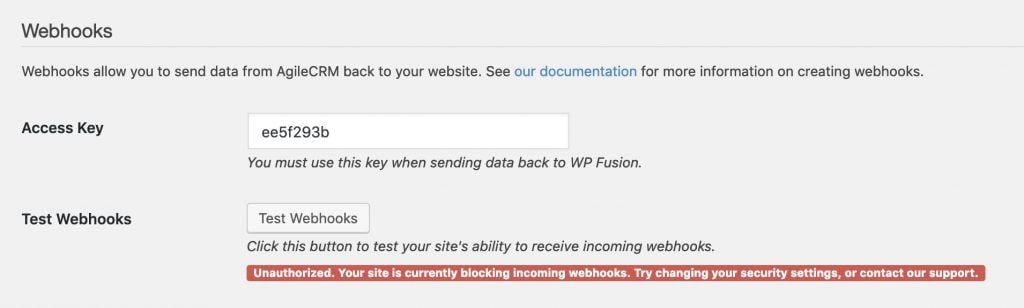
Click the Test Webhooks button and a couple of seconds later you』ll see the response. If you get a green Success message you should be good to go.
Note: Because the testing tool sends a test webhook from this site (wpfusion.com), it』s possible for webhooks to appear to be working, but still be blocked when they』re sent from your CRM. Thus the testing tool is a good indication of whether or not your site can receive webhooks, but isn』t 100% reliable.
#Security Plugins
Security software running on your site or server can block incoming webhooks. This is the most common issue people have with webhooks. If the testing tool returns a 403 or Unauthorized message then this is likely the case.
First try temporarily disabling any security or anti-spam plugins to see if the webhooks begin working. If that fixes it, you』ll need to tweak your security settings to allow incoming POST data from your CRM』s IP address.
If you view the access logs in your security plugin, you should see the incoming webhook requests that are getting blocked, and this will show the IP address of the originating server. If you whitelist this IP address it will allow the webhooks to go through.
If that doesn』t work, it』s also possible that your hosting company is blocking the webhooks for security reasons. You can contact your host, or look at your host』s security logs, to see if any traffic is being blocked. If so, they should be able to create an exception for you by modifying their security rules.
#WordFence
We』ve observed some success by putting WordFence into 「Learning Mode」 while testing incoming webhooks. This trains WordFence to recognize the incoming web traffic as legitimate.
#iThemes Security
iThemes Security can block incoming webhooks for a variety of reasons. We』ve had success by disabling the Enable HackRepair.com』s ban list feature option in the iThemes settings.
#CleanTalk
The CleanTalk anti-spam plugin often interferes with webhooks being received by WP Fusion. Because CleanTalk uses a shared IP blacklist, it』s also possible for webhooks to work at first, but mysteriously stop working later. As a troubleshooting step it』s always best to start by disabling CleanTalk.
#Cloudflare
If you』re using Cloudflare, make sure that you create a firewall exception for incoming traffic from your CRM』s IP address. You can also create a firewall rule to bypass the firewall for all requests that contain wpf_action in the URL.
If you』re not sure if Cloudflare is blocking webhooks or not, you can also temporarily pause Cloudflare on a domain.
#SiteGround
If you』re hosting with SiteGround, SiteGround』s built in bot protection sometimes will begin blocking incoming webhooks by sending them to a captcha page. In that case webhook status will show as successful (200 status code) in your CRM since it does land on the captcha page, but because it can』t solve the captcha, the webhook never reaches your site.
It』s not possible to whitelist your CRM』s IP address with SiteGround』s bot protection service, the only solution is to request SiteGround support to completely disable bot protection on your account. To protect your site from bots we recommend Cloudflare, it rarely has a problem with webhooks.
#Known IP Addresses
These are the webhook IP addresses of some of the CRMs we support. If your site is blocking incoming webhooks, then a good start would be to whitelist their IP address.
This list is based on our own tests and there may be additional IP addresses that aren』t listed here. Some platforms add new IPs and/or change them over time, so we can』t provide any guarantees as to the accuracy of this list.
#ActiveCampaign
23.20.225.34
34.192.144.26
52.45.183.46
52.55.227.5
52.7.228.32
173.193.9.0/24
34.226.103.188
34.205.102.133
34.233.54.78
#AgileCRM
107.178.[200-255].[0-255]
#ConvertKit
18.218.244.8
#Drip
54.81.10.128
#Infusionsoft
208.76.24.[0-255]
34.145.76.18
#Intercom
4.231.68.152
34.197.76.213
35.171.78.91
35.169.138.21
52.70.27.159
52.44.63.161
#MailChimp
104.196.165.118
35.190.191.63
#MailerLite
35.246.139.232
#Ontraport
209.170.211.168
#Salesforce
13.110.6.8
#Sendinblue
185.107.232.169
#Zoho
31.186.243.98
#Logging
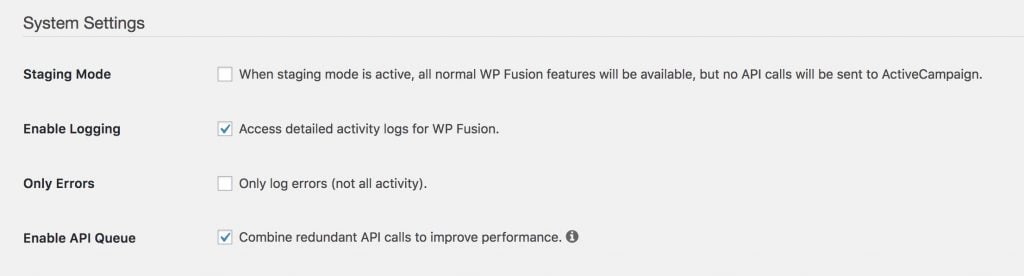
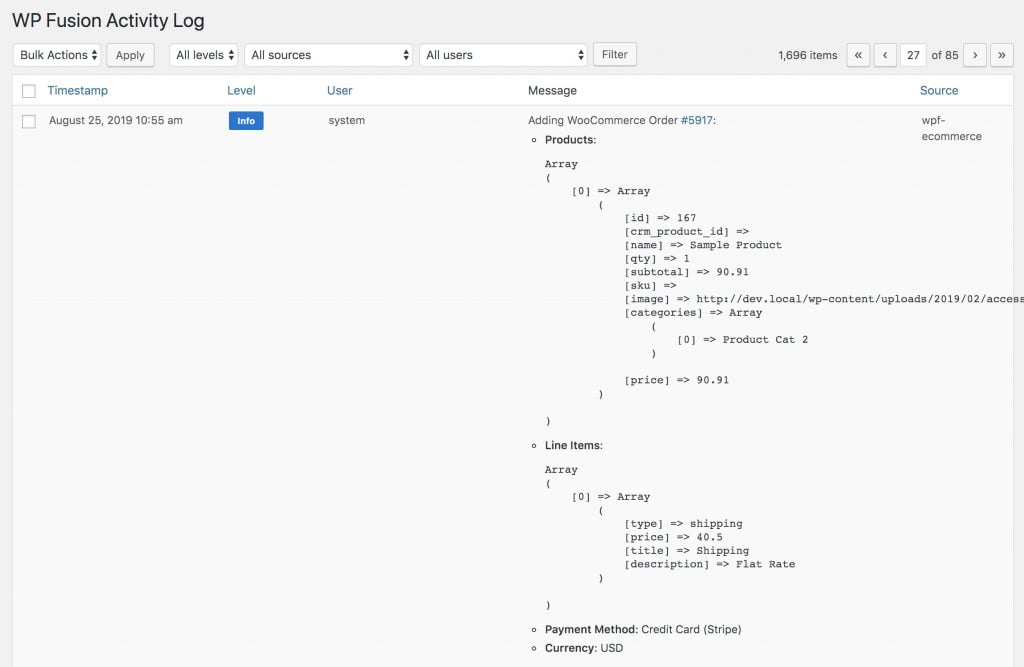
If webhooks are coming in but data is missing, you can see what data is being received by enabling WP Fusion』s activity logs.
Go to Settings >> WP Fusion >> Advanced, and checking the box 「Enable Logging」. Then try and send a webhook from your CRM to see what tags and data are being loaded.
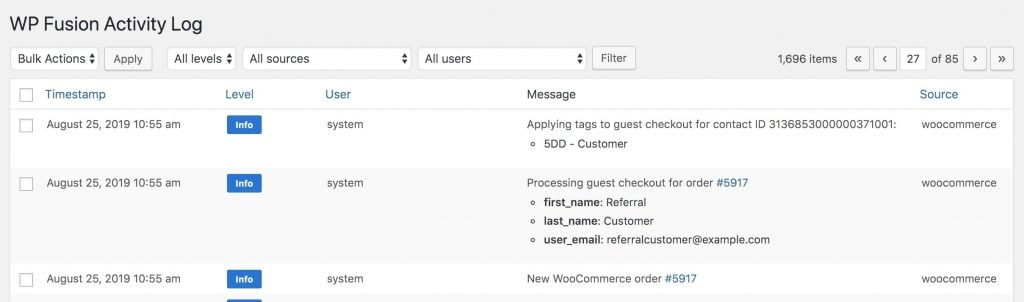
 An incoming webhook recorded in WP Fusion』s logs
#Double check your URLs
When you add the webhook URL to your site to your CRM, make sure the base URL matches your site』s home page exactly.
If your site is at https://mysite.com, then sending a webhook to http://mysite.com won』t work.
If your site is at https://www.mysite.com, then sending a webhook to https://mysite.com won』t work.
If you』re not sure you can visit the home page of your site and copy / paste the URL out of your browser into your CRM.

You can also copy the URL out of the Webhook Base URL field in the WP Fusion settings.
#Making sure the automation is working correctly
If you』re sending the webhook as part of a complex automation in your CRM, it might help to make sure the webhook is actually being sent in the first place. You can use a third party service for this, like https://webhook.site/.
This will give you a unique URL, like https://webhook.site/#/bd662d92-fb16-4431-ae79-f566943b0f9e, which you can paste into the URL field for the webhook in your CRM.
Send a contact through the automation or rule, and you should see a message appear on webhook.site showing the incoming data. If this works then you know the webhooks are being sent correctly.
If no message appears then your automation may have an issue that』s preventing the webhook from being sent.
#Manual testing
You can also test a webhook manually by visiting the webhook URL in your browser. This will be the same URL you used when setting up the webhook in your CRM, and you can select a contact ID to use for testing. For example
http://mysite.com/?wpf_action=update&access_key=ACCESSKEY&contact_id=CID
Replace ACCESSKEY with your access key from the settings, and CID with a contact ID you』d like to use to test. You should see a success message showing that the user was updated. If there were any errors, they』ll be reported there as well.
#The Async Method
If you』re sending many webhooks simultaneously (100+) it』s possible your web server is unable to process them in time and runs out of available resources. To prevent this, you can try WP Fusion』s (experimental) asynchronous method for processing webhooks.
To enable this, append &async=true to the end of your webhook URL. For example:
https://mysite.com/?wpf_action=update&access_key=ACCESSKEY&contact_id=CID&async=true
This will tell WP Fusion to put the incoming webhooks in a queue, and work through them over a period of time, taking into account your server』s available resources.
#The Async Endpoint
For even better webhook performance, you can bypass WordPress entirely by sending the webhooks to the api.php file in the WP Fusion plugin folder.
This may require changing the file permissions on your server and/or adjusting settings in security plugins. For example with Cloudways you need to enable 「Direct File Access」 on the application, otherwise you』ll get a 403 error trying to access the file.
The API endpoint can be found at /wp-content/plugins/wp-fusion/api.php, so your webhook URLs will need to be adjusted accordingly. For example
https://mysite.com/wp-content/plugins/wp-fusion/api.php?wpf_action=update&access_key=ACCESSKEY&contact_id=CID
Otherwise the syntax and URL parameter options are the same.
You should confirm that the file is executable by testing it first with a real contact ID. If it』s working, you』ll see a success message like this:
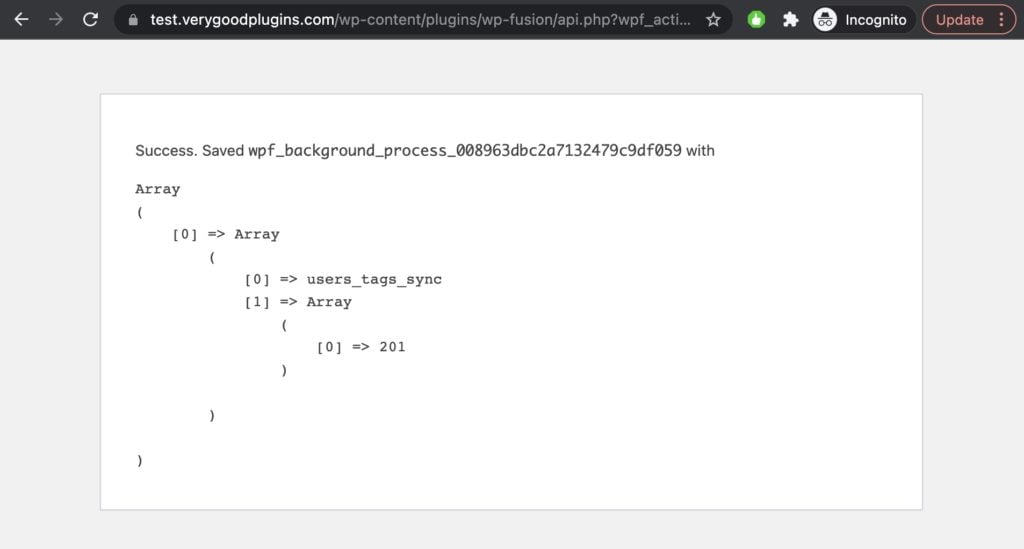
When the webhook is received it will be saved to the async import queue. WP Fusion then sets a cron job to check this queue for any pending actions.
You can set the cron interval at Settings » WP Fusion » Advanced » Cron Interval:

The cron job will check the async webhooks queue at the specified interval, and if any pending actions are found, they will be processed at that time.
For more information on the performance with using the async endpoint, check out this blog post.
#Using a third party webhook manager
There are sometimes cases where you just can』t get webhooks to work reliably— either your host has blocked your CRM』s IP address and can』t unblock it, or the volume of webhooks is causing site instability.
In that case, one potential workaround is to use a 3rd party integration tool to give you more control over your webhooks. For example Zapier, or Integromat.
#Setup in Integromat
Integromat has a free plan which allows for 1000 「Operations」 per month, so we』ll use that for this example.
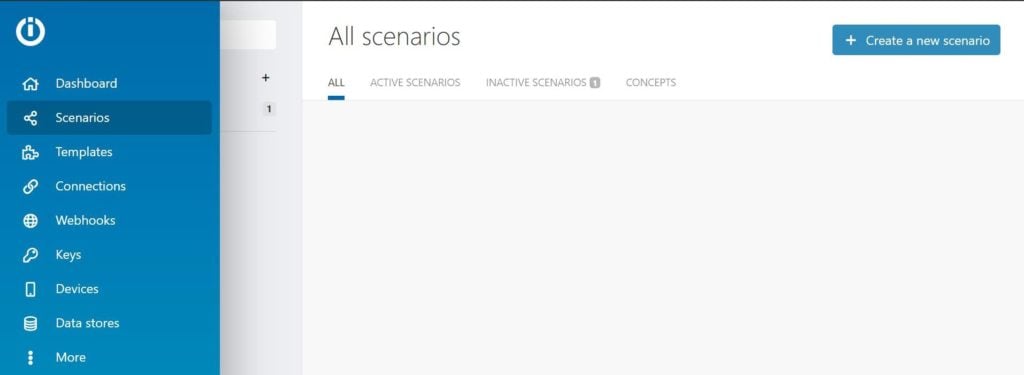
To start, create an Integromat account, and add a new Scenario.
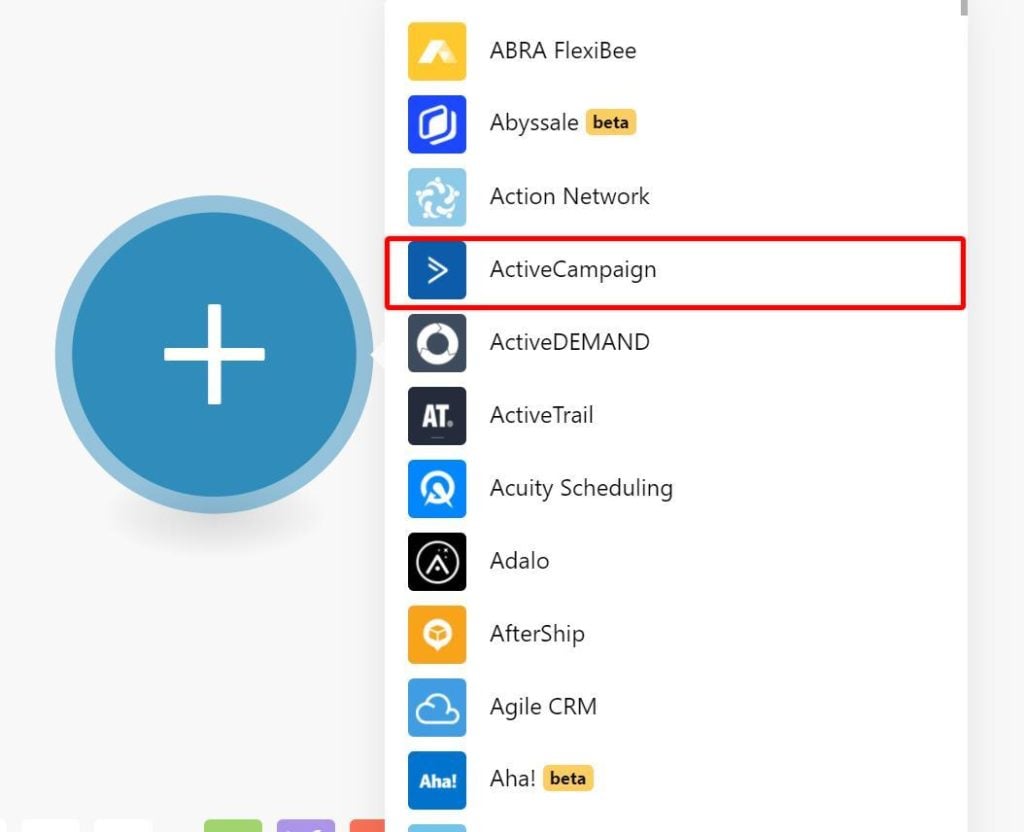
Add a new 「Module」 and select your CRM as the source. In this example we』ll use ActiveCampaign.
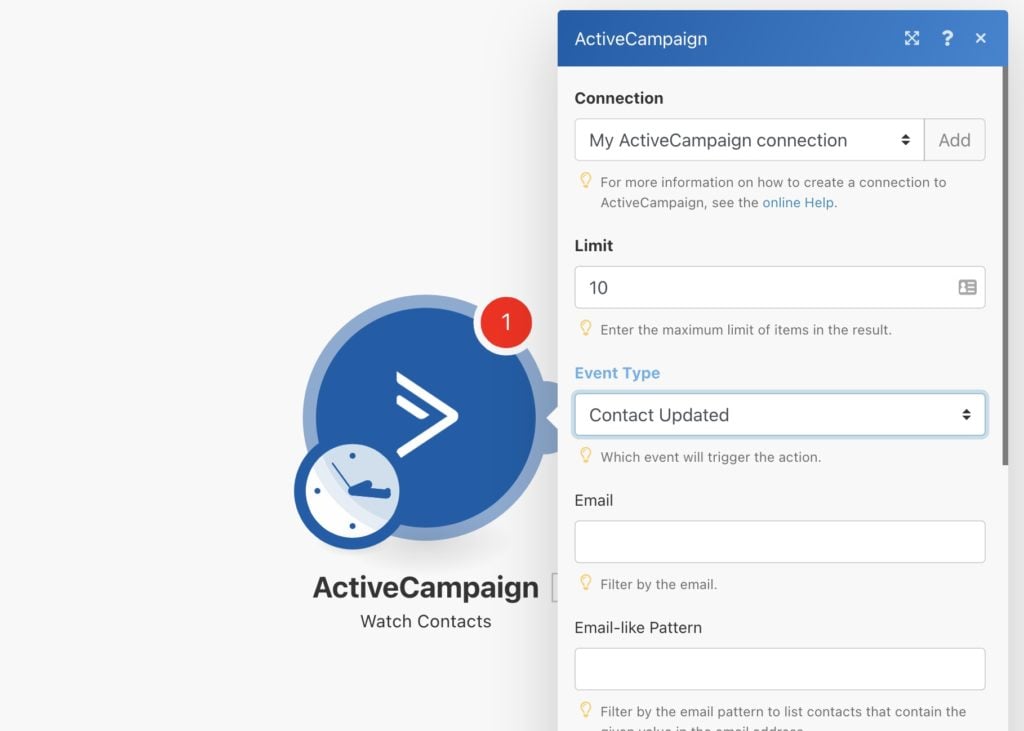
For the action, choose Watch Contacts, and select the criteria for when a contact should trigger the webhook.
Next, add a new HTTP module, and connect it to the ActiveCampaign module. Enter the URL to your site following the examples in the webhooks documentation for your CRM.
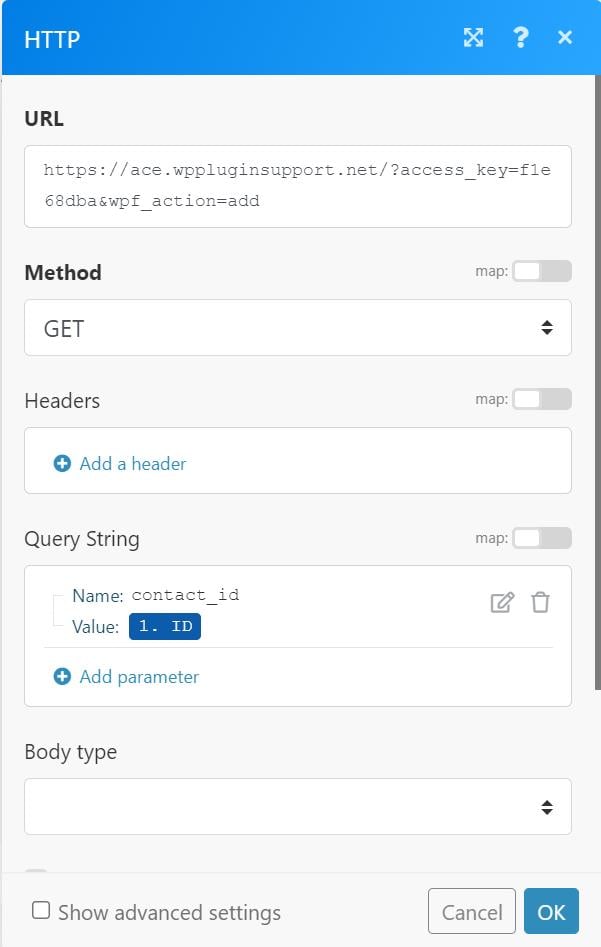
Under Query String, add a new parameter with Name: contact_id, and Value: ID. The ID should represent the ID of the contact that was just updated (the parameter name may vary depending on your connected CRM).
Now when the contact is created, updated or tagged (depending on your trigger criteria) in your connected CRM, Integromat will pass on the contact』s ID to WP Fusion, which will trigger the webhook action specified by the wpf_action= parameter in the webhook URL.
Because Integromat』s IP addresses are different than your CRM, this is one potential way of getting around firewalls or security rules. It』s also possible using Integromat to create more specific webhook criteria than are normally available with your CRM alone, which could be useful if your site is being slowed down by too many webhooks.
#Webhook performance
How fast WP Fusion processes webhooks will depend a lot on your server』s speed and available resources, as well as the responsiveness of your CRM』s API. The number of 「linked」 courses or memberships can also affect how fast the webhooks are processed.
Here』s an example of the different webhook methods and the time they took to complete on a WP Engine membership site connected to ActiveCampaign:
?wpf_action=add: 5.37 seconds (including generating a password and syncing it back to AC)
?wpf_action=update: 3.84 seconds
?wpf_action=update_tags: 3.06 seconds
?wpf_action=add&async=true: 2.06 seconds (including generating a password and syncing it back to AC)
/wp-content/wp-fusion/api.php?wpf_action=add 0.23 seconds (see this blog post)
If you have issues with webhooks not processing quickly, try using update_tags instead of update, or using the async method.
#Was this helpful?
Let us know if you liked the post. That』s the only way we can improve.
Yes
No

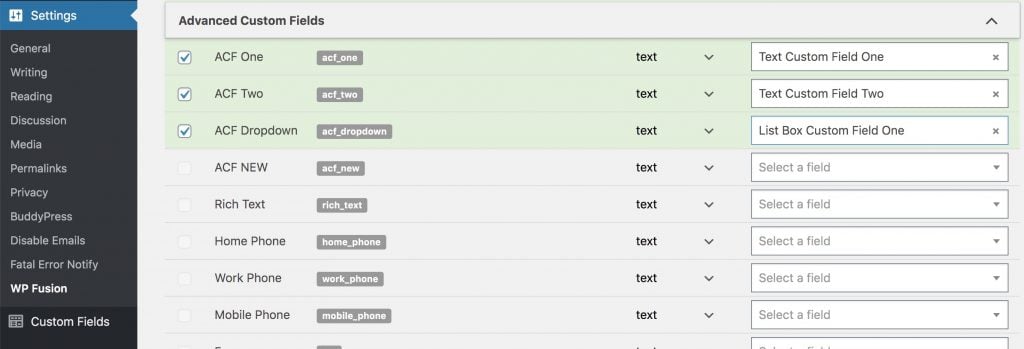
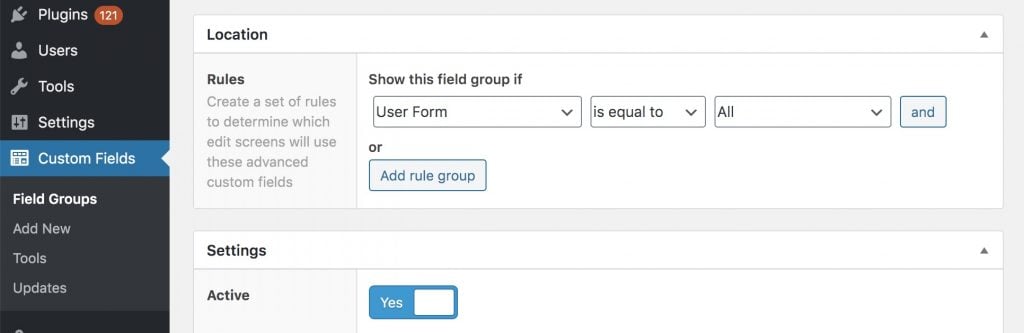 Your ACF custom fields must be set to display on the User Form to be synced with WP Fusion.