How To Connect Infusionsoft to WordPress

How To Connect Infusionsoft to WordPress

In this video, you will learn how to install WP Fusion and set up a direct connection to your Infusionsoft account.
To get started install and activate the plugin, then navigate to settings -> WP Fusion.
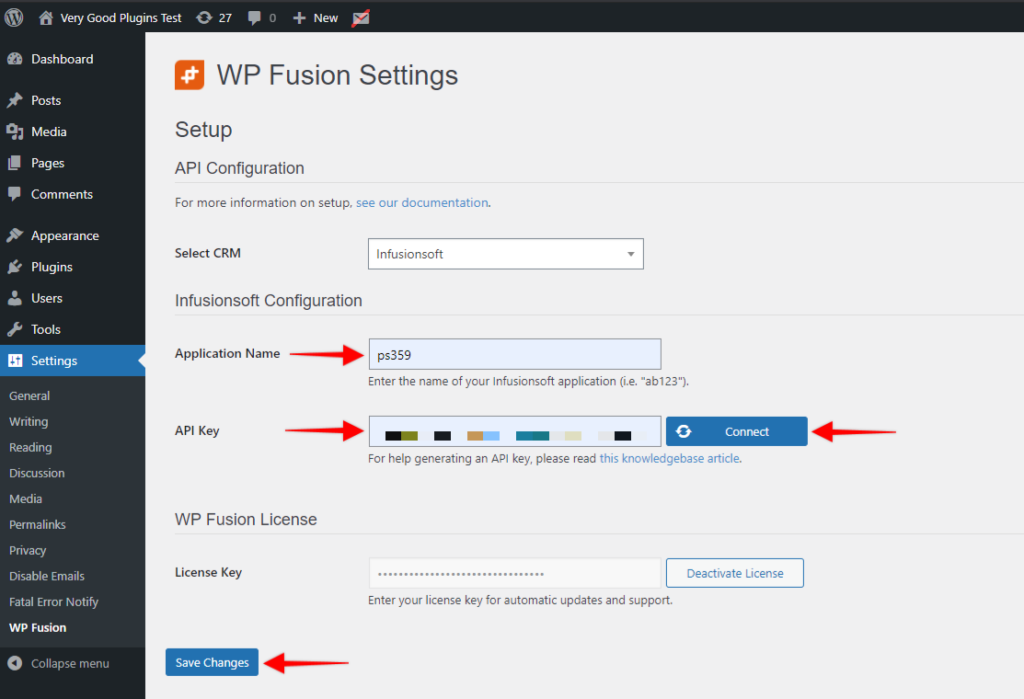
From the 『Select Your CRM』 list choose 『Infusionsoft』
Next, we will need to locate two pieces of information to initiate the connection. The 『Application Name』 and the 『API Key』.
To find the 『Application Name』 login to your Infusionsoft account and look at the URL in your browsers address bar.
The first part, immediately after https and prior to 『infusionsoft』 is your app name.
Next, we need to locate our Infusionsoft API key.
In your Infusionsoft navigate to 『Settings』 and click on 『API』.

 
To generate an API key you first need to create an 『API Passphrase』.
This is simply a password that will be used to generate your unique API key. Be sure to remember your passphrase if you ever need to generate your API key again.
Click save and you will then see your Encrypted Key.

Copy the key and return to WP Fusion and paste it in the API key box.
Finally, click on 『Connect』.
WP Fusion will now establish a connection to Infusionsoft and import your tags and custom fields.
To finalize the process click on 『Save Changes』.
 

#Was this helpful?

Let us know if you liked the post. That』s the only way we can improve.

Yes

No

How to Connect Gist to WordPress

How to Connect Gist to WordPress

In this video, you will learn how to install WP Fusion and set up a direct connection to your Gist account.
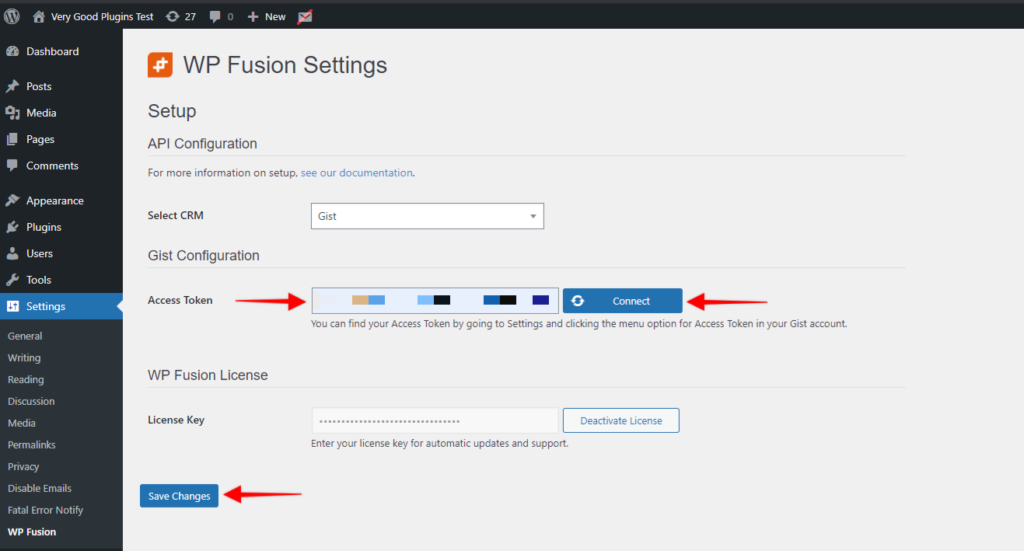
To get started install and activate the plugin, then navigate to settings -> WP Fusion.
From the 『Select Your CRM』 dropdown choose 『Gist』.
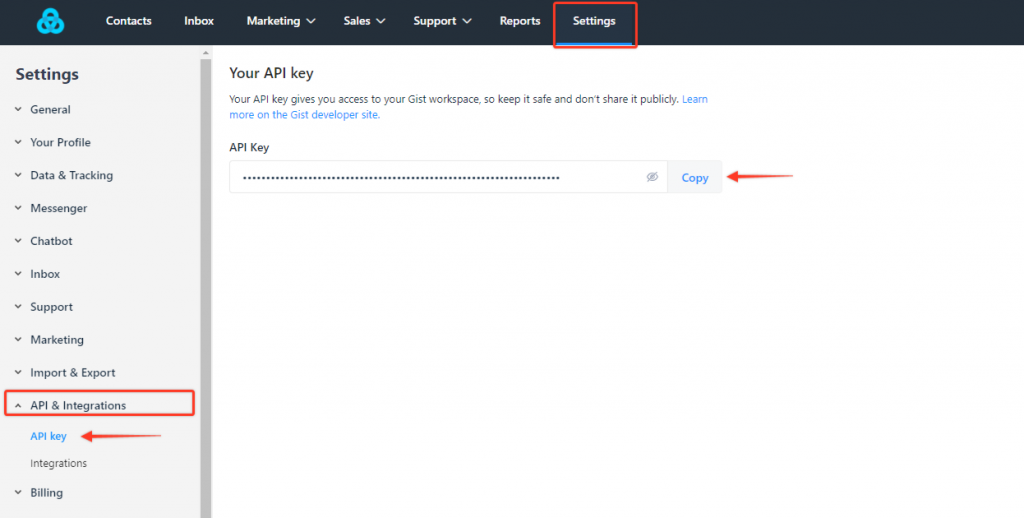
To enable the connection to Gist we need to locate your Access Token.
This can be found by logging into your Gist account and clicking on the Settings
Then choose 『API & Integrations』 and click on API Key

Copy the Access Token and paste it into the appropriate field in WP Fusion.

Then, click on 『Connect』.
WP Fusion will now establish a direct connection to your Gist account and import your tags and custom fields.
To finalize the process click on 『Save Changes』.

#Was this helpful?

Let us know if you liked the post. That』s the only way we can improve.

Yes

No

How to Connect CovertKit to WordPress

How to Connect CovertKit to WordPress

In this video, you will learn how to install WP Fusion and set up a direct connection to your ConvertKit account.
To get started install and activate the plugin, then navigate to settings -> WP Fusion.
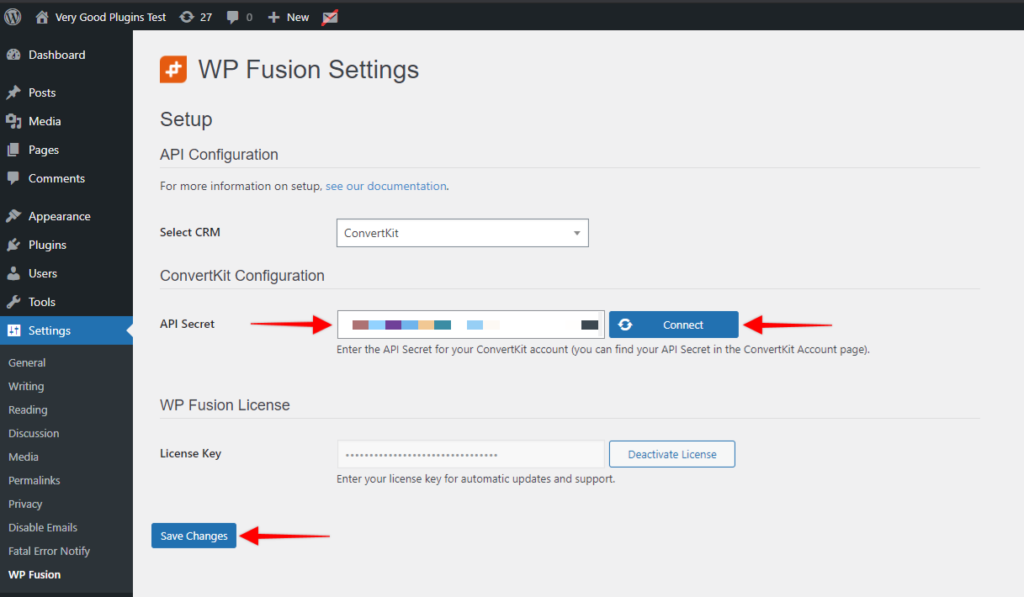
From the 『Select Your CRM』 dropdown choose 『ConvertKit』.
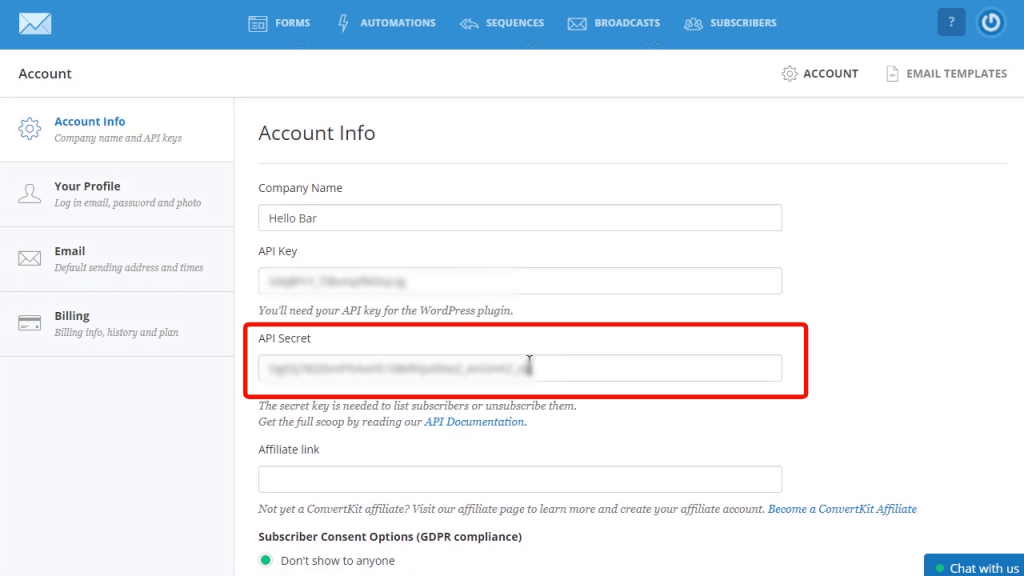
We will need to locate your API secret.
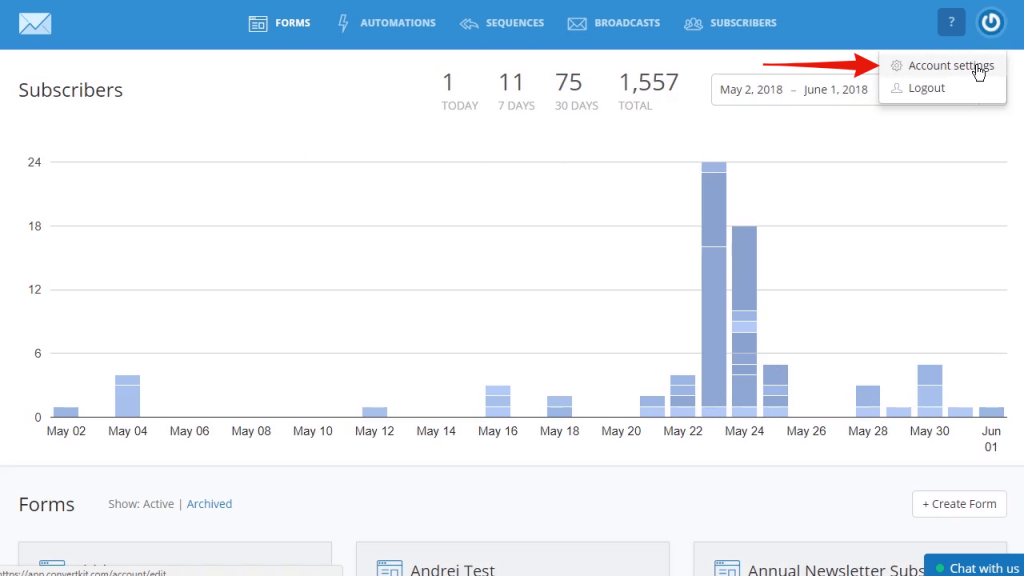
This can be found in your ConvertKit account by clicking on the menu icon in the top right and choosing 『Account Settings』.

Click on the 『Show』 link below 『API Secret』.

then copy and paste into the appropriate field in WP Fusion

Finally, click on 『Connect』.
WP Fusion will now establish a connection to ConvertKit and import your tags and custom fields.
To finalize the process click on 『Save Changes』
 

#Was this helpful?

Let us know if you liked the post. That』s the only way we can improve.

Yes

No
How to Connect Intercom to WordPress

How to Connect Intercom to WordPress

In this video, you will learn how to install WP Fusion and set up a direct connection to your Intercom account.
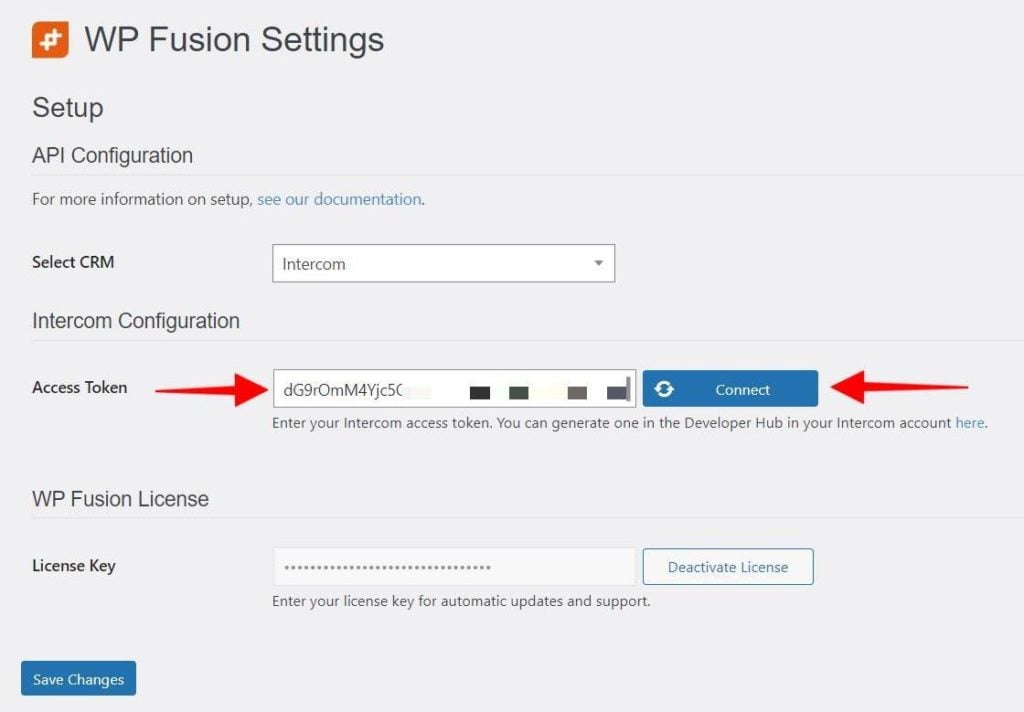
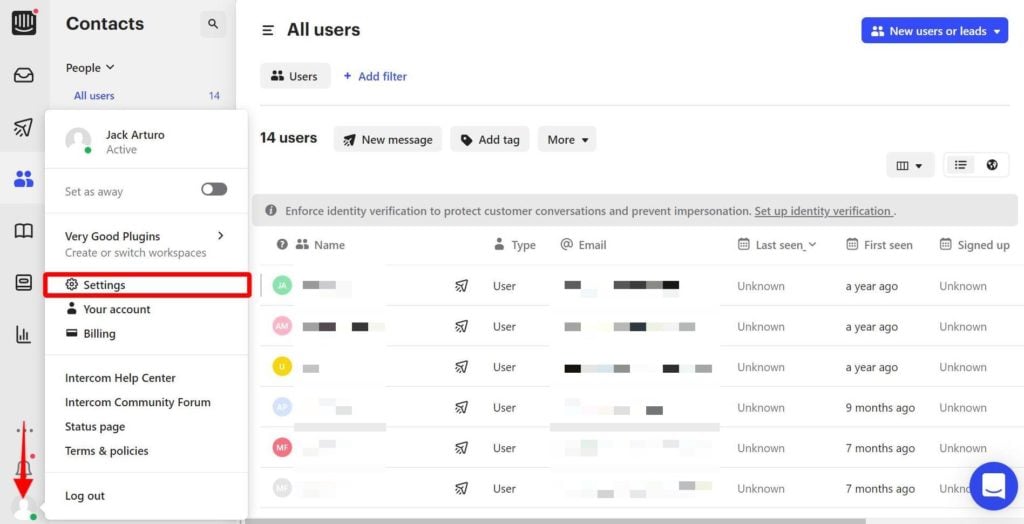
To get started, install and activate the WP Fusion plugin, then navigate to Settings -> WP Fusion. From the 『Select Your CRM』 dropdown choose 『Intercom』. To enable the connection to Intercom we need to locate your Access Token.
This can be found by logging into your Intercom account and clicking on profile icon in the bottom left corner and choosing 『Settings』.

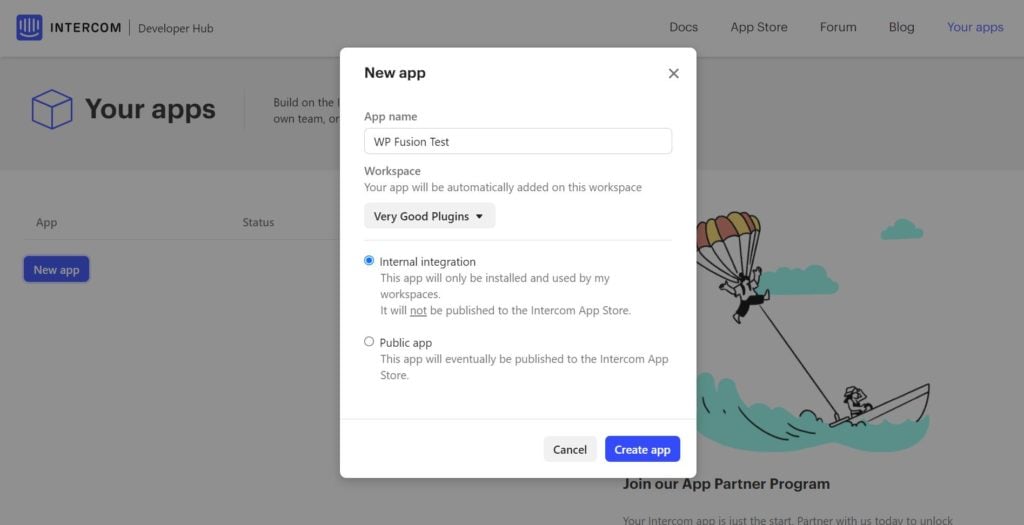
And go to Developers » Developers Hub and create a new App.

Inside your App, go to Configure » Authentication » Access Token

Copy the Access Token and paste it into the appropriate field in WP Fusion.

Then, click on 『Connect』.
WP Fusion will now establish a direct connection to your Intercom account and import your tags and custom fields.
To finalize the process click on 『Save Changes』.

#Was this helpful?

Let us know if you liked the post. That』s the only way we can improve.

Yes

No
How to Connect Groundhogg (REST API) to WordPress

How to Connect Groundhogg (REST API) to WordPress

In this video, you will learn how to install WP Fusion and set up a direct connection to Groundhogg on another website, over the REST API.
To get started install and activate the WP Fusion, then navigate to Settings » WP Fusion.
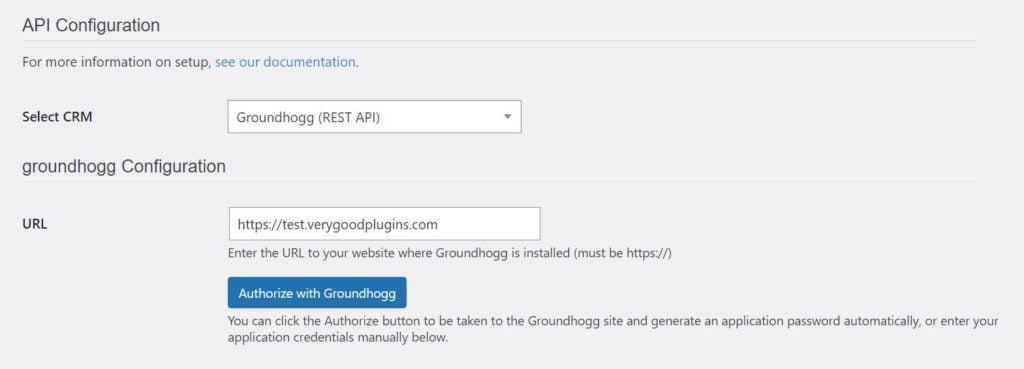
From the 『Select Your CRM』 dropdown choose 『Groundhogg (REST API)』. Enter the URL to your website where Groundhogg is installed.
Then, click on 『Authorize with Groundhogg』 to begin the authorization process.

WP Fusion will now establish a direct connection to your Groundhogg (REST API) account and import your tags and custom fields.
To finalize the process click on 『Save Changes』.

#Was this helpful?

Let us know if you liked the post. That』s the only way we can improve.

Yes

No
How to Connect Drift to WordPress

How to Connect Drift to WordPress

In this video, you will learn how to install WP Fusion and set up a direct connection to your Drift account.
To get started install and activate the plugin, then navigate to settings -> WP Fusion.
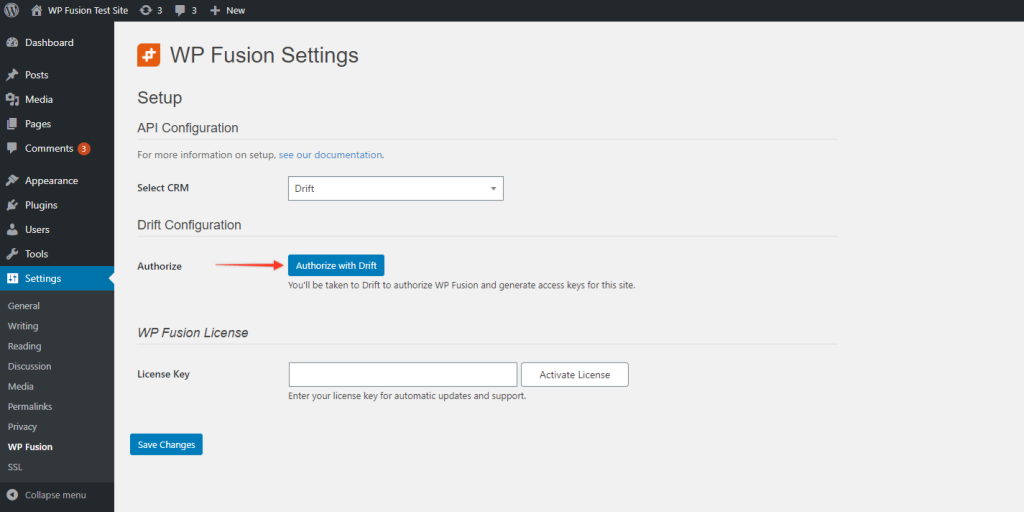
From the 『Select Your CRM』 dropdown choose 『Drift』.
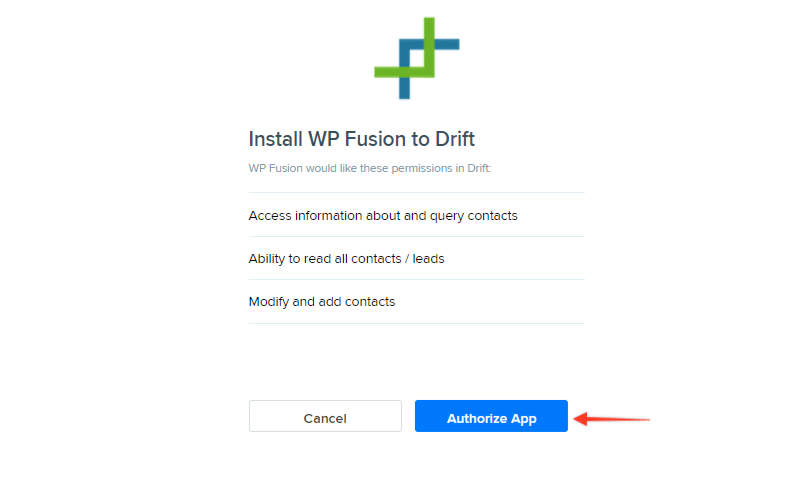
To enable the connection we need to authorize with Drift and generate access keys for your website.

Authorize App
WP Fusion will now establish a direct connection to your Drift account and import your tags and custom fields.
To finalize the process click on 『Save Changes』

#Was this helpful?

Let us know if you liked the post. That』s the only way we can improve.

Yes

No
How to Connect Kartra to WordPress

How to Connect Kartra to WordPress

In this video, you will learn how to install WP Fusion and set up a direct connection to your Kartra account.
To get started install and activate the plugin, then navigate to settings -> WP Fusion.
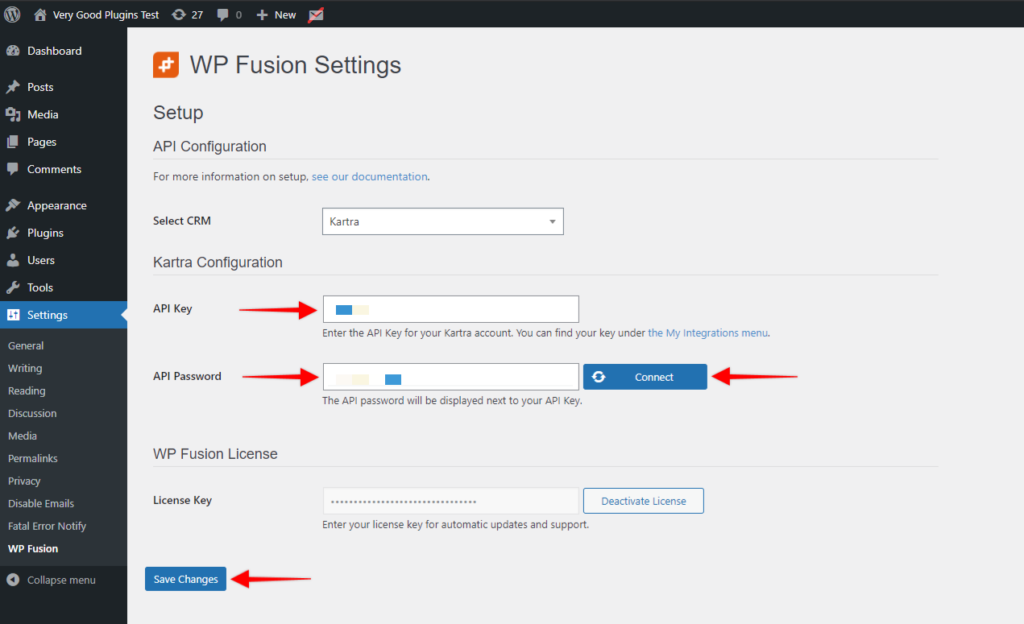
From the 『Select Your CRM』 dropdown choose 『Kartra』.
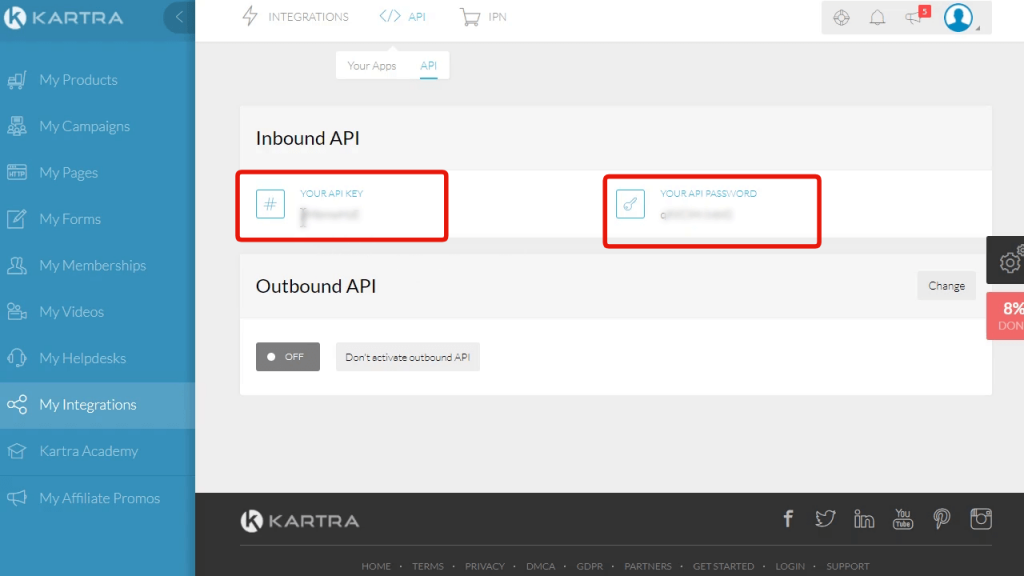
To enable the connection we need to locate the API Key and API password.
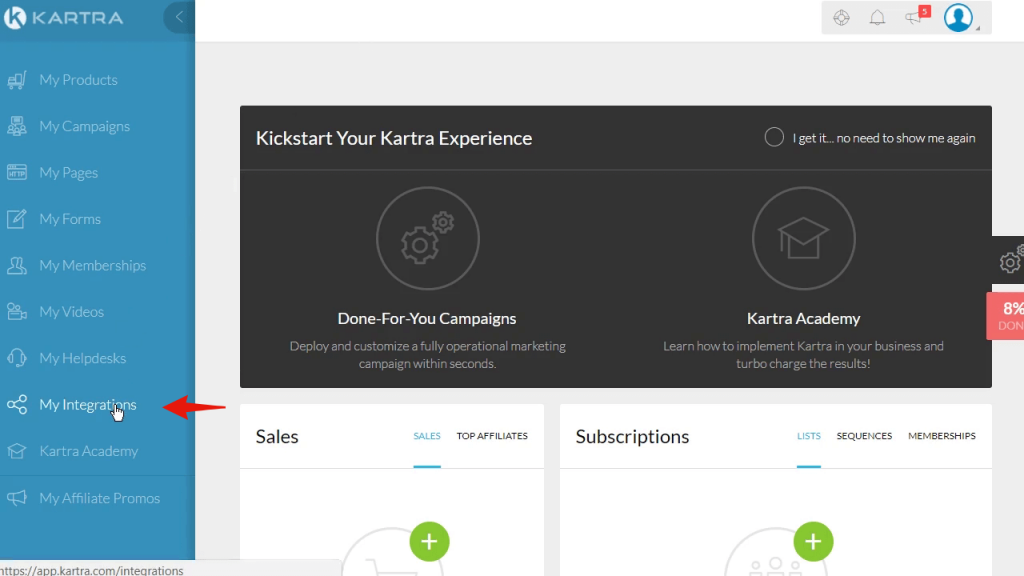
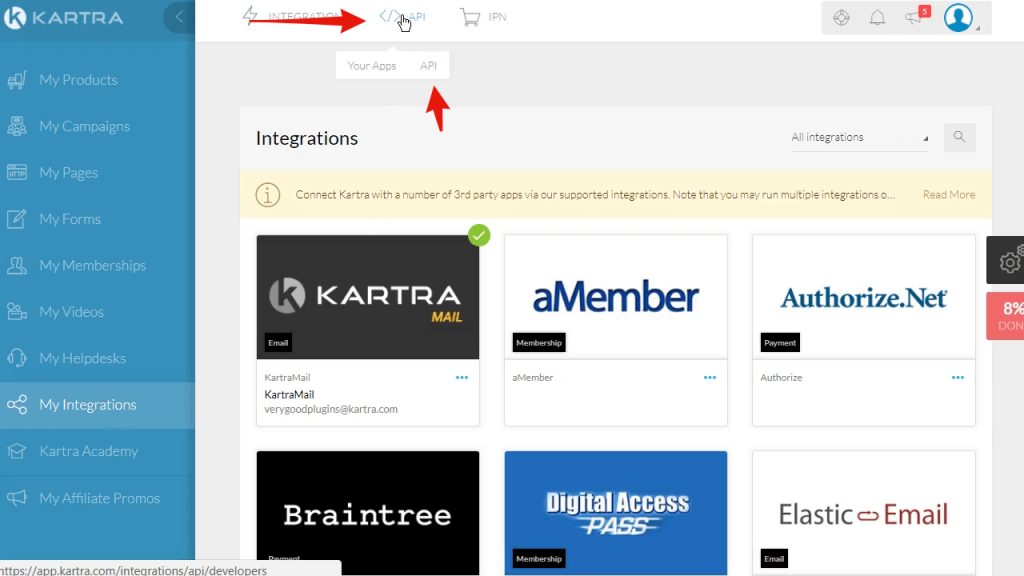
This can be found by logging into your Kartra account and navigating to 『My Integrations』.

Then, at the top, click on 『API』


Copy the key and password and paste into the appropriate fields in WP Fusion.
Then click on 『Connect』.

WP Fusion will now establish a direct connection to your Kartra account and import your tags and custom fields.
To finalize the process click on 『Save Changes』

#Was this helpful?

Let us know if you liked the post. That』s the only way we can improve.

Yes

No
How to Connect Groundhogg to WordPress

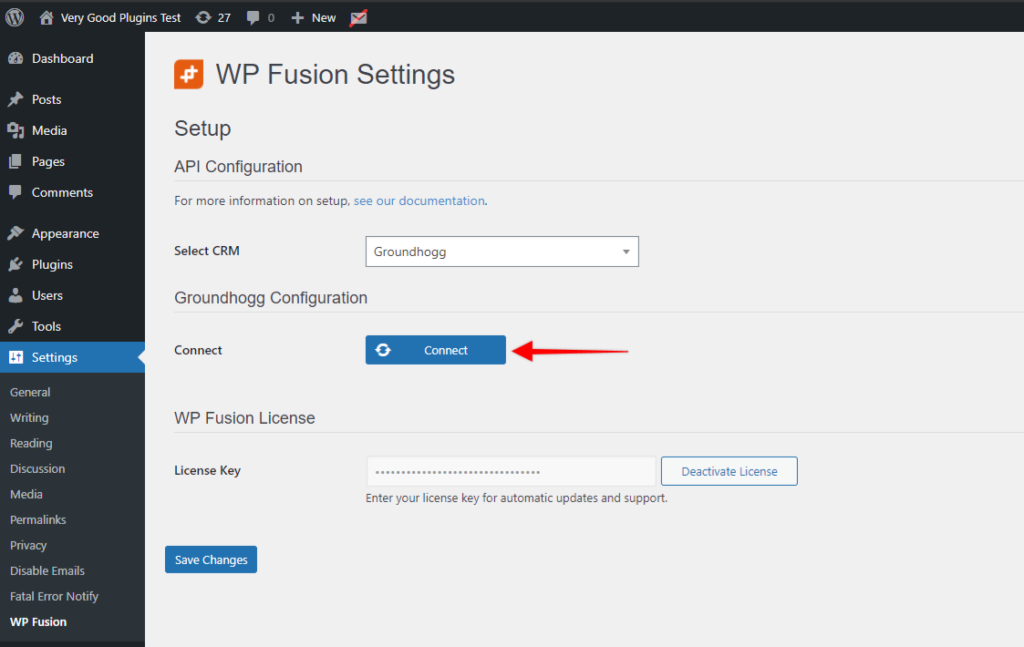
How to Connect Groundhogg to WordPress

In this video, you will learn how to install WP Fusion and set up a direct connection to your Groundhogg account.
To get started install and activate the plugin, then navigate to settings -> WP Fusion.
From the 『Select Your CRM』 dropdown choose 『Groundhogg』.
Then, click on 『Connect』.

WP Fusion will now establish a direct connection to your Groundhogg account and import your tags and custom fields.
To finalize the process click on 『Save Changes』

#Was this helpful?

Let us know if you liked the post. That』s the only way we can improve.

Yes

No
How to Connect Drip to WordPress

How to Connect Drip to WordPress

In this video, you will learn how to install WP Fusion and set up a direct connection to your Drip account.
To get started install and activate the plugin, then navigate to settings -> WP Fusion.
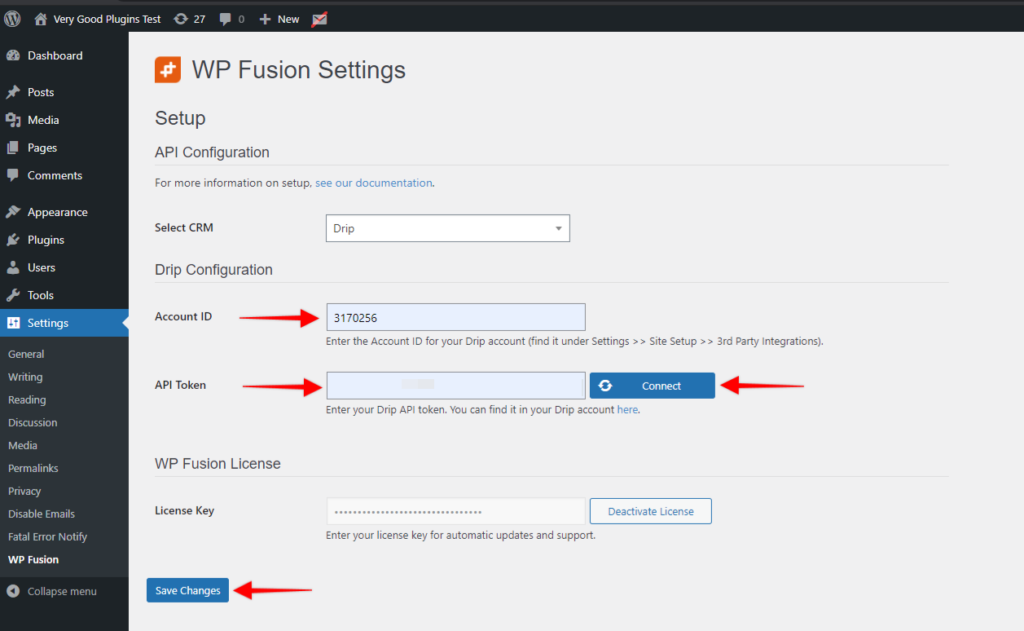
From the 『Select Your CRM』 dropdown choose 『Drip』.
We will need to locate two pieces of information:

Your 『Account ID』
Your 『API token』

To find these credentials login to your Drip account and click on the menu icon in the top right hand corner.
Click on 『Account』

And choose the 『General Info』 tab

Then scroll down and locate your Account ID.

Copy the ID and paste into WP Fusion.
To locate the API key, return to Drip, click on the menu icon once more but this time click on 『User Settings』.

Scroll down to the bottom and copy the API token and paste into the appropriate field in WP Fusion.


Finally, click on 『Connect』.
WP Fusion will now establish a connection to Drip and import your tags and custom fields.
To finalize the process click on 『Save Changes』.

#Was this helpful?

Let us know if you liked the post. That』s the only way we can improve.

Yes

No
How to Connect Autonami to WordPress

How to Connect Autonami to WordPress

In this video, you will learn how to install WP Fusion and set up a direct connection to your Autonami account.
To get started install and activate the plugin, then navigate to settings -> WP Fusion.
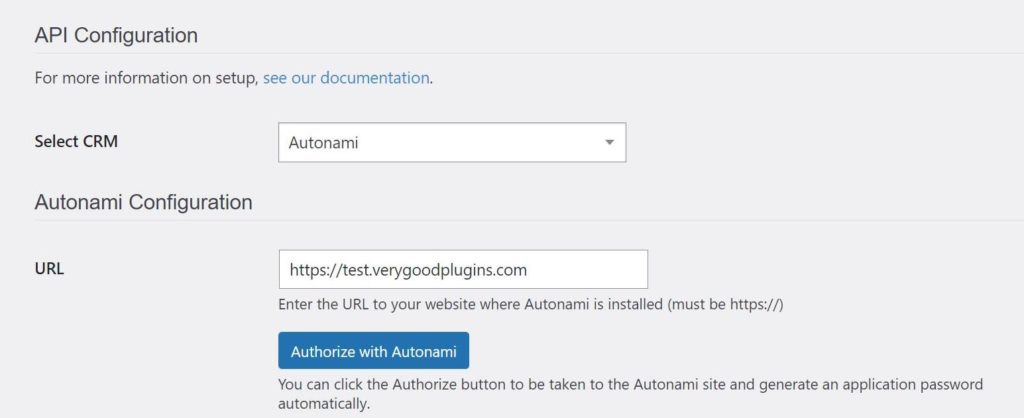
From the 『Select Your CRM』 dropdown choose 『Autonami』. Enter the URL to your website where Autonami is installed.
Then, click on 『Authorize with Autonami』.

WP Fusion will now establish a direct connection to your Autonami account and import your tags and custom fields.
To finalize the process click on 『Save Changes』

#Was this helpful?

Let us know if you liked the post. That』s the only way we can improve.

Yes

No