How to Connect Capsule to WordPress

How to Connect Capsule to WordPress

In this video, you will learn how to install WP Fusion and set up a direct connection to your Capsule account.
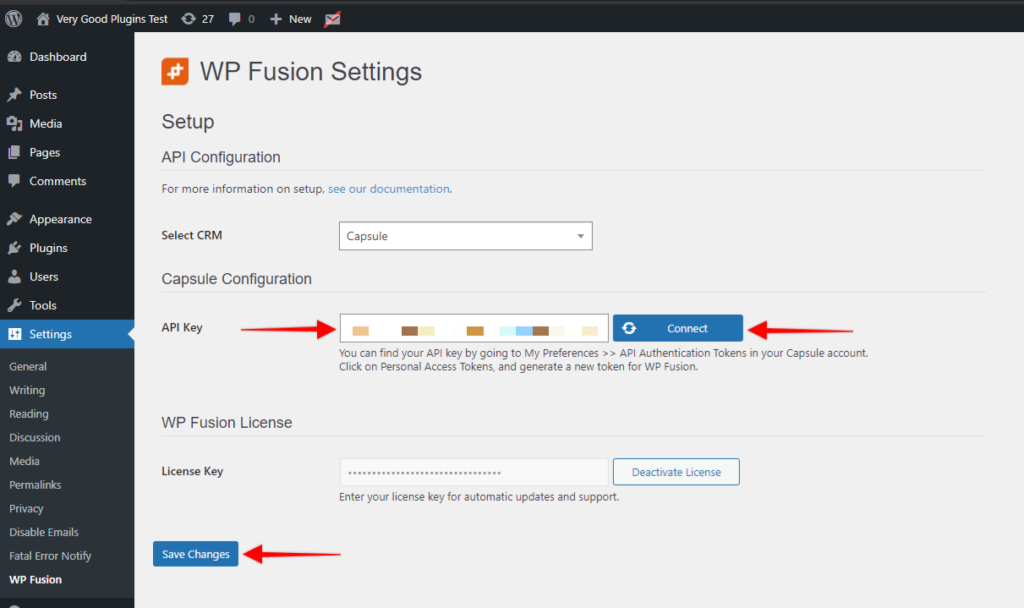
To get started install and activate the plugin, then navigate to settings -> WP Fusion.
From the 『Select Your CRM List』 choose 『Capsule』
To enable the connection to Capsule we need to locate your API key.
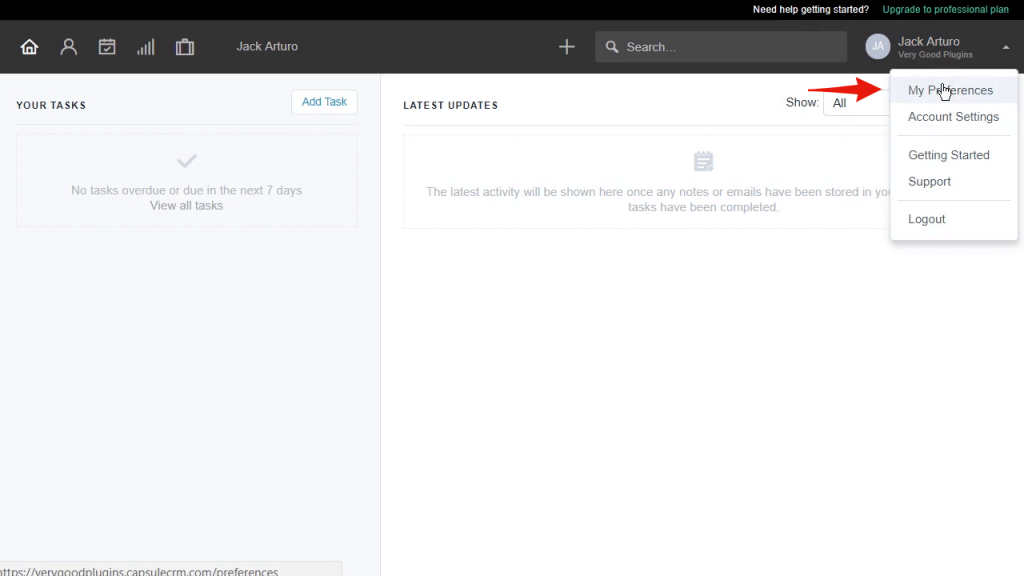
This can be found by logging into your account and clickin on the profile link in the top right hand corner.
Choose 『My Preferences』

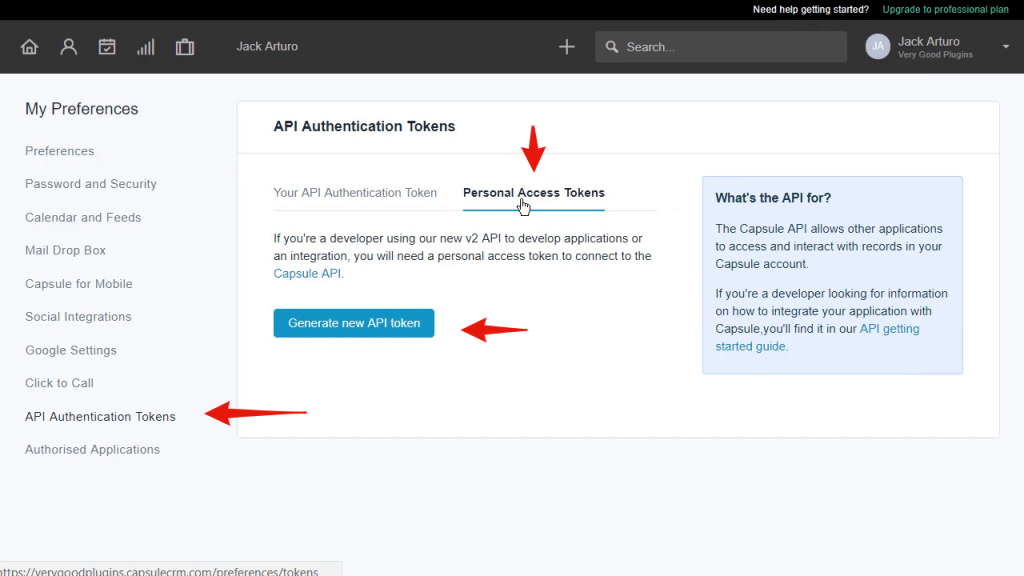
And click on 『API Authentication Tokens』


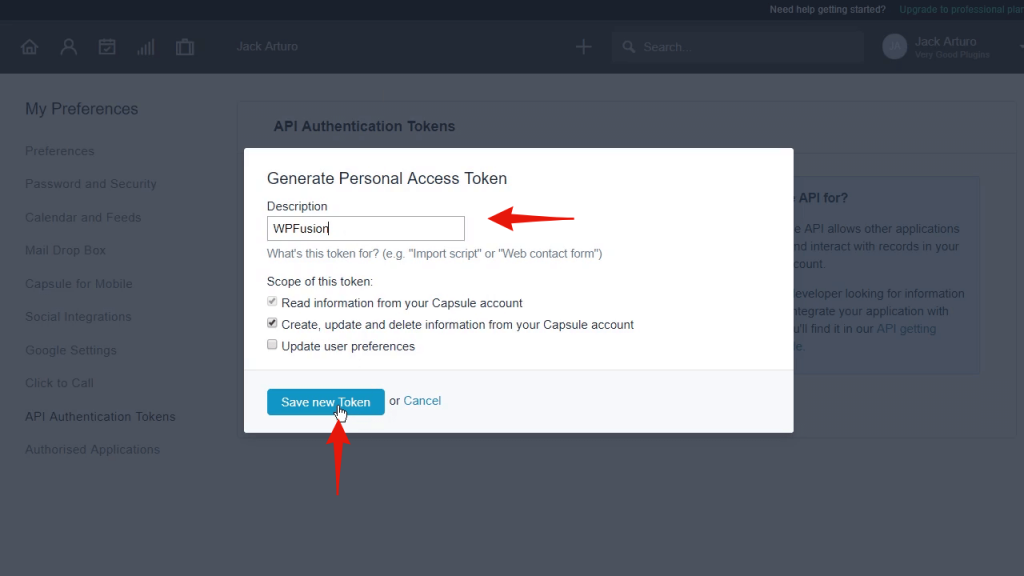
Copy the API token and paste into the appropriate field in WP Fusion.
Then click on 『Connect』.

WP Fusion will now establish a direct connection to your Capsule account and import your tags and custom fields.
To finalize the process click on 『Save Changes』.

#Was this helpful?

Let us know if you liked the post. That』s the only way we can improve.

Yes

No
How to Connect BirdSend to WordPress

How to Connect BirdSend to WordPress

In this video, you will learn how to install WP Fusion and set up a direct connection to your BirdSend account.
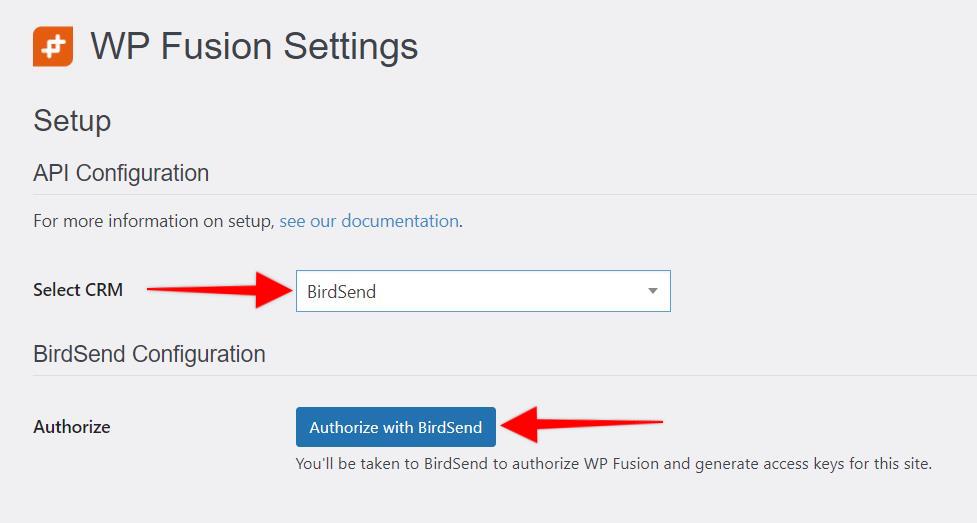
To get started install and activate the plugin, then navigate to settings -> WP Fusion.
From the 『Select Your CRM』 dropdown choose 『BirdSend 』.
To enable the connection we need to authorize with BirdSend and generate access keys for your website.
1. Click 『Authorize with BirdSend』:

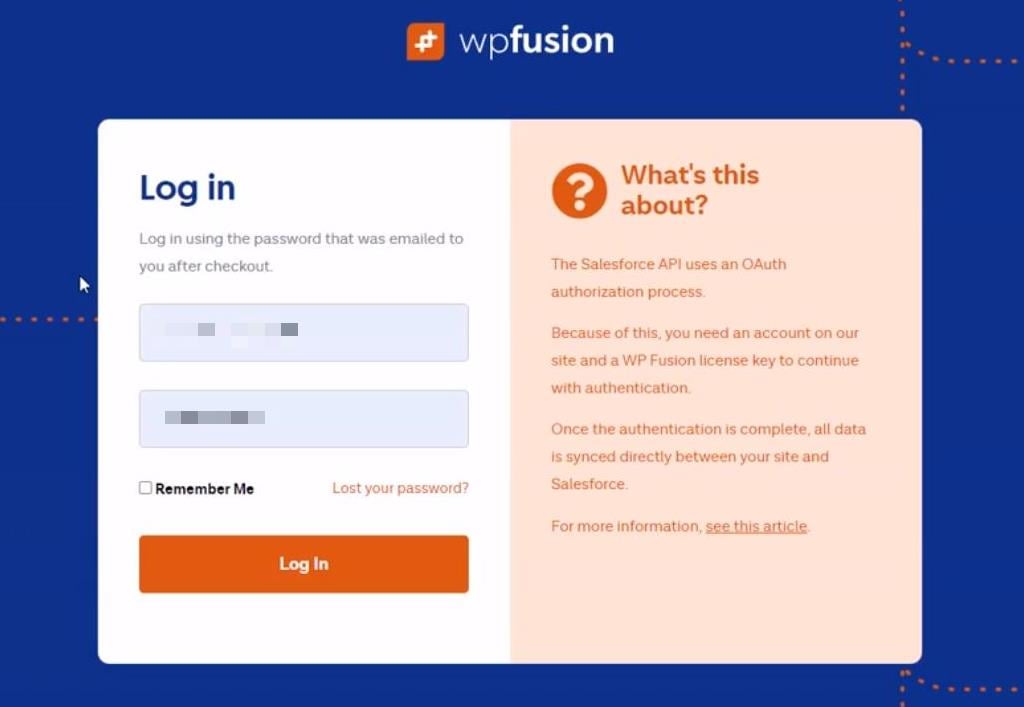
2. Login to your WP Fusion account:

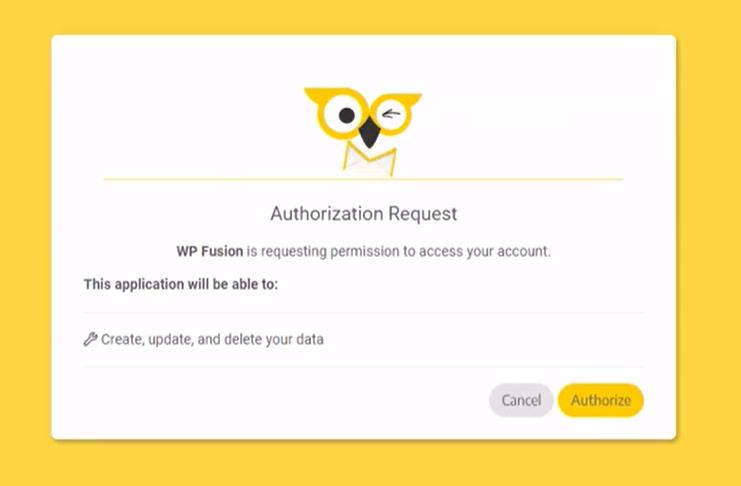
3. Authorize WP Fusion:

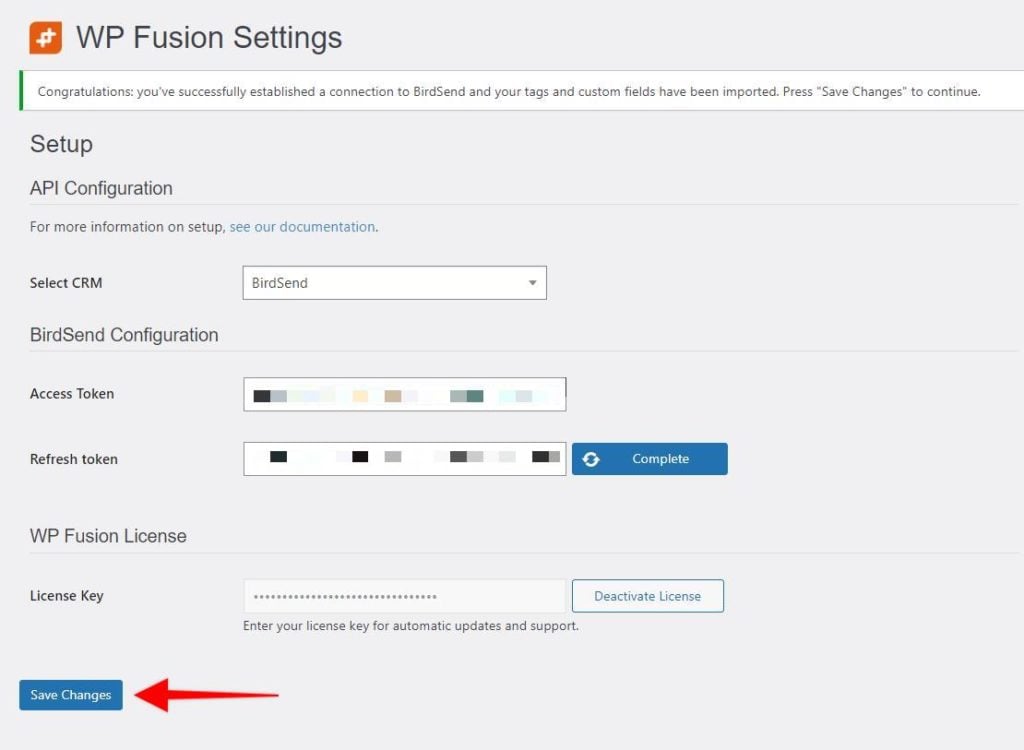
WP Fusion will now establish a direct connection to your BirdSend account and import your tags and custom fields. To finalize the process click on 『Save Changes』.

#Was this helpful?

Let us know if you liked the post. That』s the only way we can improve.

Yes

No
How to Connect Bento to WordPress

How to Connect Bento to WordPress

In this video, you will learn how to install WP Fusion and set up a direct connection to your Bento account.
To get started install and activate the WP Fusion plugin, then navigate to settings -> WP Fusion.
From the 『Select Your CRM』 list choose 『Bento』.
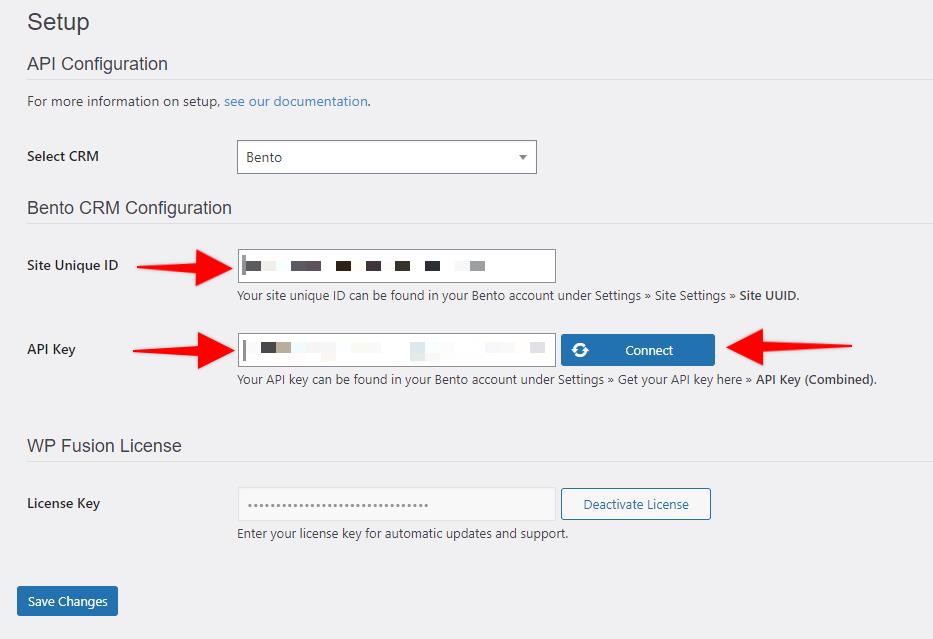
Next, we will need to locate two pieces of information to initiate the connection. The 『Site Unique ID』 and the 『API Key』.
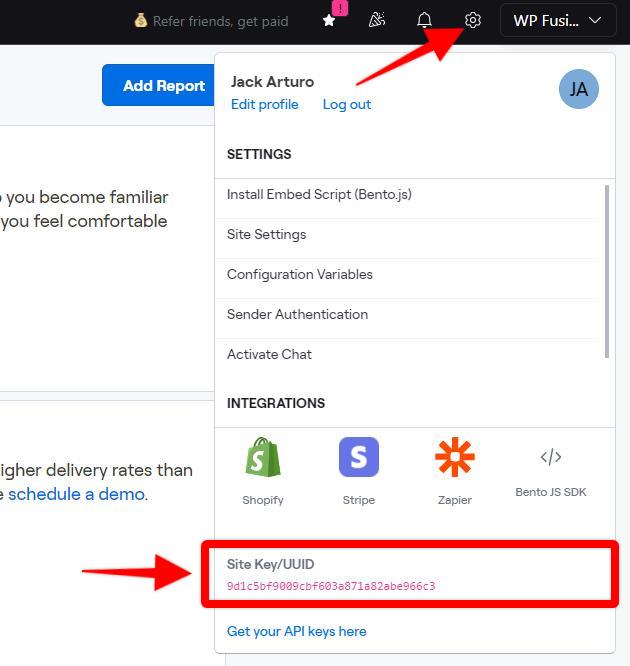
To find the 『Site Unique ID』 and the 『API Key』, login to your Bento account, launch your Team.
For the 『Site Unique ID』, navigate to 『Settings』 and at the bottom part you』ll find the Site Key/UUID.

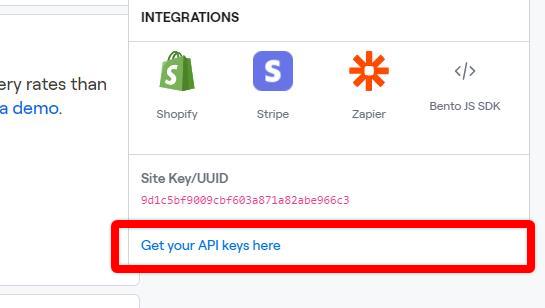
And for the 『API Key』, click the 『Get your API keys here』 link.

Click 『Generate Key』, and copy the 『API Key』 and the 『Site Unique ID』, and paste it into the appropriate fields in WP Fusion.

Finally, click on 『Connect』.
WP Fusion will now establish a direct connection to your Bento account and import your tags and custom fields.

To finalize the process click on 『Save Changes』.

#Was this helpful?

Let us know if you liked the post. That』s the only way we can improve.

Yes

No
How to Connect Autonami to WordPress

How to Connect Autonami to WordPress

In this video, you will learn how to install WP Fusion and set up a direct connection to your Autonami account.
To get started install and activate the plugin, then navigate to settings -> WP Fusion.
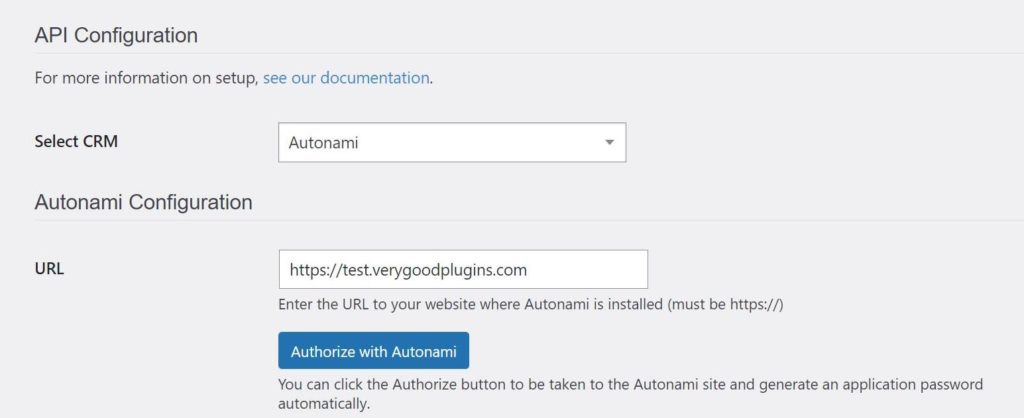
From the 『Select Your CRM』 dropdown choose 『Autonami』. Enter the URL to your website where Autonami is installed.
Then, click on 『Authorize with Autonami』.

WP Fusion will now establish a direct connection to your Autonami account and import your tags and custom fields.
To finalize the process click on 『Save Changes』

#Was this helpful?

Let us know if you liked the post. That』s the only way we can improve.

Yes

No
How to Connect AgileCRM to WordPress

How to Connect AgileCRM to WordPress

<span data-mce-type="bookmark" style="display: inline-block; width: 0px; overflow: hidden; line-height: 0;" class="mce_SELRES_start"></span>
In this video, you will learn how to install WP Fusion and set up a direct connection to your AgileCRM account.
To get started install and activate the plugin, then navigate to settings -> WP Fusion.
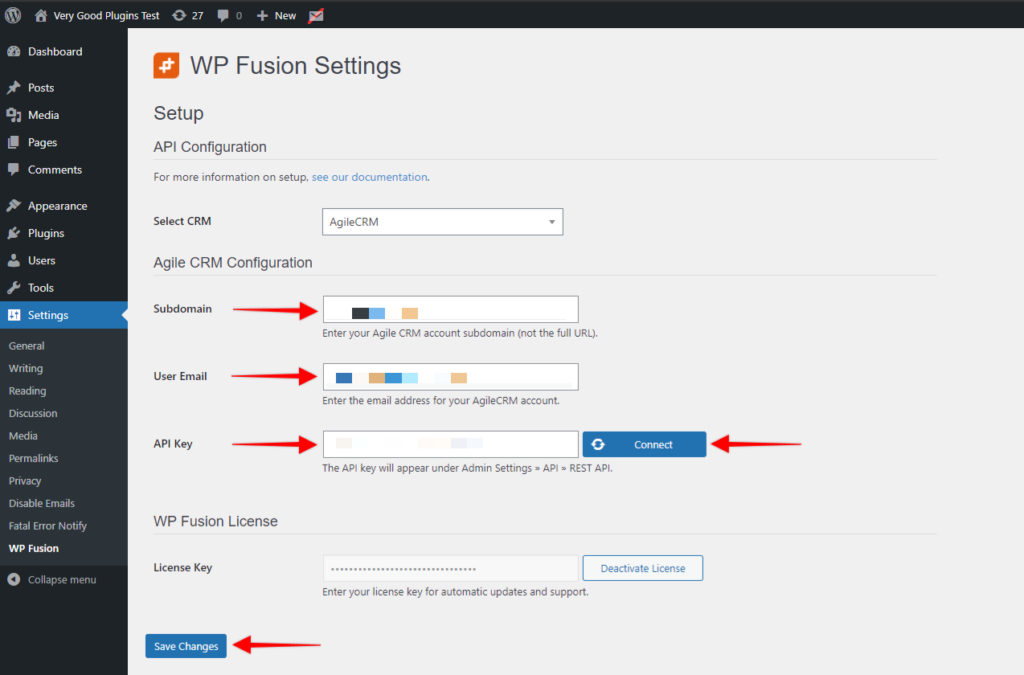
From the 『Select Your CRM List』 choose 『Agile CRM』
We will need to locate three pieces of information

Your AgileCRM subdomain
Your User Email
And Your API Key.

Your AgileCRM subdomain can be found by logging into your account and looking at the URL in the browser address bar.
Copy the first part of the address, after the https:// and prior to agilecrm.
Paste into the appropriate field in WP Fusion.
Your user email is the email address you use to login to AgileCRM.
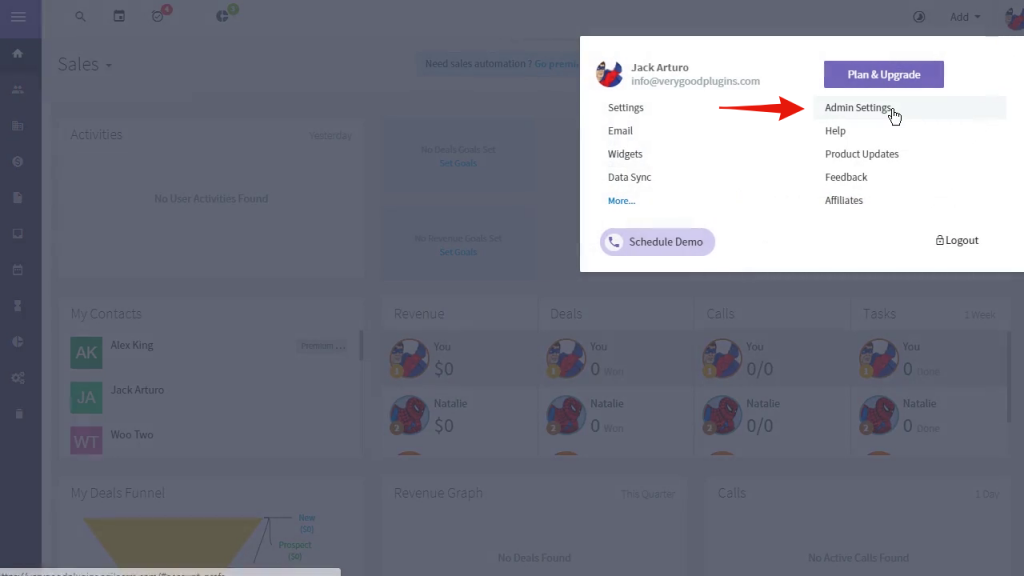
And the API Key can be found by in your account by clicking on the profile icon in the top right corner and choosing 『Admin Settings』.

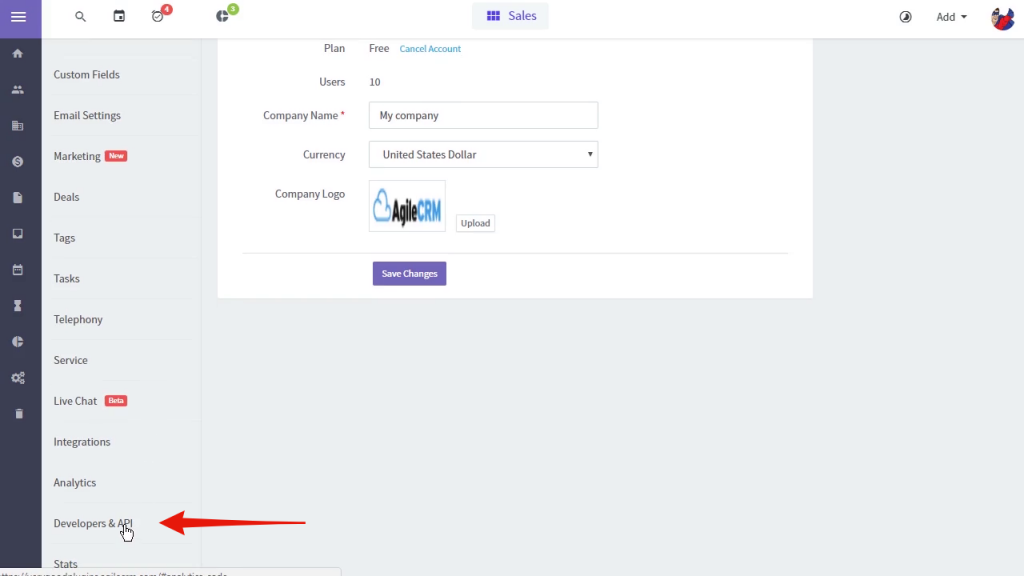
In the left hand menu scroll down and select 『Developers and API』.

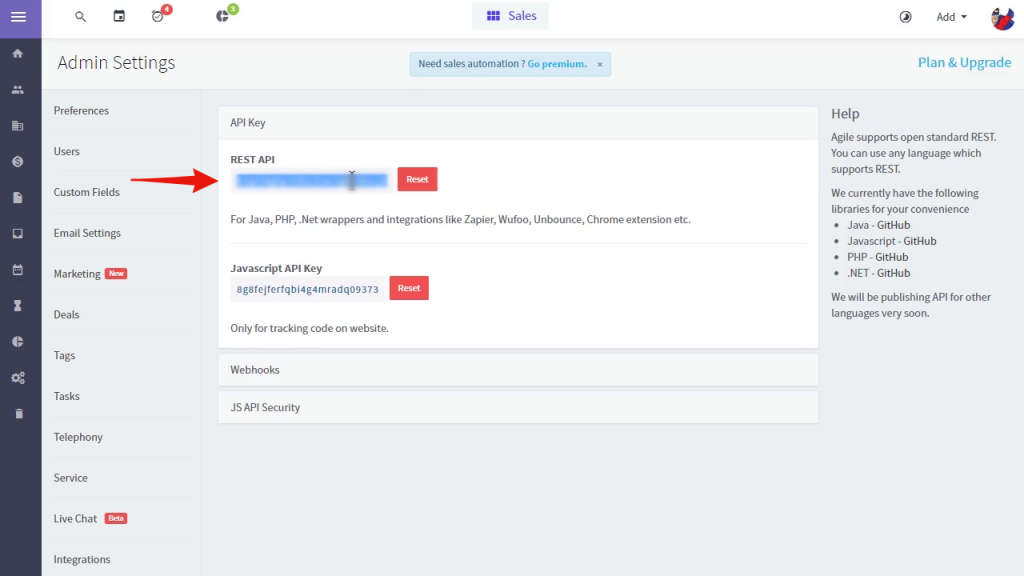
The copy the 『Rest API』 key and paste into the appropriate field in WP Fusion.


Finally, click on 『Connect』.
WP Fusion will now establish a direct connection to Agile and import your tags and custom fields.
To finalize the process click on 『Save Changes』.

#Was this helpful?

Let us know if you liked the post. That』s the only way we can improve.

Yes

No

How To Connect ActiveCampaign to WordPress

How To Connect ActiveCampaign to WordPress

In this video, you will learn how to install WP Fusion and set up a direct connection to your ActiveCampaign account.
To get started install and activate the plugin, then navigate to settings -> WP Fusion.
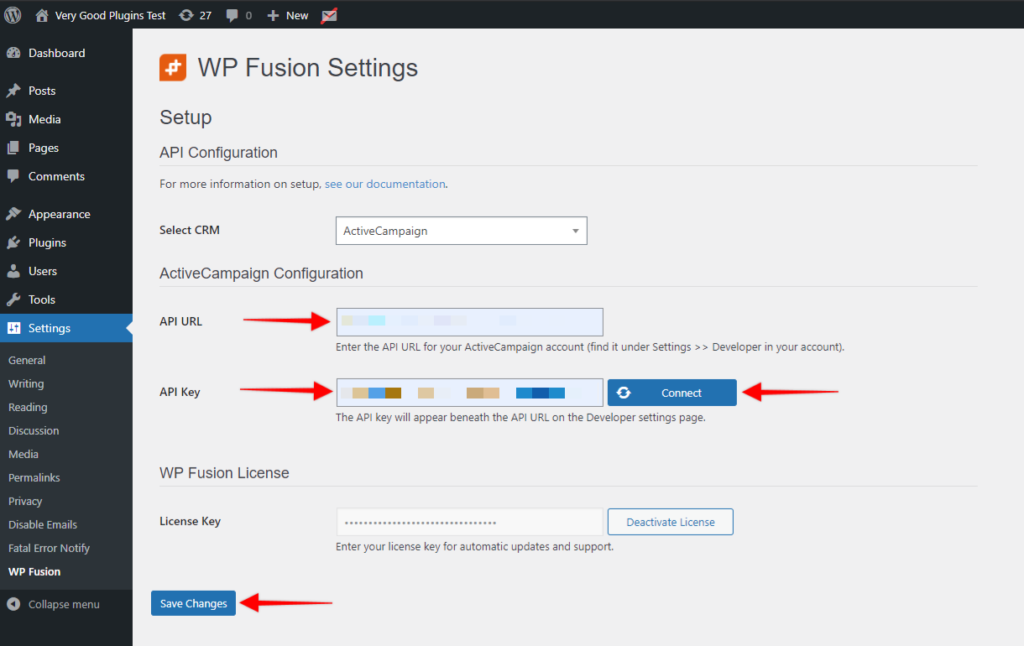
From the 『Select Your CRM list』 choose 『Active Campaign』
Next, we will need to locate to pieces of information.
Your API URL and your API Key.
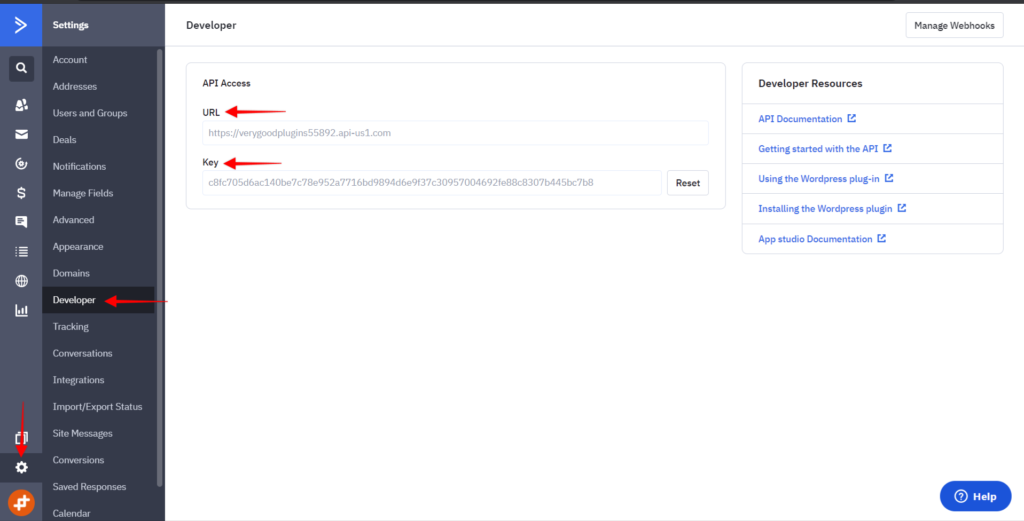
To find the API URL login to your ActiveCampaign account.
Go to 『Settings』
And click on the 『Developer』 tab.
Copy the URL
And paste it into the API URL field in WP Fusion
The API Key can be found directly below the URL

Let』s copy it once more and paste it into the appropriate field.
Finally, click on 『Connect』.

WP Fusion will now establish a connection to Active Campaign and import your tags and custom fields.
To finalize the process click on 『Save Changes』.

#Was this helpful?

Let us know if you liked the post. That』s the only way we can improve.

Yes

No

Tracking User Activity

Tracking User Activity

#Tracking User Activity
WP Fusion includes many options for tracking user and customer engagement with your site by applying tags in your CRM. Most of those options are available via the various plugin integrations, but there are a few global options as well.
#Meta Box
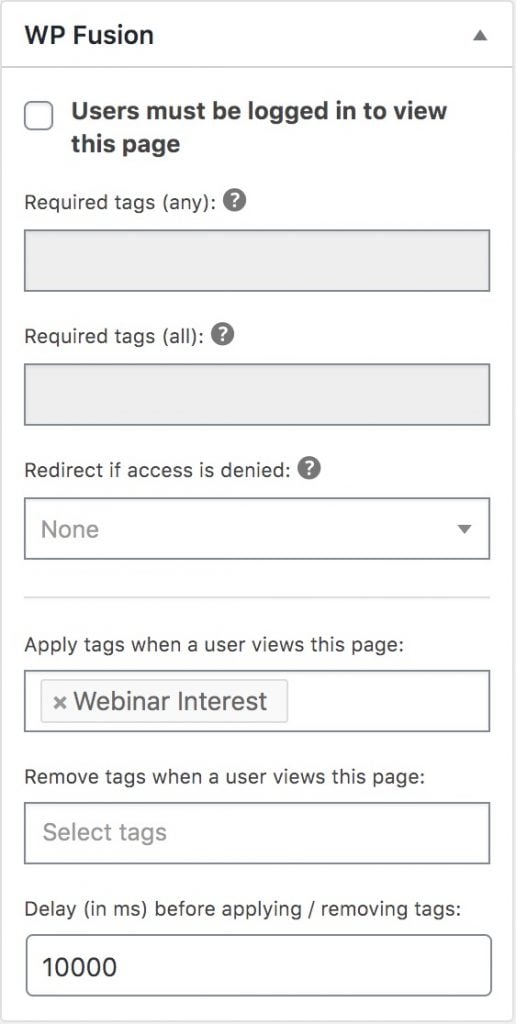
The WP Fusion meta box that』s added to every post and page on your site includes an option to either apply or remove tags when that page is viewed.
This can be used to confirm when someone has viewed a page (like when a student starts a course), or to gauge interest in a piece of content by applying a tag after a delay— for example if a user looks at a product for longer than 10 seconds.

#Apply tags
In this example we』ve configured the page to apply the tag Webinar Interest if a user views the page for 10 seconds. This tag could then be used as a trigger to send a followup email from your CRM.
Note that if a page is restricted via WP Fusion, the tags will only be applied if the user has the correct permissions to view the page.
#Remove tags
There is also an option for Remove tags when a user views this page. An example use case for this might be tagging someone as Profile Incomplete when they register on your site, and then removing that tag when they view their profile page.
#Delay
You can specify a delay in milliseconds before any tags are applied or removed. In the screenshot above, 10,000 milliseconds equals 10 seconds.
#Category / term settings
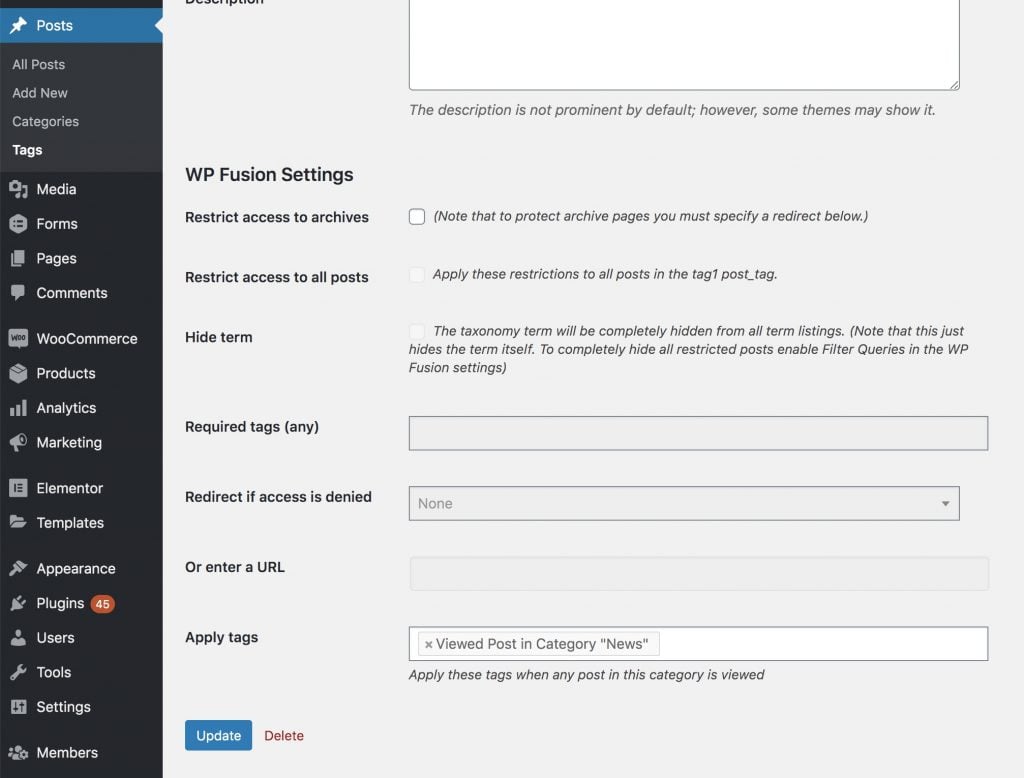
In the same way that you can apply tags whenever a single post or page is viewed, you can also set up any taxonomy term on your site to apply tags when a post with that term is viewed. That can be Categories, Post Tags, or a custom taxonomy.
These settings are accessed by editing any individual taxonomy term.

In this example we have a post tag called 「News」, and WP Fusion is configured to apply the tag Viewed Post in Category 「News」 whenever any post with that post tag is viewed.
For more information on the rest of these settings see the access control documentation.
#Click Tracking
WP Fusion includes an option where you can apply tags when a link, button, or any other HTML element is clicked. That』s covered in the Link Click Tracking documentation.
#Advanced Tracking
WP Fusion also includes a JavaScript API that lets you apply tags and sync data to your CRM with your own JavaScript code. Using this you can create more complex setups such as tagging people based on progress in a video player or based on a quiz score. That』s covered in the JavaScript API tutorial.
#Site tracking
With some CRMs that support page view tracking, WP Fusion bundles the scripts required to enable that functionality. When enabled, all page views are synced to your CRM. More info on that in the Site Tracking documentation.

#Was this helpful?

Let us know if you liked the post. That』s the only way we can improve.

Yes

No
Syncing Contact Fields

Syncing Contact Fields

#Overview
In addition to applying tags in your CRM, a core feature of WP Fusion is the ability to sync data bidirectionally between WordPress user records and CRM contact records.
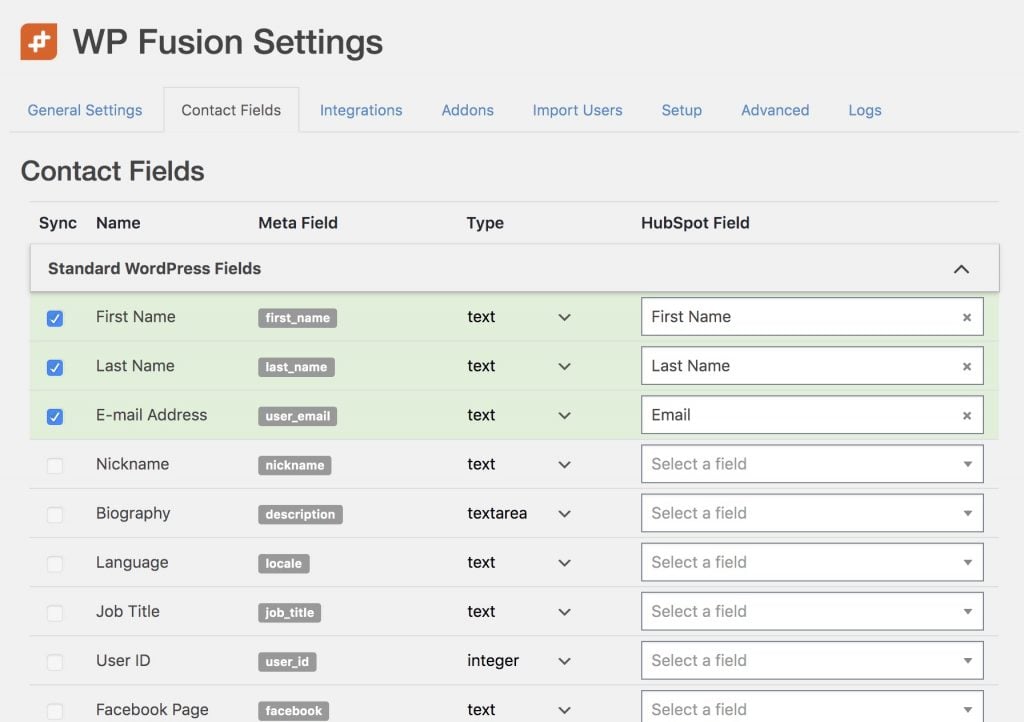
This is managed from the Contact Fields tab in the WP Fusion settings.

In the left column are all the fields that WP Fusion has detected in WordPress. To help finding fields easier these are grouped into collapsable sections based on the plugin that registered the field.
In the right column are dropdowns where you can select a corresponding custom field in your CRM.
Note: If you』ve just added a new custom field in your CRM, it may not appear in the dropdown of available fields. Begin typing the name of the new field, and if no matches are found, click the 「Resynchronize」 link that appears in the dropdown. The new custom field will be loaded from the CRM and you should see it appear once you re-type the name.
#Which fields are available
The fields that are available for sync depend on the plugins you have installed. Each of WP Fusion』s plugin integrations has the ability to detect the fields for that plugin.
The fields WP Fusion can sync with your CRM relate to a specific user on your site, not a custom post type or other related content.
Generally these would be standard fields (like Billing Address with WooCommerce), as well as custom fields (for example custom fields you』ve added to a registration form using Ultimate Member).
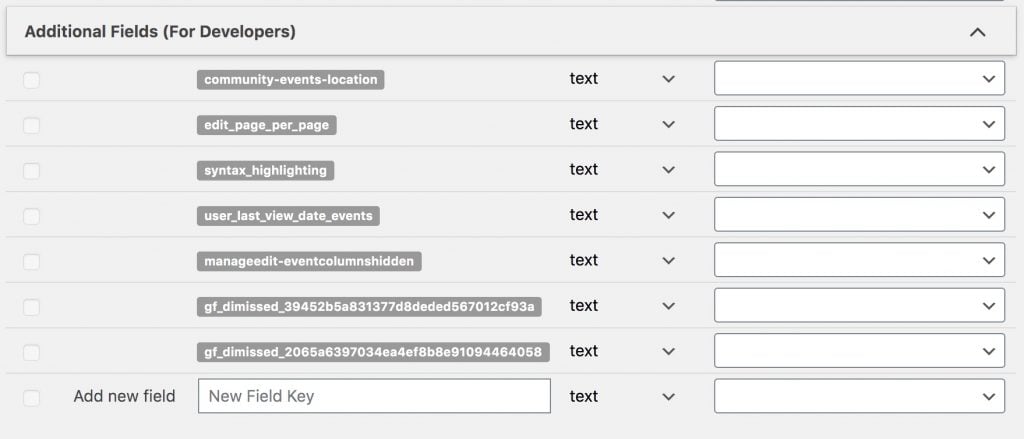
In addition to that, WP Fusion will scan the database (the wp_usermeta table) for your own admin user to try and find any other fields that might not have been detected, or might come from a plugin we don』t officially support. These will be listed at the bottom of the Contact Fields list in the Additional Fields section.
#Pseudo-fields
With some plugins, WP Fusion has been designed to sync some pseudo fields with your CRM. These are fields that don』t exist in any one place in your database, but WP Fusion can calculate them and sync them as part of a specific process, for example a checkout or membership level status change.
Some examples:

WooCommerce order data
LearnDash course progress
MemberPress current membership details

If the data you』re trying to sync with your CRM isn』t related to a specific user, or is coming from a plugin not currently supported by WP Fusion, you can also extend WP Fusion to detect and sync additional fields. For more info on that, see this tutorial.
#Additional Fields
At the bottom of the Contact Fields list is a section called Additional Fields.
This contains any meta fields that were found in your database but aren』t associated with a particular plugin integration.
Note: To build the list of Additional Fields, for performance reasons WP Fusion only scans the usermeta of your own admin user. If you』ve just added a new field and it』s not showing, try saving some data in that field for your own admin user.
For the most part you can leave this section alone, but if you』re trying to sync data to your CRM from a plugin that WP Fusion doesn』t have an official integration with, you may find the field keys here.

If you』re not using the Additional Fields you can hide them completely by checking the box for Hide Additional Fields on the Advanced settings tab.
If you』re a developer and are creating custom registration or profile forms, you can also type in new field keys into the Add new field line. The field you enter here should match the input name on your form. When the form is submitted, if WP Fusion detects an input with the matching name, then the value will be synced to the corresponding field in your CRM.
By default any enabled Additional Fields will only be synced if those fields are found on a submitted profile form.
If you find the fields aren』t syncing, you can enable Push All from the General settings tab. This causes WP Fusion to run on the added_user_meta and updated_user_meta hooks, and will also sync the field values any time those keys are updated in the wp_usermeta table.
#How data is synced
WP Fusion can either 「push」 data from WordPress to your CRM, or 「pull」 data from your CRM to WordPress.
A 「push」 happens when someone registers a user account, updates their profile, or a batch operation is run. Any available WordPress fields from the left column are synced to their corresponding CRM custom fields from the right column.
A 「pull」 can happen in a few scenarios:

When a webhook is received
When someone logs in and Login Meta Sync is enabled
When a page is loaded that has the [wpf_update_meta] shortcode on it

When that happens any fields that are enabled in the right column on the Contact Fields list are loaded via an API call and saved to their corresponding WordPress fields in the database.
Note: By default WP Fusion will not send an empty field to your CRM, or load an empty field from your CRM into WordPress. This is to avoid overwriting any valid data with a blank value. This can be overridden by setting the field type to raw in the dropdown.
#Field types
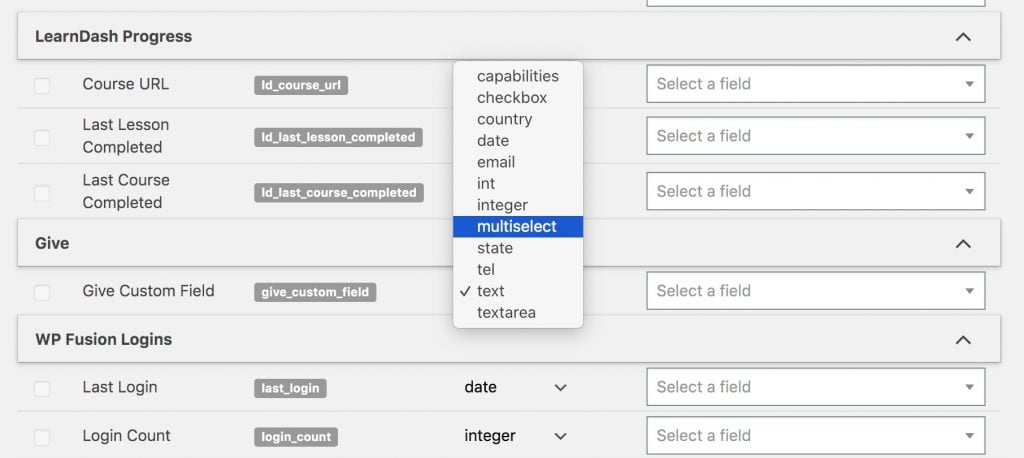
For each field there is a Type dropdown where you can tell WP Fusion how to treat the data in that field. These are detected automatically for most plugin integrations and don』t usually need to be changed, but if needed you can click on the type and select a new type from a dropdown to override the defaults.

Generally text type fields are the most compatible. What the other types do depend on your connected CRM. For example:

If a field type is set to checkbox then the value will be converted to a boolean 「true」 or 「false」 when the API call is sent to supported CRMs.
If a field type is set to multiselect then array-formatted data sent to ActiveCampaign will be separated with pipes || to properly update ActiveCampaign list box and checkbox fields.
If a field type is set to country then a country abbreviation will be sent to your CRM, which is compatible with the Country dropdowns in Infusionsoft, Mautic, and others. If it』s set to text the full country name will be sent instead.
If a field type is set to date then a date sent to HubSpot will be converted to a Unix timestamp to properly update a HubSpot datepicker field.
If a field type is set to raw then WP Fusion will not perform any additional checks or formatting on the field data. Fields set to raw will also be synced to your CRM even if they are empty, which has a potential for data loss.

#Dynamic Tagging
With some platforms, WP Fusion can dynamically convert a user meta value into tags in the CRM. To set this up, select Create tag(s) from value from any Select a field dropdown.
When WP Fusion goes to sync the metadata to your CRM, it will convert the value into a tag. If the value is in an array format (like a multiselect or checkboxes field), then the selected values will be converted into multiple tags.
This should be used with caution as it can result in WP Fusion generating many hundreds or thousands of new tags.

#Was this helpful?

Let us know if you liked the post. That』s the only way we can improve.

Yes

No
Showing and Hiding Widgets

Showing and Hiding Widgets

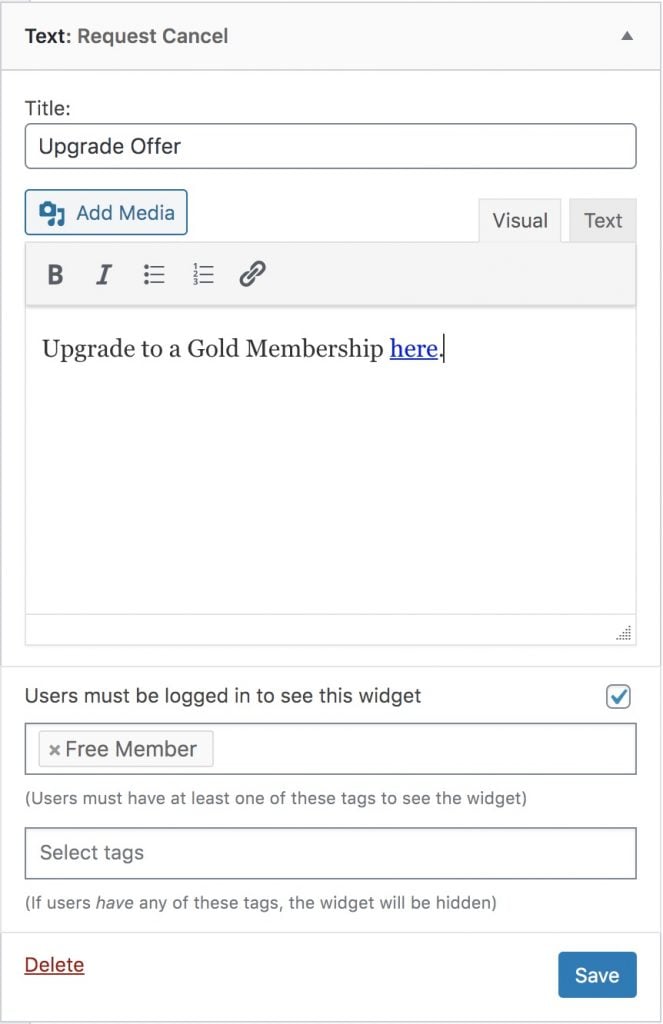
Heads up! Since WordPress 5.8, widgets are now managed using the block editor. To show and hide widgets based on CRM tags, we recommend the Block Visibility plugin, which includes an integration with WP Fusion. Or, to use the classic widgets editing experience, install the Classic Widgets plugin.
#Overview
WP Fusion also has the ability to control widget visibility based on a logged-in user』s tags.
By checking the box next to Users must be logged in to see this widget, the widget only be visible to logged in users.

There are two tag select boxes. The first lets you specify a list of tags required  to view the widget. The widget will be hidden from users who don』t have these tags.
The second box lets you hide the widget from people who have certain tags. This might be useful in removing a promotion after the customer has already purchased the product, for example.
#Additional Widget Options
For additional widget visibility options, like logged in vs. logged out, or mobile vs. desktop, check out the free If Widget plugin.

#Was this helpful?

Let us know if you liked the post. That』s the only way we can improve.

Yes

No
Shortcodes

Shortcodes

#Overview
WP Fusion includes a few shortcodes that let you display user meta, and show / hide content based on a user』s tags in your CRM. These can be used to personalize the site content based on a user』s custom fields or tags.
#Displaying user meta
You can use shortcodes to display meta data for logged in users. The syntax is pretty simple. For example, to show a user』s first name:
[user_meta field="first_name"]
Any field listed in the Contact Field tab of WP Fusion』s settings can be accessed in this way.
You can also display different information for users who haven』t registered yet, or aren』t logged in, like so:
Welcome, [user_meta field="first_name"]Guest[/user_meta]!
Logged in users will see their first name, while visitors will see 「Welcome, Guest!」
#User meta formatting
WP Fusion supports formatting date and time fields using PHP』s date function. For example:
[user_meta field="next_bill_date" date-format="Y-m-d"]
This will output the date like 2019-03-10.
For escaping text in the date format, use a double backslash. For example:
[user_meta field="next_bill_date" date-format="l \t\h\e jS \o\f F, Y"]
This will output the date like Friday the 22nd of March, 2019. For more information on the syntax see PHP』s date documentation.
#User meta formatting – timezone offset
WP Fusion syncs dates with most CRMs in UTC. To correct for this, the user_meta shortcode will adjust the date to local time (based on the site』s timezone) before displaying it.
Sometimes this can result in the time being displayed incorrectly, especially if you are entering dates via another plugin and they are already in local time. To manually correct the timezeone conversion, you can use the timezone-offset parameter, for example
[user_meta field="date_time" date-format="Y-m-d H:i:sa" timezone-offset="-2"]
This will display the date and time, corrected backwards two hours. The timezone-offset parameter accepts any positive or negative number.
#Video – Displaying user meta

#Displaying a contact ID
You can display the current user』s contact ID as well. The format is [user_meta field="{crm_slug}_contact_id"]. For example with Infusionsoft the shortcode would be:
[user_meta field="infusionsoft_contact_id"]
 
#Displaying content based on tags
You can use these shortcodes to show and hide content based on a user』s logged in status and CRM tags.
Note that WP Fusion also includes support for Elementor, Beaver Builder, Divi, Oxygen, and the Gutenberg Editor. If you』re using a page builder it may be easier to configure access rules using WP Fusion』s visual interfaces rather than a shortcode.
Note that while you can put other shortcodes inside the [wpf]] shortcode, you cannot put a [[wpf]] shortcode inside another [[wpf]] shortcode.
#Restricting content based on logged in status
You can use the following two shortcodes to show content based on whether or not a user is logged in, regardless of their tags. This works like:
[[wpf_loggedin]Only visible to logged in users[/wpf_loggedin]]
[[wpf_loggedout]Only visible to logged out visitors[/wpf_loggedout]]
#Restricting content based on tags
To restrict content based on a user』s CRM tags, wrap the desired content in the WP Fusion shortcode, using the examples below.
This content will only show if the user is logged in and has the tag 「New Customer」:
[[wpf tag="New Customer"]Restricted Content[/wpf]
This content will only show if the user is logged in and has both the tags 「New Customer」 and 「Purchased Course」:
[wpf tag="New Customer,Purchased Course"]Restricted Content[/wpf]
#Show the content if a user does not have a tag
To show content only if a user doesn』t have a certain tag, use the following syntax:
[wpf not="New Customer"]Restricted Content[/wpf]
You can also combine multiple tags for the not parameter, like
[wpf not="New Customer, Active Member"]Restricted Content[/wpf]
In that case the content will be hidden if the user has any of the tags. So if the user is tagged either New Customer or Active Member, the content will be hidden.
You can also combine parameters for more advanced locking, like so:
[wpf tag="New Customer" not="Payment Failed"]Restricted Content[/wpf]
#Requiring any tag, instead of all
By default, WP Fusion will only unlock the content if the user has all of the tags in the list. To make it so that the content will unlock when any of the tags are found, include method="any" in the shortcode, like:
[wpf tag="New Customer,Purchased Course" method="any"]Restricted Content[/wpf]
#Else conditions
The [wpf] shortcode also supports an 「else」 condition. The usage works like:
[wpf tag="New Customer"]
Shows only to users with the "New Customer" tag
[else]
Shows to all logged in users who don't have the "New Customer" tag
[/wpf]
#Logged out parameters
By default, content in the shortcode will always be hidden from users who aren』t logged in. You can change this by adding logged_out to the shortcode. For example:
[wpf not="New Customer" logged_out]
This will show to everyone who doesn't have the "New Customer" tag, including logged out visitors.
[/wpf]
or:
[wpf tag="New Customer" logged_out]
Shows only to users with the "New Customer" tag
[else]
Shows to all users who don't have the "New Customer" tag, as well as logged-out visitors.
[/wpf]
#Square brackets in tag names
WordPress does not allow square brackets in shortcode parameters. If your tag names have square brackets in them, you can use parentheses instead and they will be treated as equivalent by WP Fusion.
For example if your tag name is [Customer] Paid Course, your shortcode will work with [wpf tag="(Customer) Paid Course"].
#Displaying content based on page rules
Using the [wpf_user_can_access]] shortcode, you can show and hide content based on the access rules configured in the WP Fusion meta box on another post.
For example, this shortcode shows a message only if the current user has permission to access a course with post ID 456.
[[wpf_user_can_access id="456"]
Thanks for signing up for Awesome Course!
[/wpf_user_can_access]
#Else conditions
This shortcode also accepts an [else] condition:
[wpf_user_can_access id="456"]
Thanks for signing up for Awesome Course!
[else]
You might be interested in our Awesome Course
[/wpf_user_can_access]
#Within a loop
If the id= parameter is omitted, the shortcode will use the current post ID. This can be used in a loop or custom template to personalize the results.
For example to alternate the Elementor template displayed based on a user』s permissions:
[wpf_user_can_access]

[[elementor-template id="14331"]] // Enrolled template

[else]

[[elementor-template id="53371"]] // Unenrolled template

[/wpf_user_can_access]
#Displaying content based on user meta values
As of January 2021, WP Fusion includes a new [user_meta_if]] shortcode.
This can be used to conditionally display content based on user meta values of the current user, similar to Liquid Tags with Shopify or Drip.
Note: By their nature, shortcodes are difficult to work with. We recommend making use of these shortcodes sparingly, if at all. One typo in the attributes will make the whole shortcode not work. WP Fusion includes many PHP filters to control the visibility of content and these are generally easier to work with.
#Available attributes
The [[user_meta_if]] shortcode accepts 5 parameters:

field= The meta field on the current user to check (any value from the wp_users or wp_usermeta table)
value= The value to compare the user meta field against
field_format= The formatting for the user meta field. Can be any PHP function, for example strtotime(), strtolower(), or a custom function.
value_format= The formatting for the field to check against. Can be any PHP function.
compare= The comparison. Default is =, can be any comparison operator, or IN / NOT IN (see below)

#Simple example
The simplest example is comparing a user meta value to a text value. For example to check a user』s role:
[[user_meta_if field="role" value="customer"] Welcome back, Customer! [/user_meta_if]
Or to check someone』s BuddyPress account status:
[user_meta_if field="account_status" value="approved"]Thanks for verifying your email address![/user_meta_if]
#Numeric comparisons
As another example, you can compare numeric values using the compare= attribute, for example with lifetime value:
[user_meta_if field="lifetime_value" value="100" compare=">"] Hey hey, big spender! [/user_meta_if]
In that example the content will only be displayed if the user』s lifetime_value field is greater than 100.
Note that you must have a field called lifetime_value for the user in your database. WP Fusion does not track lifetime values.
#Date comparisons
You can get a little more fancy by making use of the field_format= and value_format= attributes, along with the strtotime() function.
For more info on valid inputs to strtotime() see the PHP manual.
[user_meta_if field="next_exam_date" field_format="strtotime" value="-5 days" value_format="strtotime" compare=">="]
Your exam is coming up soon, take the checklist to make sure you're ready on the big day!
[/user_meta_if]
This one is a bit complicated. Let』s break it down:

field=」next_exam_date」 This says we should use the field next_exam_date from the wp_usermeta table. It can be in any date string. For example 2021-01-25 8:15am
field_format=」strtotime」 This converts the exam date into a timestamp for comparison, i.e. 1611558900
value=」-5 days」 This is the value to compare against, 「five days ago」 relative to now
value_format=」strtotime」 This runs the value through strtotime() which gives us a timestamp for five days ago
compare=">="The greater than or equal to comparison. The condition will only be met if the student』s next exam date is greater than or equal to 5 days ago.

The end result is that the message will be hidden until five days before the student』s next exam date, at which point it will be shown.
#IN and NOT IN
WP Fusion can also evaluate against partial matches in a meta value. For this, use either compare="IN" to search for the value inside the user meta field, or compare="NOT IN" to invert the logic.
This works with either strings, or data stored as an array.
For example, let』s say you have a usermeta field called favorite_animals. For the current user, it is set to "Dogs, Horses, Cats". The following would display the content:
[user_meta_if field="favorite_animals" value="Cats" compare="IN"] Meow! [/user_meta_if]
The result is the same if favorite_animals is an array, like array( "Dogs", "Horses", "Cats" ).
#Updating data
You can insert a shortcode into your pages to force an update of a users tags and/or meta data before the rest of the page is displayed.
This can be used to force a refresh of data from your CRM before displaying content using the [wpf] or [user_meta] shortcodes.
To force an update of the current user』s tags, use:
[wpf_update_tags]
To force an update of the current user』s meta data, use:
[wpf_update_meta]
Note that these shortcodes will trigger an API call to your CRM and slow down your page load by several seconds. They should be used sparingly, if at all.

#Was this helpful?

Let us know if you liked the post. That』s the only way we can improve.

Yes

No